<?xml version="1.0" encoding="utf-8"?><feed xmlns="http://www.w3.org/2005/Atom" ><generator uri="https://jekyllrb.com/" version="3.10.0">Jekyll</generator><link href="https://blog.cronn.de/feed.xml" rel="self" type="application/atom+xml" /><link href="https://blog.cronn.de/" rel="alternate" type="text/html" /><updated>2025-12-08T13:03:55+00:00</updated><id>https://blog.cronn.de/feed.xml</id><title type="html">wir bloggen über software_</title><subtitle>Im cronn Blog findet ihr Artikel zu Softwareentwicklung mit den neusten Technologien, zu coolen UI/UX-Designs, automatisierten Tests, aber auch zum Life-Style und Work-Life-Balance - alles &quot;the cronn way&quot;.</subtitle><entry xml:lang="en"><title type="html">Setting Up an ML HPC Server (Part 1 - Hardware)</title><link href="https://blog.cronn.de/en/machinelearning/2025/12/03/setting-up-ml-hpc-server-1.html" rel="alternate" type="text/html" title="Setting Up an ML HPC Server (Part 1 - Hardware)" /><published>2025-12-03T00:00:00+00:00</published><updated>2025-12-03T00:00:00+00:00</updated><id>https://blog.cronn.de/en/machinelearning/2025/12/03/setting-up-ml-hpc-server-1</id><content type="html" xml:base="https://blog.cronn.de/en/machinelearning/2025/12/03/setting-up-ml-hpc-server-1.html"><![CDATA[<h3 id="motivation">Motivation</h3>
<p>Many powerful AI models such as <em>gpt-oss</em> or <em>DeepSeek</em> are now published as open source. Powerful graphics cards (GPUs) are required in order to operate current and larger models at high performance. The decisive criterion here is the available graphics memory (vRAM).
High-end gaming GPUs are equipped with up to 24GB of vRAM. However, this is not sufficient for larger language models. Professional cards such as the NVIDIA H100 Tensor Core GPU have 80 GB of vRAM, but currently cost around €30,000.
Our goal was to build a machine learning computer on which medium-sized models could be operated locally without using cloud providers, which would be as powerful as possible, but on a manageable budget.
The choice fell on a Dell PowerEdge C4130 rack server with two Nvidia Tesla P40 GPUs, 64 Xeon cores, 128GB RAM and 800GB hot-swap disks. The acquisition costs for the used hardware amounted to a total of 1550 €.
In 2020 the P40 GPUs were in the upper performance class and continue to be provided with driver updates by Nvidia. How their performance has stood the test of time is revealed in the benchmarks in the second part of the article. For now we’ll describe the structure of the basic system without starting up the GPUs. The goal is to create a working environment that can be operated completely without physical access. The server hardware has some interesting featutres which allow such access, and we will now take a closer look at these features.</p>

<h3 id="initial-assessment">Initial assessment</h3>
<p>The chassis of the C4130 is designed for mounting in a 19” rack, with a height unit (1U) and a depth of almost 90cm. It has 2 redundant 2 kW power supplies, one of which unfortunately suffered damage during shipping.</p>

<figure>
<img data-src="/img/posts/einrichtung-ml-hpc-server-1/Lieferschaden.jpg" class="lazyload img-fluid img-feature" alt="Photo of the delivery damage to the power supply." />
<figcaption class="long-fig-caption">Delivery damage to the power supply.</figcaption>
</figure>

<p>While we had no issues with the <a href="https://www.bargainhardware.co.uk/">seller</a> exchanging the damaged goods, the matching C19 power cables were not included and had to be reordered.
The machine is completely designed for remote maintenance, so it usually no longer requires on-site presence after installation in the data center. It also has 2 Gigabit Ethernet ports and a maintenance port. It can be accessed via VGA and USB, but we do not use this due to the lack of a suitable VGA adapter. The handbook documents the various access routes.
When switched on for the first time, the LEDs on the front and back of the chassis flash orange. Ideally they should be solid blue, so the system doesn’t feel completely healthy.
The maintenance access (iDRAC) has a somewhat old-fashioned web interface on the factory-set IP <code class="language-plaintext highlighter-rouge">192.168.0.120.</code> Commendably, you can use the maintenance port on a switch as well as on a laptop (auto-sense), for which you have to manually select an IP address on the same LAN as the laptop.
The iDRAC is completely independent of the main system and can be accessed as soon as the chassis receives power. In the diagnostics area, the condition of all components is visible. In our case, as expected, the removed power supply is flagged, and a fan is also defective, which is why the status LEDs flash orange.
Speaking of fans: There are 8 built-in cooling units, each with 2 fans. Due to the low height (1U is about 4.5cm), they already spin at idle at 8,000 rpm. The limit is about 20,000 rpm, which is unpleasantly loud. Colleagues present in the room quickly left after it had been switched on.
Other interior features: a 128 GB main memory, 64 cores in 2 Xeon E5-2697A processors, and two 800 GB hot-swappable SSDs (1.8” uSATA).
When you remove the lid of the chassis, your eye is immediately caught by the 4 GPU bays directly in front of the fans. There are several slots free for more main memory, and there is still room for more hard drives at the back. The opening and reclosing of the chassis is logged by the iDRAC, even when it is switched off.
In the iDRAC there is a VNC console which allows access to the BIOS and other diagnostic tools. We performed a detailed memory test, which ended after several hours without returning any errors.</p>

<figure>
<img data-src="/img/posts/einrichtung-ml-hpc-server-1/idrac-oberfläche.jpg" class="lazyload img-fluid img-feature" alt="Screenshot of the iDRAC interface." />
<figcaption class="long-fig-caption">iDRAC interface has that look and feel of the 90s.</figcaption>
</figure>

<p>Before the first boot of the main system, we change the boot order in the BIOS and disable the default network start (PXE). Thanks to this we avoid long pauses at startup.</p>

<p>Before you can turn your attention to GPUs, a basic operating system is required. The choice fell on Ubuntu because it is both commonly used and supplied by Nvidia with current GPU drivers and libraries. We are looking for:
Encryption on both SSDs (cryptsetup + LUKS);
LVM with 2 physical volumes;
and within it logical partitions for <code class="language-plaintext highlighter-rouge">/</code>, <code class="language-plaintext highlighter-rouge">/var</code> and <code class="language-plaintext highlighter-rouge">/home</code>.
We decide against RAID1 on the hot-swappable disks in favor of more usable space for our AI models.
We start the Ubuntu server installer from a USB stick and access it via the VNC console in iDRAC. Caution is advised when entering passwords during installation: The keyboard layout of the VNC viewer in the iDRAC console is neither German nor English, but instead a wild mixture.
We noticed that the VNC console didn’t not run stable, with the connection not always working. A <a href="https://www.dell.com/support/contents/en-uk/videos/videoplayer/how-to-reset-and-drain-power-of-dell-poweredge-server/6301449860001">cold start</a> might help.
The Ubuntu installer is somewhat overwhelmed with our partitioning requests: it apparently fails because the two encrypted disks are to be combined into one LVM volume (LVM = Logical Volume Manager). We work around the problem by initially setting up only an encrypted SSD with an LVM root volume. This means that the initial installation is complete within 5 minutes after a reboot.</p>

<p><a href="https://en.wikipedia.org/wiki/Logical_Volume_Manager_(Linux)">LVM</a> allows us to change volume sizes in the file system relatively easily afterwards, as well as to include additional disks. The necessary connections are already available in the chassis.</p>

<p>Manual setup of the second hard drive
We would like to have <code class="language-plaintext highlighter-rouge">/home</code> on the second (still unformatted) disk <code class="language-plaintext highlighter-rouge">/dev/sdb</code>, as we want to have plenty of room for our AI models. To do this, we create an encrypted partition:</p>

<div class="language-plaintext highlighter-rouge"><div class="highlight"><pre class="highlight"><code># parted /dev/sdb mklabel gpt
# parted -a optimal /dev/sdb mkpart primary 0% 100%
# cryptsetup luxFormat /dev/sdb1
</code></pre></div></div>

<p>To be able to unlock both disks with the same password, we use the script <code class="language-plaintext highlighter-rouge">decrypt_keyctl</code> (included in <code class="language-plaintext highlighter-rouge">cryptsetup</code>). It takes <code class="language-plaintext highlighter-rouge">keyctl</code> from the keyutils package, which we however still need to install manually. Then it is entered in <code class="language-plaintext highlighter-rouge">/etc/crypttab</code> for both disks:</p>

<div class="language-plaintext highlighter-rouge"><div class="highlight"><pre class="highlight"><code># apt install keyutils
# cat /etc/crypttab
dm_crypt-0 UUID=035c6de5-99df-4e81-ba49-578d6b97c4cf none luks,keyscript=decrypt_keyctl
crypt_sdb1 UUID=97675b26-983a-42f8-8e2c-a5edb0fb051f none luks,keyscript=decrypt_keyctl
# update-initramfs -u
# reboot
</code></pre></div></div>

<p>The next time the machine is restarted, both disks are decoded as planned. We occupy the now available space entirely with /home in another physical LVM volume. In theory, LVM could be dispensed with for a single partition, however it allows us to change the distribution of the disks later if necessary.</p>
<div class="language-plaintext highlighter-rouge"><div class="highlight"><pre class="highlight"><code># pvcreate /dev/mapper/crypt_sdb1
# vgcreate data-vg /dev/mapper/crypt_sdb1
# lvcreate -n data-home -l 100%FREE data-vg
# mkfs.ext4 /dev/data-vg/data-home
# cat /etc/fstab
...
/dev/disk/by-uuid/8209347b-0ddd-47f8-a5ba-b505cb822085 /home ext4 defaults 0 1
</code></pre></div></div>

<p>Normally, the password for encrypted hard drives is required at system startup. However, this will no longer be accessible as soon as the machine is placed in the rack. We therefore install <code class="language-plaintext highlighter-rouge">dropbear-initramfs</code> to be able to unlock the disks via SSH.
Deviating from usual procedure, we convert the existing OpenSSH host keys to Dropbear format and install them in <code class="language-plaintext highlighter-rouge">initramfs</code>, so that we can use the normal SSH port (22) for unlocking without causing any key conflicts.</p>

<div class="language-plaintext highlighter-rouge"><div class="highlight"><pre class="highlight"><code># /usr/lib/dropbear/dropbearconvert openssh dropbear \ /etc/ssh/ssh_host_ecdsa_key \ /etc/dropbear/initramfs/dropbear_ecdsa_host_key
# /usr/lib/dropbear/dropbearconvert openssh dropbear \ /etc/ssh/ssh_host_ed25519_key \ /etc/dropbear/initramfs/dropbear_ed25519_host_key
# /usr/lib/dropbear/dropbearconvert openssh dropbear \ /etc/ssh/ssh_host_rsa_key \ /etc/dropbear/initramfs/dropbear_rsa_host_key
</code></pre></div></div>

<p>Finally, the public keys of all administrators are entered in /etc/dropbear/initramfs/authorized_keys and the ramdisk is updated:</p>
<div class="language-plaintext highlighter-rouge"><div class="highlight"><pre class="highlight"><code># update-initramfs -u
# reboot
</code></pre></div></div>

<p>Et voilà, after a reboot, the disks can be unlocked via SSH.</p>

<h3 id="compulsory-reworking">Compulsory reworking</h3>
<p>During the final system cleanup, we stupidly overlooked the fact that <code class="language-plaintext highlighter-rouge">cryptsetup-initramfs</code> is not a manually selected package and it is automatically uninstalled. As a result, the system no longer boots because the root partition cannot be decrypted.
Luckily a rescue system is hidden in the help menu of the Ubuntu installer. From there, we manually mount the installed filesystem and reinstall <code class="language-plaintext highlighter-rouge">cryptsetup-initramfs</code> in the <code class="language-plaintext highlighter-rouge">chroot</code>. Now the machine starts again.</p>]]></content><author><name>danielKnauth</name></author><category term="en" /><category term="machinelearning" /><summary type="html"><![CDATA[This post demonstrates how to set up a high-performance server for machine learning on a small budget.]]></summary></entry><entry xml:lang="de"><title type="html">Einrichtung eines ML-HPC-Servers (Teil 1 - Hardware)</title><link href="https://blog.cronn.de/de/machinelearning/2025/12/02/einrichtung-ml-hpc-server-1.html" rel="alternate" type="text/html" title="Einrichtung eines ML-HPC-Servers (Teil 1 - Hardware)" /><published>2025-12-02T00:00:00+00:00</published><updated>2025-12-02T00:00:00+00:00</updated><id>https://blog.cronn.de/de/machinelearning/2025/12/02/einrichtung-ml-hpc-server-1</id><content type="html" xml:base="https://blog.cronn.de/de/machinelearning/2025/12/02/einrichtung-ml-hpc-server-1.html"><![CDATA[<h3 id="motivation">Motivation</h3>
<p>Viele mächtige KI-Modelle wie <em>gpt-oss</em> oder <em>DeepSeek</em> werden mittlerweile als Open Source veröffentlicht. Um aktuelle und größere Modelle performant zu betreiben, werden leistungsfähige Grafikkarten (GPUs) benötigt. Ein maßgebliches Kriterium ist dabei der verfügbare Grafikspeicher (vRAM).</p>

<p>Gaming-GPUs der oberen Preisklasse sind mit bis zu 24 GB vRAM ausgestattet. Das ist für größere Sprachmodelle jedoch nicht ausreichend. Professionelle Karten wie die NVIDIA H100 Tensor Core GPU haben 80 GB vRAM, kosten aber derzeit ca. 30.000 €. Unser Ziel war es, mit überschaubarem Budget einen möglichst leistungsfähigen Rechner für Machine-Learning aufzubauen, auf dem mittelgroße Modelle lokal betrieben werden können, ohne Nutzung von Cloud-Anbietern.</p>

<p>Die Wahl fiel auf einen Dell PowerEdge C4130 Rack Server mit zwei Nvidia Tesla P40 GPUs, 64 Xeon-Kernen, 128GB RAM und 800GB Hot-Swap Platten. Die Anschaffungskosten für die gebrauchte Hardware betragen in Summe 1550 €.
Die P40-GPUs waren um 2020 in der oberen Leistungsklasse und werden weiterhin von Nvidia mit Treiber-Updates versorgt. Was man damit heute noch anfangen kann, verraten die Benchmarks im zweiten Teil des Artikels.</p>

<p>Der erste Teil beschreibt den Aufbau des Grundsystems ohne Inbetriebnahme der GPUs. Das Ziel ist, eine lauffähige Umgebung zu bekommen, die komplett ohne physischen Zugang betreibbar ist. Dafür hat die bestellte Server-Hardware einige interessante Eigenheiten, die wir näher betrachten.</p>

<h3 id="erstbegutachtung">Erstbegutachtung</h3>
<p>Das Chassis des C4130 ist für Montage in einem 19” Rack bestimmt, es hat eine Höheneinheit (1U) und eine Tiefe von fast 90cm. Es besitzt 2 redundante 2 kW-Netzteile, von denen eines leider einen unübersehbaren Transportschaden hat.</p>

<figure>
<img data-src="/img/posts/einrichtung-ml-hpc-server-1/Lieferschaden.jpg" class="lazyload img-fluid img-feature" alt="Bild, das den Lieferschaden am Netzteil zeigt." />
<figcaption class="long-fig-caption">Lieferschaden am Netzteil.</figcaption>
</figure>

<p>Ein Austausch durch den <a href="https://www.bargainhardware.co.uk/">Händler</a> erfolgt problemlos. Die passenden C19-Stromkabel liegen dummerweise nicht bei und müssen ebenfalls nachbestellt werden.
Die Maschine ist komplett für Fernwartung ausgelegt, also erfordert sie nach Einbau im Rechenzentrum (RZ) normalerweise keine Präsenz mehr vor Ort. Dazu hat sie 2 Gigabit Ethernet-Anschlüsse und einen Wartungs-Port. Man kann auch über VGA und USB darauf zugreifen, worauf wir mangels passendem VGA-Adapter jedoch verzichten. Im Handbuch sind die verschiedenen Zugangswege dokumentiert.
Beim erstmaligen Einschalten fallen die orange blinkenden LEDs an Vorder- und Rückseite des Chassis auf. Normalerweise sollten sie konstant blau leuchten, das System fühlt sich also nicht völlig gesund.</p>

<p>Der Wartungszugang (iDRAC) hat eine etwas altbackene Weboberfläche auf der werksseitig eingestellten <code class="language-plaintext highlighter-rouge">IP 192.168.0.120</code>. Löblicherweise kann man den Wartungs-Port sowohl an einem Switch als auch an einem Laptop benutzen (auto-sense), wofür am Laptop manuell eine IP im selben LAN gewählt werden muss.</p>

<p>Das iDRAC ist komplett unabhängig vom Hauptsystem und erreichbar, sobald das Chassis Strom bekommt. Im Diagnosebereich ist der Zustand aller Komponenten sichtbar, in unserem Fall wird erwartungsgemäß das ausgebaute Netzteil beanstandet, außerdem ist ein Lüfter defekt, weswegen die Status-LEDs orange blinken. Apropos Lüfter: Eingebaut sind 8 Stück mit jeweils 2 Ventilatoren. Aufgrund der geringen Bauhöhe (1U sind ca. 4,5cm) drehen diese schon im Leerlauf mit 8.000 U/min, das Limit sind ca. 20.000 U/min, also richtig unangenehm laut. Anwesende Kollegen verließen nach dem Einschalten zügig den Raum.</p>

<p>Weitere Innenausstattung: 128 GB Hauptspeicher, 64 Kerne in 2 Xeon E5-2697A-Prozessoren, zwei 800 GB hot-Swap-fähige SSDs (1,8” uSATA).
Wenn man den Deckel des Chassis abnimmt, fallen sofort die 4 GPU-Einschübe direkt vor den Lüftern ins Auge. Für mehr Hauptspeicher sind etliche Steckplätze frei, hinten ist noch Platz für weitere Festplatten. Das Öffnen und Wiederverschließen des Chassis wird vom iDRAC protokolliert, auch in ausgeschaltetem Zustand.
Im iDRAC gibt es eine VNC-Konsole, die u.a. Zugriff auf das BIOS und weitere Diagnose-Werkzeuge erlaubt. Wir machen einen ausführlichen Speichertest, der nach mehreren Stunden ohne Fehler endet.</p>

<figure>
<img data-src="/img/posts/einrichtung-ml-hpc-server-1/idrac-oberfläche.jpg" class="lazyload img-fluid img-feature" alt="Screenshot der iDRAC-Oberfläche." />
<figcaption class="long-fig-caption">iDRAC-Oberfläche im Look&amp;Feel der 90er Jahre.</figcaption>
</figure>

<p>Vor dem ersten Start des Hauptsystems ändern wir noch die Boot-Reihenfolge im BIOS, denn dort ist Netzwerkstart (PXE) voreingestellt. Wir deaktivieren es, um lange Pausen beim Start zu vermeiden.</p>

<h3 id="linux-basisinstallation">Linux-Basisinstallation</h3>
<p>Bevor man sich den GPUs zuwenden kann, wird ein Basis-Betriebssystem benötigt. Die Wahl fiel auf Ubuntu, weil es gängig ist und von Nvidia mit aktuellen GPU-Treibern und –Bibliotheken versorgt wird.</p>

<p>Wir hätten gerne:</p>
<ul>
  <li>Verschlüsselung auf beiden SSDs (cryptsetup + LUKS),</li>
  <li>darüber LVM mit 2 physischen Volumes,</li>
  <li>und darin logische Partitionen für /, /var und /home.</li>
</ul>

<p>Auf ein RAID1 der Hot-Swap-Platten verzichten wir zugunsten von mehr nutzbarem Platz für KI-Modelle.
Wir starten den Ubuntu-Server-Installer von einem USB-Stick und greifen über die VNC-Konsole im iDRAC darauf zu. Bei der Eingabe von Kennworten während der Installation ist Vorsicht geboten: Die Tastaturbelegung des VNC-Viewers in der iDRAC-Konsole ist eigenwillig, weder deutsch noch englisch, sondern eine wilde Mixtur.</p>

<p>Uns fällt auf, dass die VNC-Konsole nicht ganz stabil läuft, manchmal funktioniert der Verbindungsaufbau nicht. Ein <a href="https://www.dell.com/support/contents/de-de/videos/videoplayer/anleitung-zum-zur%C3%BCcksetzen-und-entladen-des-reststroms-eines-dell-poweredge-servers/6301449860001">Kaltstart</a> kann weiterhelfen.</p>

<p>Der Ubuntu-Installer ist mit unseren Partitionierungswünschen etwas überfordert, es scheitert offenbar an den zwei verschlüsselten Platten, die zu einem LVM-Volume (LVM = Logical Volume Manager) zusammengefasst werden sollen. Wir umgehen das Problem, indem wir zunächst nur eine verschlüsselte SSD mit einem LVM Root-Volume einrichten. Damit ist die Erstinstallation in 5 Minuten nach einem Neustart abgeschlossen.</p>

<p><a href="https://en.wikipedia.org/wiki/Logical_Volume_Manager_(Linux)">LVM</a> erlaubt uns, nachträglich die Volume-Größen im Dateisystem relativ einfach zu ändern oder zusätzliche Platten einzubinden. Dafür sind im Chassis die passenden Anschlüsse bereits vorhanden.</p>

<h3 id="manuelle-einrichtung-der-zweiten-festplatte">Manuelle Einrichtung der zweiten Festplatte</h3>
<p>Wir hätten gerne <code class="language-plaintext highlighter-rouge">/home</code> auf der zweiten (noch unformatierten) Platte <code class="language-plaintext highlighter-rouge">/dev/sdb</code>, da wir reichlich Platz für KI-Modelle haben wollen. Dazu legen wir eine verschlüsselte Partition an:</p>

<div class="language-plaintext highlighter-rouge"><div class="highlight"><pre class="highlight"><code># parted /dev/sdb mklabel gpt
# parted -a optimal /dev/sdb mkpart primary 0% 100%
# cryptsetup luksFormat /dev/sdb1
</code></pre></div></div>

<p>Um beide Platten mit demselben Passwort entsperren zu können, benutzen wir das Skript <code class="language-plaintext highlighter-rouge">decrypt_keyctl</code> (in cryptsetup enthalten). Es benötigt <code class="language-plaintext highlighter-rouge">keyctl</code> aus dem Paket <code class="language-plaintext highlighter-rouge">keyutils</code>, das wir noch manuell installieren müssen. Anschließend wird es für beide Platten in <code class="language-plaintext highlighter-rouge">/etc/crypttab</code> eingetragen:</p>

<div class="language-plaintext highlighter-rouge"><div class="highlight"><pre class="highlight"><code># apt install keyutils
# cat /etc/crypttab
dm_crypt-0 UUID=035c6de5-99df-4e81-ba49-578d6b97c4cf none luks,keyscript=decrypt_keyctl
crypt_sdb1 UUID=97675b26-983a-42f8-8e2c-a5edb0fb051f none luks,keyscript=decrypt_keyctl
# update-initramfs -u
# reboot
</code></pre></div></div>

<p>Beim nächsten Neustart der Maschine werden wunschgemäß beide Platten entschlüsselt. Den nun verfügbaren Platz belegen wir vollständig mit <code class="language-plaintext highlighter-rouge">/home</code> in einem weiteren physischen LVM-Volume. Auf LVM könnte man für eine einzelne Partition im Prinzip auch verzichten, aber es erlaubt uns, gegebenenfalls später die Aufteilung der Platten zu ändern.</p>

<div class="language-plaintext highlighter-rouge"><div class="highlight"><pre class="highlight"><code># pvcreate /dev/mapper/crypt_sdb1
# vgcreate data-vg /dev/mapper/crypt_sdb1
# lvcreate -n data-home -l 100%FREE data-vg
# mkfs.ext4 /dev/data-vg/data-home
# cat /etc/fstab
...
/dev/disk/by-uuid/8209347b-0ddd-47f8-a5ba-b505cb822085 /home ext4 defaults 0 1
</code></pre></div></div>

<p>Normalerweise wird beim Systemstart das Kennwort für verschlüsselte Festplatten auf der Konsole verlangt. Diese wird jedoch nicht mehr zugänglich sein, sobald die Maschine ins Rack kommt. Wir installieren daher <code class="language-plaintext highlighter-rouge">dropbear-initramfs</code>, um die Platten über SSH entsperren zu können.
Abweichend von der üblichen Vorgehensweise konvertieren wir die vorhandenen OpenSSH Host Keys ins Dropbear-Format und installierten sie ins <code class="language-plaintext highlighter-rouge">initramfs</code>, so dass wir zur Entsperrung den normalen SSH-Port 22 ohne Schlüsselkonflikte nutzen können.</p>

<div class="language-plaintext highlighter-rouge"><div class="highlight"><pre class="highlight"><code># /usr/lib/dropbear/dropbearconvert openssh dropbear \
/etc/ssh/ssh_host_ecdsa_key \
/etc/dropbear/initramfs/dropbear_ecdsa_host_key
# /usr/lib/dropbear/dropbearconvert openssh dropbear \
/etc/ssh/ssh_host_ed25519_key \
/etc/dropbear/initramfs/dropbear_ed25519_host_key
# /usr/lib/dropbear/dropbearconvert openssh dropbear \
/etc/ssh/ssh_host_rsa_key \
/etc/dropbear/initramfs/dropbear_rsa_host_key
</code></pre></div></div>

<p>Zuletzt werden öffentliche Schlüssel der Administratoren in <code class="language-plaintext highlighter-rouge">/etc/dropbear/initramfs/authorized_keys</code> eingetragen und die Ramdisk aktualisiert:</p>

<div class="language-plaintext highlighter-rouge"><div class="highlight"><pre class="highlight"><code># update-initramfs -u
# reboot
</code></pre></div></div>

<p>Voilà, nach einem Neustart lassen sich die Platten auch über SSH entsperren.</p>

<h3 id="unfreiwillige-nacharbeiten">Unfreiwillige Nacharbeiten</h3>
<p>Bei der abschließenden Bereinigung des Systems übersehen wir dummerweise, dass <code class="language-plaintext highlighter-rouge">cryptsetup-initramfs</code> kein manuell gewähltes Paket ist und automatisch deinstalliert wird. Daraufhin startet das System nicht mehr, weil die Root-Partition nicht entschlüsselt werden kann.</p>

<p>Ein vollständiges Rettungssystem ist im Hilfemenü des Ubuntu-Installers versteckt. Von dort hängen wir das installierte Dateisystem manuell ein und installieren <code class="language-plaintext highlighter-rouge">cryptsetup-initramfs</code> im <code class="language-plaintext highlighter-rouge">chroot</code> noch einmal. Nun startet die Maschine wieder.</p>

<p>Für den nächsten Schritt montieren wir die P40-GPUs in die Einschübe 1+2. Deren Einrichtung und die Messung der Rechenleistung werden im zweiten Teil beschrieben.</p>]]></content><author><name>danielKnauth</name></author><category term="de" /><category term="machinelearning" /><summary type="html"><![CDATA[Wir zeigen, wie ihr mit kleinem Budget einen High-Performance-Server für Machine Learning einrichtet.]]></summary></entry><entry xml:lang="de"><title type="html">Sicherheit automatisiert testen: Mit Playwright zu robuster Web Security</title><link href="https://blog.cronn.de/de/testing/2025/11/13/security-e2e-tests.html" rel="alternate" type="text/html" title="Sicherheit automatisiert testen: Mit Playwright zu robuster Web Security" /><published>2025-11-13T00:00:00+00:00</published><updated>2025-11-13T00:00:00+00:00</updated><id>https://blog.cronn.de/de/testing/2025/11/13/security-e2e-tests</id><content type="html" xml:base="https://blog.cronn.de/de/testing/2025/11/13/security-e2e-tests.html"><![CDATA[<h2 id="einleitung">Einleitung</h2>
<p>Mit automatisierten Ende-zu-Ende-Tests lassen sich nicht nur Bugs finden, sondern auch regelmäßig die Einhaltung von Sicherheitsmaßnahmen überprüfen. Das hat eine Reihe von Vorteilen:</p>
<ul>
  <li>Automatisierte Security-Tests überprüfen zuverlässig, ob Sicherheitsfunktionen wie vorgesehen funktionieren.</li>
  <li>Sie helfen dabei, Sicherheitsmechanismen während der Weiterentwicklung stabil zu halten und ungewollte Regressionen frühzeitig zu erkennen.</li>
  <li>Beim Schreiben automatisierter Tests wird die Perspektive potenzieller Angreifer eingenommen.</li>
</ul>

<p>In diesem Artikel zeigen wir anhand konkreter Beispiele, wie sich mit Playwright sicherheitsrelevante Aspekte wie Content Security Policy (CSP), Clickjacking oder Cross-Site Request Forgery (CSRF) zuverlässig testen lassen.</p>

<h2 id="ansatz-playwright-ende-zu-ende-security-testing">Ansatz: Playwright-Ende-zu-Ende-Security-Testing</h2>
<p>In diesem Artikel werden wir uns auf die Überprüfung ausgewählter Sicherheitsaspekte mithilfe von automatisierten Ende-zu-Ende-Tests konzentrieren. Diese Tests können neben den Ende-zu-Ende-Tests für die Features der Anwendung implementiert werden. Sie können in der gleichen Pipeline laufen wie diese „normalen“ Tests. Daher fühlt sich ihre Entwicklung wie die Entwicklung der Tests für Anwendungsfeatures an. Wir zeigen in diesem Beispiel exemplarisch für Content Security Policy (CSP) wie man einige Aspekte mithilfe von Playwright überprüfen kann. Die CSP wird im Header einer HTML-Antwort verschickt. Sie wird während der Entwicklungsarbeiten des Frontends konfiguriert. Um die CSP zu überprüfen, bietet es sich daher an, im Rahmen eines Tests, die Seite aufzurufen und dort die Checks durchzuführen. Playwright ist für Ende-zu-Ende Tests einer Webapplikation derzeit das gängige Werkzeug. Hier werden wir speziell auf die Besonderheiten beim Testen der CSP mit Playwright eingehen. Im Großen und Ganzen können für die Sicherheitstests die gleichen Ansätze und Methoden verwendet werden wie für Ende-zu-Ende Tests für neue Features.
In unseren Tests für die CSP wollen wir verschiedene Aspekte überprüfen.</p>

<h2 id="content-security-policy-überprüfung">
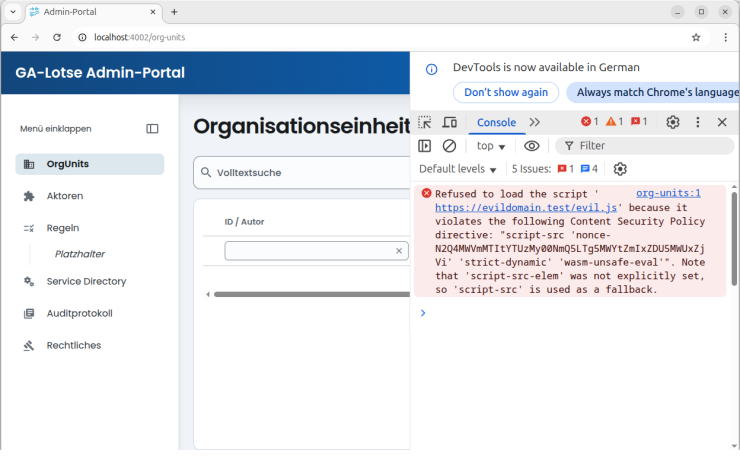
Content-Security-Policy-Überprüfung</h2>
<p>Der erste Aspekt betrifft das einfache Aufrufen der zu überprüfenden Seite. Hier wollen wir als Erstes sicherstellen, dass keine CSP durch die vorhandene Implementierung verletzt wird. Daher rufen wir die Seite auf und überprüfen, dass keine Warnung in der Konsole des Browsers erscheint. Mit einer kleinen Funktion können wir Playwright anweisen, die Fehlermeldungen der Browserkonsole, die während des Tests erzeugt werden, in ein Array zu schreiben. Dazu übergeben wir die Seite und das Array an die Funktion und deren Implementierung sorgt dafür, dass die Fehlermeldungen in unser Array geschrieben werden.</p>

<div class="language-ts highlighter-rouge"><div class="highlight"><pre class="highlight"><code><span class="kd">function</span> <span class="nx">logBrowserErrors</span><span class="p">(</span><span class="nx">page</span><span class="p">:</span> <span class="nx">Page</span><span class="p">,</span> <span class="nx">errors</span><span class="p">:</span> <span class="kr">string</span><span class="p">[])</span> <span class="p">{</span>
  <span class="nx">page</span><span class="p">.</span><span class="nx">on</span><span class="p">(</span><span class="dl">"</span><span class="s2">console</span><span class="dl">"</span><span class="p">,</span> <span class="p">(</span><span class="nx">messsage</span><span class="p">)</span> <span class="o">=&gt;</span> <span class="p">{</span>
    <span class="k">if</span> <span class="p">(</span><span class="nx">messsage</span><span class="p">.</span><span class="kd">type</span><span class="p">()</span> <span class="o">===</span> <span class="dl">"</span><span class="s2">error</span><span class="dl">"</span><span class="p">)</span> <span class="p">{</span>
      <span class="nx">errors</span><span class="p">.</span><span class="nx">push</span><span class="p">(</span><span class="nx">messsage</span><span class="p">.</span><span class="nx">text</span><span class="p">());</span>
    <span class="p">}</span>
  <span class="p">});</span>
<span class="p">}</span>
</code></pre></div></div>

<p>Wir können daher nach dem Aufruf unserer zu überprüfenden Seite validieren, dass keine CSP-Warnungen oder andere Fehlermeldungen auf der Seite ausgelöst wurden. Die Überprüfung kann mit der expect-Funktion von Playwright vorgenommen werden.</p>

<div class="language-ts highlighter-rouge"><div class="highlight"><pre class="highlight"><code><span class="nx">expect</span><span class="p">(</span><span class="nx">errors</span><span class="p">).</span><span class="nx">toHaveLength</span><span class="p">(</span><span class="mi">0</span><span class="p">);</span>
</code></pre></div></div>

<p>Beim Aufrufen der Seite durch Playwright erhalten wir auch die Antwort auf diesen Aufruf. Diese enthält im Header die CSP-Attribute. Wir schreiben diese Werte in eine sogenannte Validierungsdatei. Diese wird beim ersten Durchlaufen des Tests mit den aktuellen CSP-Attributen gefüllt. Diese Werte müssen initial auf die erwarteten Werte kritisch überprüft werden. Sollte es Abweichungen zu den erwarteten Werten geben, so muss die CSP angepasst werden, damit die Werte in der Validierungsdatei mit den erwarteten Werten übereinstimmen.</p>

<p>Sobald die Validierungsdatei freigegeben worden ist, wird in jedem weiteren Durchlauf des Tests, ob lokal oder in einer Pipeline, der Inhalt der Datei mit den aktuell erhaltenen Attributen verglichen. Sollte eine Abweichung erkannt werden, schlägt der Test fehl. Auf diese Weise werden zuverlässig alle Änderungen an der CSP erkannt. Bei geplanten Änderungen der CSP kann die Datei angepasst werden. In den restlichen Fällen wird überprüft, warum sich die CSP geändert hat und es kann entschieden werden, ob die Änderung rückgängig gemacht werden muss oder ob sie beibehalten werden kann.</p>

<p>Hier ist ein Beispiel, wie der Inhalt einer solchen Validierungsdatei aussieht:</p>

<div class="language-json highlighter-rouge"><div class="highlight"><pre class="highlight"><code><span class="p">{</span><span class="w">
  </span><span class="nl">"cspHeaderValues"</span><span class="p">:</span><span class="w"> </span><span class="p">[</span><span class="w">
    </span><span class="s2">"default-src 'self'"</span><span class="p">,</span><span class="w">
    </span><span class="s2">"connect-src 'self'"</span><span class="p">,</span><span class="w">
    </span><span class="s2">"script-src 'nonce-[NONCE]' 'strict-dynamic' 'wasm-unsafe-eval'"</span><span class="p">,</span><span class="w">
    </span><span class="s2">"style-src-elem 'self' 'nonce-[NONCE]'"</span><span class="p">,</span><span class="w">
    </span><span class="s2">"style-src-attr 'unsafe-inline'"</span><span class="p">,</span><span class="w">
    </span><span class="s2">"img-src 'self' blob: data:"</span><span class="p">,</span><span class="w">
    </span><span class="s2">"font-src 'self' data:"</span><span class="p">,</span><span class="w">
    </span><span class="s2">"object-src 'none'"</span><span class="p">,</span><span class="w">
    </span><span class="s2">"base-uri 'self'"</span><span class="p">,</span><span class="w">
    </span><span class="s2">"form-action 'self'"</span><span class="p">,</span><span class="w">
    </span><span class="s2">"frame-ancestors 'none'"</span><span class="w">
  </span><span class="p">]</span><span class="w">
</span><span class="p">}</span><span class="w">
</span></code></pre></div></div>
<p>Die Nonce-Werte haben wir in dieser Datei maskiert, da sie in jedem Durchlauf neu erzeugt werden und der Test daher nicht auf einen konkreten Nonce-Wert testen kann.</p>

<div class="language-ts highlighter-rouge"><div class="highlight"><pre class="highlight"><code><span class="k">async</span> <span class="kd">function</span> <span class="nx">validateCSPData</span><span class="p">(</span>
  <span class="nx">response</span><span class="p">:</span> <span class="nx">Response</span><span class="p">,</span>
  <span class="nx">page</span><span class="p">:</span> <span class="nx">Page</span><span class="p">,</span>
<span class="p">)</span> <span class="p">{</span>
  <span class="kd">const</span> <span class="nx">cspHeaderValues</span> <span class="o">=</span>
    <span class="p">(</span><span class="k">await</span> <span class="nx">response</span><span class="p">.</span><span class="nx">allHeaders</span><span class="p">())[</span><span class="dl">"</span><span class="s2">content-security-policy</span><span class="dl">"</span><span class="p">]</span> <span class="o">??</span> <span class="dl">""</span><span class="p">;</span>
  <span class="k">if</span> <span class="p">(</span><span class="nx">cspHeaderValues</span> <span class="o">===</span> <span class="dl">""</span><span class="p">)</span> <span class="p">{</span>
    <span class="k">throw</span> <span class="k">new</span> <span class="nb">Error</span><span class="p">(</span><span class="dl">"</span><span class="s2">CSP must not be empty.</span><span class="dl">"</span><span class="p">);</span>
  <span class="p">}</span>
  <span class="kd">const</span> <span class="nx">hasMetaCSP</span> <span class="o">=</span> <span class="k">await</span> <span class="nx">checkMetaCSP</span><span class="p">(</span><span class="nx">page</span><span class="p">);</span>
  <span class="nx">expect</span><span class="p">(</span><span class="nx">hasMetaCSP</span><span class="p">).</span><span class="nx">toBeFalsy</span><span class="p">();</span>
  <span class="kd">const</span> <span class="nx">snapshot</span><span class="p">:</span> <span class="nb">Record</span><span class="o">&lt;</span><span class="kr">string</span><span class="p">,</span> <span class="kr">string</span><span class="p">[]</span><span class="o">&gt;</span> <span class="o">=</span> <span class="p">{};</span>
  <span class="nx">snapshot</span><span class="p">.</span><span class="nx">cspHeaderValues</span> <span class="o">=</span> <span class="nx">cspHeaderValues</span>
    <span class="p">.</span><span class="nx">split</span><span class="p">(</span><span class="sr">/;</span><span class="se">\s</span><span class="sr">*/</span><span class="p">)</span>
    <span class="p">.</span><span class="nx">filter</span><span class="p">((</span><span class="nx">str</span><span class="p">)</span> <span class="o">=&gt;</span> <span class="nx">str</span> <span class="o">!==</span> <span class="dl">""</span><span class="p">);</span>
  <span class="k">await</span> <span class="nx">compareActualWithValidationFile</span><span class="p">(</span><span class="nx">snapshot</span><span class="p">);</span>
<span class="p">}</span>
</code></pre></div></div>

<p>In der gezeigten Methode <code class="language-plaintext highlighter-rouge">validateCSPData</code> ist unsere Implementierung für die Validierung der CSP-Attribute zu sehen. Wir müssen der Methode lediglich die Seite (<code class="language-plaintext highlighter-rouge">page</code>) und die Antwort des Aufrufs der Seite (<code class="language-plaintext highlighter-rouge">response</code>) übergeben. Die Methode extrahiert aus der Antwort den Anteil, der die CSP betrifft. In einer ersten Validierung überprüfen wir, dass die CSP nicht leer ist. Wir führen dann eine weitere Überprüfung aus und validieren, dass keine Meta-CSP-Attribute im HTML-Teil der Antwort befindlich sind. Wir haben uns dazu entschieden als eigenen Standard keine Meta-CSP-Attribute zuzulassen und überprüfen das an dieser Stelle, um Konflikte zwischen der CSP im Header und in den Meta-Attributen zu vermeiden. Am Ende der Methode formatieren wir die CSP-Attribute und übergeben sie unserer Methode, die die Werte mit der oben erwähnten Datei vergleicht.</p>

<h2 id="csp-warnung-überprüfen">CSP-Warnung überprüfen</h2>
<p>In einem weiteren Schritt manipulieren wird den HTML-Teil unserer zu überprüfenden Seite und verifizieren, dass die erwarteten CSP-Warnungen in der Konsole des Browsers erscheinen.
Eine Manipulation enthält zum Beispiel folgende Zeile, die wir dem HTML-Body der Seite hinzufügen:</p>

<div class="language-html highlighter-rouge"><div class="highlight"><pre class="highlight"><code><span class="nt">&lt;script </span><span class="na">src=</span><span class="s">"https://bad.test/evil.js"</span> <span class="na">async=</span><span class="s">""</span><span class="nt">&gt;&lt;/script&gt;</span>
</code></pre></div></div>

<p>Diese Manipulation simuliert einen Angriff per XSS (Cross-Site-Scripting). Bei einem solchen Angriff wird auf eine Website „bösartiger Code“, meist in Form von JavaScript, eingeschleust. Falls der Code zur Ausführung käme, könnten zum Beispiel sensible Daten abgegriffen werden. Daher ist es wichtig zu überprüfen, dass falls Code in die Seite eingeschleust werden sollte, dieser auf keinen Fall ausgeführt wird.</p>

<p>Die Manipulation des HTML-Bodys erreichen wir mithilfe der Methode route, die wir auf das <code class="language-plaintext highlighter-rouge">page</code>-Objekt von Playwright anwenden:</p>

<div class="language-ts highlighter-rouge"><div class="highlight"><pre class="highlight"><code><span class="k">async</span> <span class="kd">function</span> <span class="nx">setupRouteWithModifiedBody</span><span class="p">(</span>
  <span class="nx">page</span><span class="p">:</span> <span class="nx">Page</span>
<span class="p">)</span> <span class="p">{</span>
  <span class="k">await</span> <span class="nx">page</span><span class="p">.</span><span class="nx">route</span><span class="p">(</span>
    <span class="nx">page</span><span class="p">.</span><span class="nx">url</span><span class="p">(),</span>
    <span class="k">async</span> <span class="p">(</span><span class="nx">route</span><span class="p">)</span> <span class="o">=&gt;</span> <span class="p">{</span>
      <span class="kd">const</span> <span class="nx">response</span> <span class="o">=</span> <span class="k">await</span> <span class="nx">route</span><span class="p">.</span><span class="nx">fetch</span><span class="p">();</span>
      <span class="kd">let</span> <span class="nx">bodyForModification</span> <span class="o">=</span> <span class="k">await</span> <span class="nx">response</span><span class="p">.</span><span class="nx">text</span><span class="p">();</span>
      <span class="nx">bodyForModification</span> <span class="o">=</span> <span class="nx">bodyForModification</span><span class="p">.</span><span class="nx">replace</span><span class="p">(</span>
        <span class="dl">"</span><span class="s2">&lt;/body&gt;</span><span class="dl">"</span><span class="p">,</span>
        <span class="s2">`&lt;script src="https://bad.test/evil.js" async=""&gt;&lt;/script&gt;&lt;/body&gt;`</span><span class="p">,</span>
      <span class="p">);</span>
      <span class="k">await</span> <span class="nx">route</span><span class="p">.</span><span class="nx">fulfill</span><span class="p">({</span>
        <span class="nx">response</span><span class="p">,</span>
        <span class="na">body</span><span class="p">:</span> <span class="nx">bodyForModification</span><span class="p">,</span>
      <span class="p">});</span>
    <span class="p">}</span>
  <span class="p">);</span>
<span class="p">}</span>
</code></pre></div></div>

<p>In dieser Methode manipulieren wir den Aufruf der zu überprüfenden Seite. Wir wenden die <code class="language-plaintext highlighter-rouge">route</code>-Methode auf die URL der Seite an und manipulieren dabei den HTML-Body. In der <code class="language-plaintext highlighter-rouge">route</code>-Methode geben wir als ersten Parameter die URL an, die wir manipulieren möchten. Als zweiten Parameter definieren wir die Anweisungen, die dazu führen, dass der Body manipuliert wird. Dazu lassen wir zuerst mittels <code class="language-plaintext highlighter-rouge">route.fetch</code> die eigentliche Antwort auf Anfragen zu der zu testenden Seite in eine Variable speichern. Diese Antwort verändern wird dann, indem wir am Ende ein „böses“ Skript hinzufügen. Mittels <code class="language-plaintext highlighter-rouge">route.fulfill</code> weisen wir Playwright an, beim Aufruf der Seite den manipulierten Body zurückzugeben.</p>

<p>Nachdem die Methode im Test aufgerufen worden ist, wird jeder Aufruf der Seite von Playwright abgefangen und der HTML-Body der Antwort wird durch den manipulierten Body ersetzt.</p>

<p>Für den Fall, dass durch eine unzureichende CSP das Skript aufgerufen werden sollte, verwenden wir auch die <code class="language-plaintext highlighter-rouge">route</code>-Methode von Playwright. Diese leitet den Aufruf für das Skript auf ein von uns definiertes Skript um:</p>

<div class="language-ts highlighter-rouge"><div class="highlight"><pre class="highlight"><code><span class="k">async</span> <span class="kd">function</span> <span class="nx">setupRouteForEvilScript</span><span class="p">(</span><span class="nx">page</span><span class="p">:</span> <span class="nx">Page</span><span class="p">)</span> <span class="p">{</span>
  <span class="k">await</span> <span class="nx">page</span><span class="p">.</span><span class="nx">route</span><span class="p">(</span><span class="dl">"</span><span class="s2">https://bad.test/evil.js</span><span class="dl">"</span><span class="p">,</span> <span class="k">async</span> <span class="p">(</span><span class="nx">route</span><span class="p">)</span> <span class="o">=&gt;</span> <span class="p">{</span>
    <span class="kd">const</span> <span class="nx">jsContent</span> <span class="o">=</span> <span class="s2">`console.log("Hello world!");`</span><span class="p">;</span>
    <span class="k">await</span> <span class="nx">route</span><span class="p">.</span><span class="nx">fulfill</span><span class="p">({</span>
      <span class="na">status</span><span class="p">:</span> <span class="mi">200</span><span class="p">,</span>
      <span class="na">contentType</span><span class="p">:</span> <span class="dl">"</span><span class="s2">application/javascript</span><span class="dl">"</span><span class="p">,</span>
      <span class="na">body</span><span class="p">:</span> <span class="nx">jsContent</span><span class="p">,</span>
    <span class="p">});</span>
  <span class="p">});</span>
<span class="p">}</span>
</code></pre></div></div>

<p>Wenn während der Testausführung die Seite mit dem manipulierten Body aufgerufen wird, wird eine Warnung in der Konsole des Browsers ausgegeben und das „böse“ Skript wird nicht geladen.</p>

<figure>
    <img data-src="/img/posts/security-e2e-tests-img1.png" class="lazyload img-fluid img-feature" alt="Screenshot des Browsers mit der zu testenden URL. Das Dev-Tool ist geöffnet und zeigt die Fehlermeldung: „Refused to load the script „https://evildomain.test/evil.js“ because it violates the following Content Security Policy directive: „script-src“ „nonce-N2Q4MWMmMTIyTUzMy0NmQ5LTg5MWYtZmIxZDUSMWUxZjVi“ „strict-dynamic“ „wasm-unsafe-eval““. Note that „script-src-elem“ was not explicitly set, so „script-src“ is used as a fallback.“ (Backticks und Code-Anführungszeichen wurden in diesem Alternativtext aus technischen Gründen durch deutsche Anführungszeichen ersetzt, um der HTML-Syntax im CMS genüge zu tun.)" />
    <figcaption class="long-fig-caption"> 
</figcaption>
</figure>

<p>Man kann in dem Screenshot, der während der Testausführung erstellt wurde, mehrere verletzte CSP-Regeln sehen. Diese Fehlermeldungen werden in das anfangs erwähnte Array geschrieben. Sie werden wie die CSP im Header der HTML-Antwort in einer separaten Datei validiert. Sollte sich während einer Testausführung die Fehlermeldung ändern oder ganz ausbleiben, schlägt der Test fehl und es muss nach einer Ursache sowie einer Lösung dafür gesucht werden.</p>

<h2 id="clickjacking-mittels-csp-verhindern">
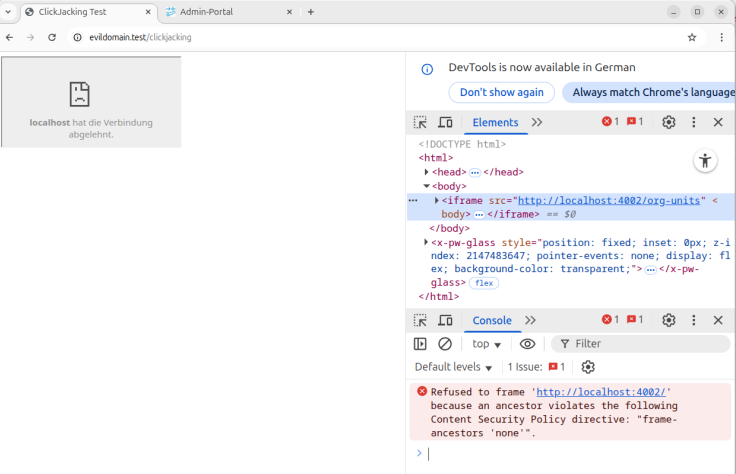
Clickjacking mittels CSP verhindern</h2>
<p>Mithilfe der CSP kann auch verhindert werden, dass „bösartige“ Websites unsere Seite mittels eines iframe Elements in ihre Website einbetten, ein sogenannter Clickjacking-Angriff. Durch die Einbettung der Website wird unsere Seite durch die bösartige Website überlagert und weder die User noch wir als Betreiber erkennen, dass ungewollt Funktionen auf der Seite ausgeführt werden. Um dies zu verhindern, wird der CSP „frame-ancestors `none`“ hinzugefügt. Dies sorgt dafür, dass die Einbettung auf anderen Websites fehlschlägt. Für unseren Test haben wir eine minimale Website erstellt, die ein iframe-Element auf unsere Seite enthält. Wir haben dazu wieder die <code class="language-plaintext highlighter-rouge">route</code>-Methode verwendet.</p>

<div class="language-ts highlighter-rouge"><div class="highlight"><pre class="highlight"><code><span class="k">async</span> <span class="kd">function</span> <span class="nx">setupRouteForIframeSite</span><span class="p">(</span><span class="nx">page</span><span class="p">:</span> <span class="nx">Page</span><span class="p">)</span> <span class="p">{</span>
  <span class="kd">const</span> <span class="nx">body</span> <span class="o">=</span> <span class="s2">`&lt;!DOCTYPE html&gt;
    &lt;head&gt;
      &lt;meta charset="utf-8"&gt;
      &lt;title&gt;ClickJacking Test&lt;/title&gt;
    &lt;/head&gt;
    &lt;body&gt;&lt;iframe src="</span><span class="p">${</span><span class="nx">page</span><span class="p">.</span><span class="nx">url</span><span class="p">()}</span><span class="s2">"&lt;/body&gt;
    &lt;/html&gt;`</span><span class="p">;</span>
  <span class="k">await</span> <span class="nx">page</span><span class="p">.</span><span class="nx">route</span><span class="p">(</span><span class="dl">"</span><span class="s2">https://bad.test/clickjacking</span><span class="dl">"</span><span class="p">,</span> <span class="p">(</span><span class="nx">route</span><span class="p">)</span> <span class="o">=&gt;</span>
    <span class="nx">route</span><span class="p">.</span><span class="nx">fulfill</span><span class="p">({</span>
      <span class="na">contentType</span><span class="p">:</span> <span class="dl">"</span><span class="s2">text/html;charset=utf-8</span><span class="dl">"</span><span class="p">,</span>
      <span class="nx">body</span><span class="p">,</span>
    <span class="p">}),</span>
  <span class="p">);</span>
<span class="p">}</span>
</code></pre></div></div>

<p>Die Methode <code class="language-plaintext highlighter-rouge">setupRouteForIframeSite</code> führt dazu, dass wenn im Test die URL „https://bad.test/clickjacking“ aufgerufen wird, die in der Methode definierte Seite aufgerufen wird. Wenn die CSP korrekt konfiguriert ist, dann funktioniert das iframe-Element nicht. Zudem wird auf der Seite eine Fehlermeldung in der Konsole ausgegeben.</p>

<figure>
    <img data-src="/img/posts/security-e2e-tests-img2.png" class="lazyload img-fluid img-feature" alt="Screenshot des Browsers in dem die bösartige Clickjacking-Domain geöffnet ist. Das Dev-Tool ist geöffnet und zeigt folgende Fehlermeldung: „Refused to frame „http://localhost:4002/“ because an ancestor violates the following Content Security Policy directive: „frame-ancestors „none““. (Backticks und Code-Anführungszeichen wurden in diesem Alternativtext aus technischen Gründen durch deutsche Anführungszeichen ersetzt, um der HTML-Syntax im CMS genüge zu tun.)" />
    <figcaption class="long-fig-caption"> 
</figcaption>
</figure>

<p>Das ist in dem obigen Screenshot zu sehen. In der Fehlermeldung wird auch die verletzte CSP „frame-ancestors 'none’“ angegeben. Auch diese
Fehlermeldung wird wie oben beschrieben in eine Validierungsdatei geschrieben und bei jeder Ausführung des Tests überprüft.
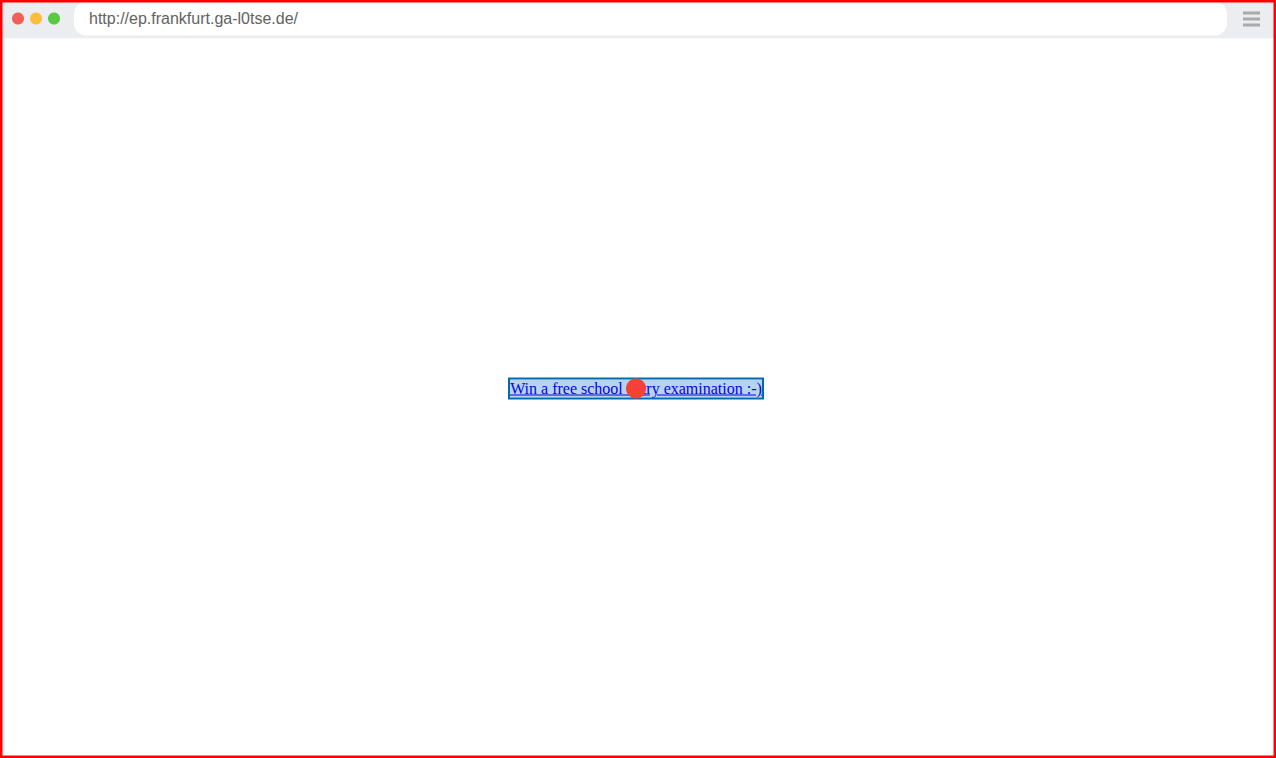
</p>

<h2 id="csrf-angriff-testen">CSRF-Angriff testen</h2>
<p>Zum Abschluss stellen wir noch ein CSRF-Szenario vor, welches man mittels Ende-zu-Ende-Tests in Playwright überprüfen kann. In einem ersten Schritt loggt sich der Playwright Test bei der zu testenden Software ein. Wir haben für diesen Test zwei minimale Websites erstellt, die bei dem Klick auf einen Link eine Abfrage an unsere zu testende Software abschicken. Dies ist jedoch auf den ersten Blick für einen Nutzer nicht ersichtlich. Zu Demonstrationszwecken beziehungsweise Testzwecken haben wir dazu einen zustandsändernden GET-Request verwendet.</p>

<p>Wir testen sowohl einen Cross-Origin- als auch einen Same-Site-Fall.</p>

<figure>
    <img data-src="/img/posts/security-e2e-tests-img3.png" class="lazyload img-fluid img-feature" alt="" />
    <figcaption class="long-fig-caption"> 
</figcaption>
</figure>

<p>Die erste Website hat eine von der zu testenden Seite unterschiedliche Domain. Die zweite Website hat eine Subdomain unserer zu testenden Seite als URL. Diese Seite ist oben abgebildet. Sie ist, wie man sieht, für den Test sehr minimal gehalten und enthält im Wesentlichen nur den bösartigen Link. Wenn Playwright im Test auf den Link klickt, überprüfen wir jeweils, dass eine Fehlermeldung beim Aufruf des Links auf unsere zu testende Software erscheint. Zusätzlich überwachen wir mittels der <code class="language-plaintext highlighter-rouge">route</code>-Methode von Playwright den Endpunkt, der durch die bösartigen Aufrufe, also hier das Klicken auf den Link, angegriffen wird.</p>

<div class="language-ts highlighter-rouge"><div class="highlight"><pre class="highlight"><code><span class="k">async</span> <span class="kd">function</span> <span class="nx">monitorAttackedEndpoint</span><span class="p">(</span>
  <span class="nx">page</span><span class="p">:</span> <span class="nx">Page</span><span class="p">,</span>
<span class="p">)</span> <span class="p">{</span>
  <span class="k">await</span> <span class="nx">page</span><span class="p">.</span><span class="nx">route</span><span class="p">(</span><span class="nx">attackedEndpoint</span><span class="p">,</span> <span class="k">async</span> <span class="p">(</span><span class="nx">route</span><span class="p">)</span> <span class="o">=&gt;</span> <span class="p">{</span>
    <span class="kd">const</span> <span class="nx">response</span> <span class="o">=</span> <span class="k">await</span> <span class="nx">route</span><span class="p">.</span><span class="nx">fetch</span><span class="p">();</span>
    <span class="nx">expect</span><span class="p">(</span><span class="nx">response</span><span class="p">.</span><span class="nx">status</span><span class="p">()).</span><span class="nx">toBe</span><span class="p">(</span><span class="mi">403</span><span class="p">);</span>

    <span class="k">await</span> <span class="nx">route</span><span class="p">.</span><span class="nx">fulfill</span><span class="p">({</span> <span class="na">response</span><span class="p">:</span> <span class="nx">response</span> <span class="p">});</span>
  <span class="p">});</span>
<span class="p">}</span>
</code></pre></div></div>

<p>Um einen solchen Angriff zu verhindern, werden zum Beispiel CSRF-Cookies verwendet. Auf diese Weise wird verhindert, dass der Endpunkt den bösartigen Request beantwortet, da die bösartige Seite keinen Zugriff auf die CSRF-Cookies hat, die für einen erfolgreichen Request mitgeschickt werden müssen. Es wird in unserer Software bei einem versuchten CSRF-Angriff ein http-403-Fehlercode zurückgegeben. Dies überprüfen wir mit der oben dargestellten Methode.</p>

<h2 id="schlussbetrachtung">Schlussbetrachtung</h2>
<p>Wir haben hier an einigen Beispielen dargelegt, wie sich Sicherheitsaspekte für Webanwendungen, unter anderem CSP oder CSRF, im Zusammenspiel mit Playwright durch Ende-zu-Ende-Tests automatisiert testen lassen. Es wurde prinzipiell gezeigt, wie sich einige unterschiedliche Aspekte, zum Beispiel das Vorhandensein der erwarteten CSP in der http-Antwort, testen lassen. Die Tests lassen sich an unterschiedliche Webanwendungen anpassen und können auf diese Weise projektübergreifend eingesetzt werden. Die dargestellten Tests sind nur ein kleiner Ausschnitt von möglichen automatisierbaren Sicherheitstests. Weitere Sicherheitsaspekte, wie beispielsweise Zugriffsberechtigungen oder Brute-Force-Angriffe, können auch mithilfe von Ende-zu-Ende-Tests durch Playwright automatisiert getestet werden.</p>]]></content><author><name>adrianWeber</name></author><category term="de" /><category term="testing" /><summary type="html"><![CDATA[Die Sicherheit von Webanwendungen mit Playwright testen – wir zeigen mit Beispielen wie das geht.]]></summary></entry><entry xml:lang="en"><title type="html">Using OpenRewrite for large-scale refactoring</title><link href="https://blog.cronn.de/en/java/2025/10/23/openrewrite-for-refactoring.html" rel="alternate" type="text/html" title="Using OpenRewrite for large-scale refactoring" /><published>2025-10-23T00:00:00+00:00</published><updated>2025-10-23T00:00:00+00:00</updated><id>https://blog.cronn.de/en/java/2025/10/23/openrewrite-for-refactoring</id><content type="html" xml:base="https://blog.cronn.de/en/java/2025/10/23/openrewrite-for-refactoring.html"><![CDATA[<h2 id="our-starting-position">Our Starting Position</h2>
<p>What makes OpenRewrite so compelling is its automated nature. Migrating your code base between Java versions or upgrading a framework becomes a more relaxed task: You add the corresponding so-called “recipe”, execute <code class="language-plaintext highlighter-rouge">rewriteRun</code>, verify the code with your automated tests and then you’re done. Instead of replacing imports by hand or fighting with Gradle because of a rogue transitive dependency, you can take a coffee break while OpenRewrite works in the background.</p>

<p>An OpenRewrite recipe contains the logic to do a specific task, like changing <code class="language-plaintext highlighter-rouge">org.junit</code> imports with <code class="language-plaintext highlighter-rouge">org.assertj</code> equivalents. Due to the large user base and the open-source nature of most recipes, you can find recipes for everything from Spring Boot upgrades to switching from <code class="language-plaintext highlighter-rouge">JUnit</code> to <code class="language-plaintext highlighter-rouge">AssertJ</code> in minutes. In some cases, it might also be useful for enforcing code standards – much like an auto-formatter – where OpenRewrite can be integrated into the normal development pipeline, for example as a pre-commit hook.</p>

<h2 id="how-does-it-work">How Does It Work?</h2>
<p>There are “declarative” and “imperative” recipes which have different purposes. You can imagine declarative recipes like Lego. They are defined in a simple YAML file and typically consist of a list of existing recipes that should be executed together. Many of these recipes are available in OpenRewrite’s public repositories<sup id="fnref:3"><a href="#fn:3" class="footnote" rel="footnote" role="doc-noteref">1</a></sup> and are designed for common tasks, such as dependency upgrades or framework migrations. For example, the AssertJ<sup id="fnref:2"><a href="#fn:2" class="footnote" rel="footnote" role="doc-noteref">2</a></sup> recipe I mentioned earlier shows how an entire framework change can be automated with just a single declarative recipe.</p>

<p>Imperative recipes, on the other hand, are implemented in code. They define the actual logic that transforms your source code; in many cases by replacing old methods with new ones or changing an import. While there are many of these already available, OpenRewrite also provides a comprehensive Java API for writing your own recipes which we’ll explore in more detail next.</p>

<h2 id="lossless-semantic-tree-and-visitor-pattern">Lossless Semantic Tree and Visitor Pattern</h2>
<p>OpenRewrite builds a Lossless Semantic Tree or LST<sup id="fnref:4"><a href="#fn:4" class="footnote" rel="footnote" role="doc-noteref">3</a></sup> when it is invoked. An LST, as its name suggests, is a much more detailed version of an AST (Abstract Syntax Tree). While the AST only contains the information necessary for evaluating the logical structure of the program, the LST includes whitespace information as well as a complete representation of the type relations. This means that once OpenRewrite has parsed a source file into an LST it can generate an exact replica from that LST alone. Because of this, local design abnormalities like an unusual indentation will be preserved as OpenRewrite doesn’t assume anything about your code styles. Additionally, because of the extensive type information, it can correctly identify the type of any given field. This is incredibly helpful if a recipe only wants to act on a very specific set of statements, for example for fixing a known vulnerability in a specific method from a package. OpenRewrite also uses this to verify that the new code uses existing types and doesn’t reference unavailable classes.</p>

<p>Once that LST is built, we get a chance to modify it. OpenRewrite is designed around the visitor pattern<sup id="fnref:5"><a href="#fn:5" class="footnote" rel="footnote" role="doc-noteref">4</a></sup> which allows us to define the behavior of a “visitor” which is moving along the LST. Different visitor types exist to balance how much you’re able to change vs. what can be validated by OpenRewrite. For example, a <code class="language-plaintext highlighter-rouge">JavaIsoVisitor</code> isn’t allowed to replace a method declaration with a field, however this is possible when using a <code class="language-plaintext highlighter-rouge">JavaVisitor</code>. We would do this by overriding <code class="language-plaintext highlighter-rouge">visitX</code> methods for all kinds of elements of a source file, such as class declarations, method declarations/invocations or conditionals. In each of these methods, we get some representation of that LST node in our code. These are immutable objects which contain the information present in the source file. We can use these when we want to change something for the current element, such as only renaming methods that start with “test”:</p>

<div class="language-java highlighter-rouge"><div class="highlight"><pre class="highlight"><code><span class="nd">@Override</span>
<span class="kd">public</span> <span class="no">J</span><span class="o">.</span><span class="na">MethodDeclaration</span> <span class="nf">visitMethodDeclaration</span><span class="o">(</span><span class="no">J</span><span class="o">.</span><span class="na">MethodDeclaration</span> <span class="n">method</span><span class="o">,</span> <span class="nc">ExecutionContext</span> <span class="n">executionContext</span><span class="o">)</span> <span class="o">{</span>
   <span class="k">if</span> <span class="o">(</span><span class="n">method</span><span class="o">.</span><span class="na">getSimpleName</span><span class="o">().</span><span class="na">startsWith</span><span class="o">(</span><span class="s">"test"</span><span class="o">))</span> <span class="o">{</span>
       <span class="c1">// TODO: Rename this method</span>
   <span class="o">}</span>
   <span class="k">return</span> <span class="kd">super</span><span class="o">.</span><span class="na">visitMethodDeclaration</span><span class="o">(</span><span class="n">method</span><span class="o">,</span> <span class="n">executionContext</span><span class="o">);</span>
<span class="o">}</span>
</code></pre></div></div>

<p>To allow for more control about how the LST is traversed  , OpenRewrite leaves it up to us to decide if and where we call <code class="language-plaintext highlighter-rouge">super.visitX</code>. OpenRewrite generally recommends starting any <code class="language-plaintext highlighter-rouge">visitX</code> method with the call to <code class="language-plaintext highlighter-rouge">super</code>. Omitting this call entirely will mean that the sub-tree is not traversed  at all. This can be beneficial for improving performance; however, it isn’t needed in most cases.
To further expand upon our example from above, let’s now change the method name. In OpenRewrite, the LST itself should not be mutated. Instead, we build a new “method object” that we then return from our method.</p>

<div class="language-java highlighter-rouge"><div class="highlight"><pre class="highlight"><code><span class="nd">@Override</span>
<span class="kd">public</span> <span class="no">J</span><span class="o">.</span><span class="na">MethodDeclaration</span> <span class="nf">visitMethodDeclaration</span><span class="o">(</span><span class="no">J</span><span class="o">.</span><span class="na">MethodDeclaration</span> <span class="n">method</span><span class="o">,</span> <span class="nc">ExecutionContext</span> <span class="n">executionContext</span><span class="o">)</span> <span class="o">{</span>
   <span class="nc">String</span> <span class="n">methodName</span> <span class="o">=</span> <span class="n">method</span><span class="o">.</span><span class="na">getSimpleName</span><span class="o">();</span>

   <span class="k">if</span> <span class="o">(</span><span class="n">methodName</span><span class="o">.</span><span class="na">startsWith</span><span class="o">(</span><span class="s">"test"</span><span class="o">))</span> <span class="o">{</span>
       <span class="nc">String</span> <span class="n">newName</span> <span class="o">=</span> <span class="n">methodName</span><span class="o">.</span><span class="na">replaceFirst</span><span class="o">(</span><span class="s">"test"</span><span class="o">,</span> <span class="s">"check"</span><span class="o">);</span>
       <span class="k">return</span> <span class="n">method</span><span class="o">.</span><span class="na">withName</span><span class="o">(</span><span class="n">method</span><span class="o">.</span><span class="na">getName</span><span class="o">().</span><span class="na">withSimpleName</span><span class="o">(</span><span class="n">newName</span><span class="o">));</span>
   <span class="o">}</span>
   <span class="k">return</span> <span class="kd">super</span><span class="o">.</span><span class="na">visitMethodDeclaration</span><span class="o">(</span><span class="n">method</span><span class="o">,</span> <span class="n">executionContext</span><span class="o">);</span>
<span class="o">}</span>
</code></pre></div></div>

<p>OpenRewrite detects that we returned an object different to what was passed into   the method. It concludes that we must have changed something about the code and will store this new object in place of the old node in the LST. If you want to instead completely remove a statement, simply return null. In cases where you don’t want to do anything you should return <code class="language-plaintext highlighter-rouge">super.visitX</code>.</p>

<p>After the first visitor has traversed  the whole LST, OpenRewrite will run another visitor through our recipe. If it detects any further changes, it will repeat this step, until no changes are made anymore. To make sure that changes from our recipe did not cause a “regression” in another active recipe, it will then re-run all other recipes in a similar pattern. Once that finishes it can confidently assert that all recipes have applied their logic to every single piece of code in the code base and every possible change has been made.</p>

<h2 id="lessons-learned">Lessons learned</h2>
<p>Because of the inherent complexity in this type of meta programming, a test-driven development approach is highly favorable. It allows you to effectively cover the many possible edge cases.</p>

<p>Something that OpenRewrite already warns about in their documentation is recipe state. Recipe state      increases the risk of artifacts from previous data unexpectedly changing the behaviour of your recipe. This not only introduces bugs that are difficult to find and fix, it also massively increases the complexity of your recipe. In our above example this can’t be avoided entirely, since we not only need to rename method declarations but also adjust any calls to those methods. This means we need to pass the information about our new names to <code class="language-plaintext highlighter-rouge">visitMethodInvocation</code> so that we can adjust the method calls accordingly.</p>

<p>The first option we have is the cursor. While the Java API of OpenRewrite itself doesn’t expose explicit methods like <code class="language-plaintext highlighter-rouge">enterClass</code> and <code class="language-plaintext highlighter-rouge">exitClass</code>, the cursor keeps track of where exactly we currently are in a stack-like structure, hence the name. It is cleared between every single cycle of a recipe and is best suited for communicating between two methods inside a visitor that come after each other. This wouldn’t be suitable for our scenario since a method call may come from a completely different place in the code base. Another possible solution is to put our information into the execution context. It is only ever cleared after all recipes have run so it is a much more persistent storage location. There are some limitations that you need to keep track of, however. The execution context does not allow mutating stored data to avoid hard to debug problems that occur due to state conflicts. You also need make sure that you don’t overwrite data from other recipes. The optimal way would be a ScanningRecipe<sup id="fnref:6"><a href="#fn:6" class="footnote" rel="footnote" role="doc-noteref">5</a></sup> visitor, where we first get the opportunity to scan the whole code base and collect information, after which a second visitor can apply changes.</p>

<h2 id="final-thoughts">Final Thoughts</h2>
<p>With an extensive collection of open-source recipes and a fleshed-out Java API, OpenRewrite is a great way to approach code refactoring at a large scale. While the in-memory nature of the LST naturally will become a bottleneck for bigger projects, this problem is solved by Moderne’s custom solution with which it is possible to split the tree generation and store it more permanently.
While OpenRewrite is primarily focused on Java and the surrounding ecosystem, it also offers recipes for YAML, XML, JSON and even a few other languages like C# or Scala (although in a much more limited capacity).
Further code examples can be found in the cronn github<sup id="fnref:1"><a href="#fn:1" class="footnote" rel="footnote" role="doc-noteref">6</a></sup></p>

<div class="footnotes" role="doc-endnotes">
  <ol>
    <li id="fn:3">
      <p><a href="https://docs.openrewrite.org/recipes" target="_blank">OpenRewrite Recipe catalog</a> <a href="#fnref:3" class="reversefootnote" role="doc-backlink">&#8617;</a></p>
    </li>
    <li id="fn:2">
      <p><a href="https://docs.openrewrite.org/recipes/java/testing/assertj/junittoassertj" target="_blank">Migrate JUnit asserts to AssertJ</a> <a href="#fnref:2" class="reversefootnote" role="doc-backlink">&#8617;</a></p>
    </li>
    <li id="fn:4">
      <p><a href="https://docs.openrewrite.org/concepts-and-explanations/lossless-semantic-trees" target="_blank">Lossless Semantic Trees (LST)</a> <a href="#fnref:4" class="reversefootnote" role="doc-backlink">&#8617;</a></p>
    </li>
    <li id="fn:5">
      <p><a href="https://en.wikipedia.org/wiki/Visitor_pattern" target="_blank">Wikipedia: Visitor pattern</a> <a href="#fnref:5" class="reversefootnote" role="doc-backlink">&#8617;</a></p>
    </li>
    <li id="fn:6">
      <p><a href="https://docs.openrewrite.org/concepts-and-explanations/recipes#scanning-recipes" target="_blank">Scanning Recipes</a> <a href="#fnref:6" class="reversefootnote" role="doc-backlink">&#8617;</a></p>
    </li>
    <li id="fn:1">
      <p><a href="https://github.com/cronn/open-rewrite-blog-post-example" target="_blank">Demo project</a> <a href="#fnref:1" class="reversefootnote" role="doc-backlink">&#8617;</a></p>
    </li>
  </ol>
</div>]]></content><author><name>jakobRoth</name></author><category term="en" /><category term="java" /><summary type="html"><![CDATA[Automated refactoring with OpenRewrite – efficient and time-saving.]]></summary></entry><entry xml:lang="de"><title type="html">Performance-Testing mit k6: Ein Erfahrungsbericht</title><link href="https://blog.cronn.de/de/testing/2025/07/18/performance-testing-mit-k6.html" rel="alternate" type="text/html" title="Performance-Testing mit k6: Ein Erfahrungsbericht" /><published>2025-07-18T00:00:00+00:00</published><updated>2025-07-18T00:00:00+00:00</updated><id>https://blog.cronn.de/de/testing/2025/07/18/performance-testing-mit-k6</id><content type="html" xml:base="https://blog.cronn.de/de/testing/2025/07/18/performance-testing-mit-k6.html"><![CDATA[<h3 id="projektkontext">Projektkontext</h3>

<p><a href="https://ga-lotse.de/">GA-Lotse</a> (Gesundheitsamt-Lotse) ist eine modular aufgebaute Webanwendung für Gesundheitsämter, die die interne Dokumentation und externe Kommunikation mit Bürgerinnen und Bürgern vereinfachen soll. Verschiedene Abteilungen eines Gesundheitsamtes sind in Modulen abgebildet, die für Gesundheitsämter konfiguriert werden können. Damit die Anwendung höchsten Sicherheitsstandards genügt, werden die Daten für jedes Modul separat gespeichert. Dies und weitere Sicherheitsfeatures wie das Zero-Trust-Prinzip führen zu intrinsischen Einbußen der Performance, weshalb das Testen der Performance ein wichtiger Teil des <a href="https://www.cronn.de/referenzen/digitalisierung-gesundheitsamt">Projektes</a> war.</p>

<h3 id="auswahl-des-lasttesttools">Auswahl des Lasttesttools</h3>

<p>Wie so häufig muss man nicht alles selbst implementieren, daher haben wir uns nach einem Tool umgesehen, das Performance-Testing unterstützt. Da wir eine Webanwendung testen wollen, sollte es Browsertests ermöglichen. Zudem waren unsere Hauptanforderungen folgende:</p>
<ul>
  <li>
    <p>Die Möglichkeit den Testcode in TypeScript zu schreiben, da wir TypeScript auch für das Frontend der Anwendung und die Ende-zu-Ende-Tests verwenden</p>
  </li>
  <li>
    <p>Open-Source-Verfügbarkeit des Tools</p>
  </li>
  <li>
    <p>Ausführbarkeit auf einem selbstgehosteten Server (keine reine Cloud-Lösung)</p>
  </li>
  <li>
    <p>Ein gutes Reporting, um die Ergebnisse der Tests für uns und die Entwickler zu visualisieren.</p>
  </li>
</ul>

<p>Nach der Evaluation mehrerer Tools haben wir uns für <a href="https://grafana.com/docs/k6/latest/">k6</a> entschieden. k6 unterstützt Browsertests, ermöglicht die Entwicklung in TypeScript und bietet in Kombination mit Grafana sowie durch individuell definierbare Metriken ein umfassendes Reporting.</p>

<h3 id="unser-setup">Unser Setup</h3>

<p>k6 führt die Performance-Tests aus und erzeugt dabei bereits einige Metriken, wie z.B. <a href="https://web.dev/articles/ttfb?hl=de#:~:text=Hinweis%3A%20%E2%80%9ETime%20to%20First%20Byte,um%20auf%20Anfragen%20zu%20reagieren.">TTFB</a> oder die Dauer der einzelnen Requests. Um diese und weitere Testergebnisse persistieren und visualisieren zu können, benötigten wir noch weitere Tools.</p>

<p>Als Datenbank haben wir uns für <a href="https://www.influxdata.com/">InfluxDB</a> entschieden, da diese dafür optimiert ist, Daten zeitaufgelöst zu speichern. Zur Visualisierung der Ergebnisse haben wir <a href="https://grafana.com/oss/grafana">Grafana-Dashboards</a> genutzt, unter anderem da k6 zu Grafana gehört und es eine Schnittstelle zur InfluxDB bietet. Zur Abfrage der Daten aus der InfluxDB haben wir die proprietäre Datenbankabfragesprache <a href="https://docs.influxdata.com/flux/v0/">Flux</a> genutzt. Diese wird jedoch vermutlich in der nächsten Major-Version v3 nicht mehr oder nur noch eingeschränkt unterstützt.</p>

<p>Wir haben uns entschieden, die Tools lokal zu nutzen und sie in Docker-Container zu verpacken, um die Tests hardwareunabhängig ausführen zu können und nicht von Cloud-Anbietern abhängig zu sein. Alternativ besteht die Möglichkeit, <a href="https://grafana.com/products/cloud/k6/">Grafana Cloud k6</a> zu verwenden, um die lokale Installation der Tools zu vermeiden.</p>

<h3 id="performance-tests-mit-k6">Performance-Tests mit k6</h3>

<p>Ein Test mit k6 lässt sich mit einem Javascript oder TypeScript-File ausführen (s. Beispielskript).</p>
<div class="language-ts highlighter-rouge"><div class="highlight"><pre class="highlight"><code><span class="k">import</span> <span class="p">{</span> <span class="nx">Options</span><span class="p">,</span> <span class="nx">Scenario</span> <span class="p">}</span> <span class="k">from</span> <span class="dl">"</span><span class="s2">k6/options</span><span class="dl">"</span><span class="p">;</span>
<span class="k">import</span> <span class="p">{</span> <span class="nx">schoolEntryBrowserTest</span> <span class="p">}</span> <span class="k">from</span> <span class="dl">"</span><span class="s2">@/modules/browser/schoolEntryBrowserTest</span><span class="dl">"</span><span class="p">;</span>
<span class="k">import</span> <span class="p">{</span> <span class="nx">schoolEntryApiTest</span> <span class="p">}</span> <span class="k">from</span> <span class="dl">"</span><span class="s2">@/modules/api/schoolEntryApiTest</span><span class="dl">"</span><span class="p">;</span>

<span class="kd">const</span> <span class="nx">scenarios</span><span class="p">:</span> <span class="nb">Record</span><span class="o">&lt;</span><span class="kr">string</span><span class="p">,</span> <span class="nx">Scenario</span><span class="o">&gt;</span> <span class="o">=</span> <span class="p">{</span>
  <span class="na">schoolEntryBrowser</span><span class="p">:</span> <span class="p">{</span>
    <span class="na">exec</span><span class="p">:</span> <span class="dl">'</span><span class="s1">schoolEntryBrowserTestFunction</span><span class="dl">'</span><span class="p">,</span>
    <span class="na">executor</span><span class="p">:</span> <span class="dl">'</span><span class="s1">constant-vus</span><span class="dl">'</span><span class="p">,</span>
    <span class="na">vus</span><span class="p">:</span> <span class="mi">3</span><span class="p">,</span>
    <span class="na">duration</span><span class="p">:</span> <span class="dl">'</span><span class="s1">15m</span><span class="dl">'</span><span class="p">,</span>
    <span class="na">options</span><span class="p">:</span> <span class="p">{</span>
      <span class="na">browser</span><span class="p">:</span> <span class="p">{</span>
        <span class="na">type</span><span class="p">:</span> <span class="dl">'</span><span class="s1">chromium</span><span class="dl">'</span><span class="p">,</span>
      <span class="p">}</span>
    <span class="p">}</span>
  <span class="p">},</span>
  <span class="na">schoolEntryApi</span><span class="p">:</span> <span class="p">{</span>
    <span class="na">exec</span><span class="p">:</span> <span class="dl">'</span><span class="s1">schoolEntryApiTestFunction</span><span class="dl">'</span><span class="p">,</span>
    <span class="na">executor</span><span class="p">:</span> <span class="dl">'</span><span class="s1">ramping-vus</span><span class="dl">'</span><span class="p">,</span>
    <span class="na">startVUs</span><span class="p">:</span> <span class="mi">1</span><span class="p">,</span>
    <span class="na">stages</span><span class="p">:</span> <span class="p">[</span>
      <span class="p">{</span> <span class="na">target</span><span class="p">:</span> <span class="mi">3</span><span class="p">,</span> <span class="na">duration</span><span class="p">:</span> <span class="dl">'</span><span class="s1">5m</span><span class="dl">'</span> <span class="p">},</span>
      <span class="p">{</span> <span class="na">target</span><span class="p">:</span> <span class="mi">5</span><span class="p">,</span> <span class="na">duration</span><span class="p">:</span> <span class="dl">'</span><span class="s1">5m</span><span class="dl">'</span> <span class="p">},</span>
      <span class="p">{</span> <span class="na">target</span><span class="p">:</span> <span class="mi">3</span><span class="p">,</span> <span class="na">duration</span><span class="p">:</span> <span class="dl">'</span><span class="s1">5m</span><span class="dl">'</span> <span class="p">},</span>
    <span class="p">]</span>
  <span class="p">}</span>
<span class="p">};</span>

<span class="k">export</span> <span class="kd">const</span> <span class="nx">options</span><span class="p">:</span> <span class="nx">Options</span> <span class="o">=</span> <span class="p">{</span>
  <span class="na">discardResponseBodies</span><span class="p">:</span> <span class="kc">true</span><span class="p">,</span>
  <span class="na">scenarios</span><span class="p">:</span> <span class="nx">scenarios</span><span class="p">,</span>
  <span class="na">systemTags</span><span class="p">:</span> <span class="p">[</span><span class="dl">'</span><span class="s1">status</span><span class="dl">'</span><span class="p">,</span> <span class="dl">'</span><span class="s1">url</span><span class="dl">'</span><span class="p">,</span> <span class="dl">'</span><span class="s1">check</span><span class="dl">'</span><span class="p">,</span> <span class="dl">'</span><span class="s1">scenario</span><span class="dl">'</span><span class="p">],</span>
  <span class="na">setupTimeout</span><span class="p">:</span> <span class="dl">'</span><span class="s1">5m</span><span class="dl">'</span><span class="p">,</span>
<span class="p">};</span>

<span class="k">export</span> <span class="k">async</span> <span class="kd">function</span> <span class="nx">schoolEntryBrowserTestFunction</span><span class="p">()</span> <span class="p">{</span>
  <span class="k">await</span> <span class="nx">schoolEntryBrowserTest</span><span class="p">();</span>
<span class="p">}</span>

<span class="k">export</span> <span class="k">async</span> <span class="kd">function</span> <span class="nx">schoolEntryApiTestFunction</span><span class="p">()</span> <span class="p">{</span>
  <span class="k">await</span> <span class="nx">schoolEntryApiTest</span><span class="p">();</span>
<span class="p">}</span>
</code></pre></div></div>

<p>In diesem Skript werden Optionen für den Test sowie die auszuführenden Testfunktionen definiert. Die Optionen werden als JSON definiert. Eine wichtige Option, die den Testverlauf bestimmt, ist <code class="language-plaintext highlighter-rouge">scenarios</code>. Dort können Szenarien definiert werden, die ausgeführt werden und somit den eigentlichen Test abbilden.</p>

<p>Für ein solches Szenario wird eine auszuführende Funktion, sowie die Anzahl an ausführenden parallelen Nutzern, die in k6 Virtual User (VU) genannt werden, definiert. Mit der Angabe von Zeiträumen kann die Gesamtdauer des Szenarios bestimmt werden. Außerdem können Rampen definiert werden, um die Anzahl der parallelen User während des Tests zu erhöhen oder zu verringern. Eine andere Möglichkeit den Testverlauf zu beeinflussen, ist, ein Zeitintervall festzulegen, in dem eine konkrete Anzahl an VUs das Szenario durchlaufen sollen.</p>

<p>Für einen Test können mehrere solcher Szenarien definiert werden, die mit unterschiedlichen Konfigurationen durchlaufen werden. Um diese Definition der Szenarien einfacher und schneller zu gestalten als ein langes JSON-File zu editieren, haben wir einen Builder entwickelt, der die Szenario-Konfiguration dynamisch erstellt und diesen auf GitHub zur Verfügung gestellt: <a href="https://github.com/cronn/k6-scenario-builder">https://github.com/cronn/k6-scenario-builder</a>.</p>

<h3 id="unsere-erkenntnisse">Unsere Erkenntnisse</h3>

<p>Während des Testens sind uns einige Dinge aufgefallen, die es aus unserer Sicht zu berücksichtigen gilt. Zunächst ist es sinnvoll, eine dedizierte Maschine zur Verfügung zu haben, die die Tests ausführt. Da die Performance nicht nur durch Last vieler gleichzeitiger User beeinträchtigt wird, sondern auch von der Menge der Daten in der Datenbank, haben wir neben kurzen Spike-Tests auch Testszenarien erstellt, die eine Laufzeit über mehrere Stunden haben, um so die Datenmenge stetig zu erhöhen und eine Art Zeitraffer der tatsächlichen Nutzung der Anwendung zu simulieren. Diese Tests sind von einer externen Maschine deutlich komfortabler auszuführen als von dem eigenen Laptop.</p>

<p>Zudem benötigt die Ausführung eines Tests ausreichend Ressourcen auf der ausführenden Maschine. Daher sollte darauf geachtet werden, dass während der Ausführung eines Tests stets noch freie Ressourcen vorhanden sind, um nicht die Ergebnisse ungewollt zu beeinflussen. Dies haben wir bei der Ausführung von Browsertests mit einigen VUs bemerkt. Eine zu große Anzahl an gleichzeitig geöffneten Browsern hat die auszuführende Maschine zum Bottleneck gemacht. Unsere Lösung dafür ist, neben Browsertests gleichzeitig Szenarien zu definieren, die eine möglichst gleiche User-Journey abbilden, jedoch die nötigen Requests direkt ans Backend schicken, um somit die Last aufs Backend browserunabhängig zu erhöhen. Solche API-Szenarien eignen sich auch gut, um schnell ein Szenario zusammenzubauen und somit browserunabhängig einen Überblick über die Performance des Backends zu bekommen.</p>

<p>Eine weitere Erkenntnis von uns war, auf einer möglichst produktionsnahen Umgebung zu testen. Denn auch die Konfiguration einer Umgebung, gerade ein komplexer Microservice-Cluster, kann die Performance erheblich beeinflussen. Neben dem Ausführen der Tests von einer anderen Maschine und dem Testen auf einer produktionsähnlichen Umgebung war es für uns dennoch wichtig, auch das Testen vollständig auf dem eigenen Laptop zu ermöglichen. Dies ermöglicht die unabhängige Entwicklung neuer Szenarien durch die Entwickler und einen einfachen Zugang zu Datenbanken und Logs.</p>

<p>Es ist vorgekommen, dass wir durch die Konfiguration unserer Szenarios, vor allem bei langen Tests, fachliche Limits überschritten haben. Zum Beispiel haben wir unrealistisch viele Termine für einen Tag oder User angelegt, oder sogar zu viele User mit den gleichen Berechtigungen gehabt. Viele Größen können die Performance beeinflussen und sollten deshalb möglichst frühzeitig abgesteckt werden. Dadurch können wenig aussagekräftige Testläufe vermieden werden. Trotzdem war es uns auch wichtig, die bekannten Limits bewusst zu überschreiten, um die Reaktion der Anwendung zu testen und dort dann gegebenenfalls nachzubessern. Denn es ist ja nicht gesagt, dass der Kunde seine fachlichen Limits kennt oder diese durch technische Fehler nicht überschritten werden. Bei einem Termin zu viel sollte die Anwendung nicht unbedienbar werden. Ein Learning war für uns daher, fachliche Limits früh abzuklären und in den Tests zu beachten.</p>

<h3 id="vor--und-nachteile-von-k6">Vor- und Nachteile von k6</h3>

<p>Während des Testens mit k6 sind wir immer mal wieder auf Probleme gestoßen. Eine erhebliche Einschränkung beim Entwickeln von Performance-Tests mit k6 ist ein fehlender Debugger. k6 nutzt eine eigene <a href="https://github.com/grafana/sobek">JavaScript-Engine</a>, um den Testcode auszuführen, für die es keinen Debugger gibt. Die Javascript-Engine hat auch weitere Schwächen, denen man sich bewusst sein sollte. Beispielsweise unterstützt sie die verbreitete Fetch API nicht. Im Zusammenhang mit Browsertests sind Schwächen von k6, dass Methoden wie <em>goto()</em>, die darauf warten sollen, dass eine Seite geladen ist, im Zusammenspiel mit Chromium nicht immer zuverlässig funktionieren, was hin und wieder zu Timing-Problemen führt. Darüber hinaus müssen Locator über XPaths identifiziert werden, was sehr regressionsanfällig ist, sowie häufig unschön und lang. Zuletzt ist auch die Dokumentation von k6 häufig relativ knapp.</p>

<p>Einige andere Dinge haben sich als Vorteile von k6 herausgestellt. Das Reporting im Zusammenspiel mit der InfluxDB und Grafana hat wie erhofft sehr gut funktioniert. Über dieses Setup lassen sich ohne große Vorkenntnisse schnell aussagekräftige Plots erstellen und in einem Dashboard anzeigen, sodass die Testergebnisse analysiert und kommuniziert werden können. Außerdem funktioniert das parallele Ausführen von verschiedenen Szenarien, die jeweils ebenfalls mit parallelen virtuellen Usern ausgeführt werden, sehr gut. Dadurch lassen sich komplexe Szenarien erstellen, die verschiedene Arten von Performance-Tests wie Load-Tests, Spike-Tests und Soak-Tests abbilden. Dass die Testoptionen und insbesondere die Szenarien als JSON beschrieben werden ist sehr angenehm, da es einen fließenden Übergang zum Typescript-Code bietet. Außerdem hat man die Möglichkeit, die Browsertests in einem Headful Mode laufen zu lassen, sodass sich Probleme während der Ausführung erkennen lassen und behoben werden können.</p>

<h3 id="zusammenfassung">Zusammenfassung</h3>

<p>Da wir während der Testphase unsere Tests und unser Setup stetig weiterentwickelt haben, hat sich für uns ein iterativer Ansatz ausgezahlt. Wir sind mit zwei einfachen Szenarien für Module gestartet, die zu den wichtigsten in der Anwendung gehören. Bei diesen ersten Szenarien haben wir festgestellt, dass wir weitere Metriken und Plots in unseren Reports benötigen, um die Ergebnisse analysieren zu können. Iterativ haben wir dann Metriken zu unseren Tests hinzugefügt und im Grafana-Board visualisiert. Dies waren Informationen wie die Dauer von Requests, die Ladezeiten von bestimmten Seiten oder auch die CPU- und RAM-Auslastung der ausführenden Maschine. Für uns war vor allem die Dauer einzelner Requests von Bedeutung, welche Informationen relevant sind, hängt jedoch von der Anwendung ab. Durch in k6 eingebaute Metrik-Typen lässt sich die Erhebung von Informationen flexibel gestalten.</p>

<p>Die Arbeit mit k6 hat uns sowohl Stärken als auch Schwächen des Tools gezeigt. Ob k6 passend ist, hängt sicher vom Anwendungsfall ab, für uns war es aber trotz einiger signifikanter Schwächen ein passendes Tool.</p>]]></content><author><name>simonBiwer</name></author><category term="de" /><category term="testing" /><summary type="html"><![CDATA[Wir teilen unsere Erfahrungen mit Performance-Testing im Projekt GA-Lotse – mit einem Setup aus k6, Grafana, InfluxDB und TypeScript.]]></summary></entry><entry xml:lang="en"><title type="html">Performance Testing with k6: A Field Report</title><link href="https://blog.cronn.de/en/testing/2025/07/18/performance-testing-with-k6.html" rel="alternate" type="text/html" title="Performance Testing with k6: A Field Report" /><published>2025-07-18T00:00:00+00:00</published><updated>2025-07-18T00:00:00+00:00</updated><id>https://blog.cronn.de/en/testing/2025/07/18/performance-testing-with-k6</id><content type="html" xml:base="https://blog.cronn.de/en/testing/2025/07/18/performance-testing-with-k6.html"><![CDATA[<h3 id="project-context">Project context</h3>

<p><a href="https://ga-lotse.de/">GA-Lotse</a> is a modular web application for health authorities which is intended to simplify internal documentation and external communication with citizens. Different departments are mapped in modules, which then can be configured by the health authorities. To ensure that the application meets highest security standards, the data is stored separately for each module. This and other security features – such as the Zero Trust principle – lead to intrinsic performance losses, which is why performance testing was an important part of the <a href="https://www.cronn.de/referenzen/digitalisierung-gesundheitsamt-en">project</a>.</p>

<h3 id="selecting-the-load-testing-tool">Selecting the load testing tool</h3>

<p>It is often the case that you don’t have to implement everything yourself, so we looked for a tool which supports performance testing. Since we want to test a web application, the tool must allow browser testing. Our additional requirements were as follows:</p>

<ul>
  <li>
    <p>The ability to write the test code in TypeScript, as we also use TypeScript for the frontend of the application and the end-to-end tests</p>
  </li>
  <li>
    <p>Open-source availability of the tool</p>
  </li>
  <li>
    <p>Executability on a self-hosted server (not a pure cloud solution)</p>
  </li>
  <li>
    <p>Good reporting to visualize the results of the tests for us and the developers.</p>
  </li>
</ul>

<p>After evaluating several tools, we decided on <a href="https://grafana.com/docs/k6/latest/">k6</a>. k6 supports browser tests, enables development in TypeScript and, in combination with Grafana and through individually definable metrics, offers comprehensive reporting.</p>

<h3 id="our-setup">Our setup</h3>

<p>k6 runs the performance tests and generates some metrics, such as <a href="https://web.dev/articles/ttfb">TTFB</a> or the duration of the individual requests. However, in order to visualize these and other test results, we needed even more tools. We chose <a href="https://www.influxdata.com/">InfluxDB</a> as the database, as it is optimized for storing data in a time-resolved manner. To visualize the results, we used <a href="https://grafana.com/oss/grafana">Grafana-Dashboards</a> because k6 belongs to Grafana and it provides an interface to InfluxDB. To query the data from the InfluxDB, we used the proprietary database query language <a href="https://docs.influxdata.com/flux/v0/">Flux</a>. However, this is not a long-term solution as Flux will probably no longer be supported – or only supported to a limited extent – in the next major version. We decided to use the tools locally and package them in Docker containers in order to be able to run the tests hardware-independently and not be dependent on cloud providers. Alternatively, there is the option of using <a href="https://grafana.com/products/cloud/k6/">Grafana Cloud k6</a>
to avoid installing the tools locally.</p>

<h3 id="performance-testing-with-k6">Performance testing with k6</h3>

<p>A test with k6 can be executed with a Javascript or TypeScript file (see example script).</p>
<div class="language-ts highlighter-rouge"><div class="highlight"><pre class="highlight"><code><span class="k">import</span> <span class="p">{</span> <span class="nx">Options</span><span class="p">,</span> <span class="nx">Scenario</span> <span class="p">}</span> <span class="k">from</span> <span class="dl">"</span><span class="s2">k6/options</span><span class="dl">"</span><span class="p">;</span>
<span class="k">import</span> <span class="p">{</span> <span class="nx">schoolEntryBrowserTest</span> <span class="p">}</span> <span class="k">from</span> <span class="dl">"</span><span class="s2">@/modules/browser/schoolEntryBrowserTest</span><span class="dl">"</span><span class="p">;</span>
<span class="k">import</span> <span class="p">{</span> <span class="nx">schoolEntryApiTest</span> <span class="p">}</span> <span class="k">from</span> <span class="dl">"</span><span class="s2">@/modules/api/schoolEntryApiTest</span><span class="dl">"</span><span class="p">;</span>

<span class="kd">const</span> <span class="nx">scenarios</span><span class="p">:</span> <span class="nb">Record</span><span class="o">&lt;</span><span class="kr">string</span><span class="p">,</span> <span class="nx">Scenario</span><span class="o">&gt;</span> <span class="o">=</span> <span class="p">{</span>
  <span class="na">schoolEntryBrowser</span><span class="p">:</span> <span class="p">{</span>
    <span class="na">exec</span><span class="p">:</span> <span class="dl">'</span><span class="s1">schoolEntryBrowserTestFunction</span><span class="dl">'</span><span class="p">,</span>
    <span class="na">executor</span><span class="p">:</span> <span class="dl">'</span><span class="s1">constant-vus</span><span class="dl">'</span><span class="p">,</span>
    <span class="na">vus</span><span class="p">:</span> <span class="mi">3</span><span class="p">,</span>
    <span class="na">duration</span><span class="p">:</span> <span class="dl">'</span><span class="s1">15m</span><span class="dl">'</span><span class="p">,</span>
    <span class="na">options</span><span class="p">:</span> <span class="p">{</span>
      <span class="na">browser</span><span class="p">:</span> <span class="p">{</span>
        <span class="na">type</span><span class="p">:</span> <span class="dl">'</span><span class="s1">chromium</span><span class="dl">'</span><span class="p">,</span>
      <span class="p">}</span>
    <span class="p">}</span>
  <span class="p">},</span>
  <span class="na">schoolEntryApi</span><span class="p">:</span> <span class="p">{</span>
    <span class="na">exec</span><span class="p">:</span> <span class="dl">'</span><span class="s1">schoolEntryApiTestFunction</span><span class="dl">'</span><span class="p">,</span>
    <span class="na">executor</span><span class="p">:</span> <span class="dl">'</span><span class="s1">ramping-vus</span><span class="dl">'</span><span class="p">,</span>
    <span class="na">startVUs</span><span class="p">:</span> <span class="mi">1</span><span class="p">,</span>
    <span class="na">stages</span><span class="p">:</span> <span class="p">[</span>
      <span class="p">{</span> <span class="na">target</span><span class="p">:</span> <span class="mi">3</span><span class="p">,</span> <span class="na">duration</span><span class="p">:</span> <span class="dl">'</span><span class="s1">5m</span><span class="dl">'</span> <span class="p">},</span>
      <span class="p">{</span> <span class="na">target</span><span class="p">:</span> <span class="mi">5</span><span class="p">,</span> <span class="na">duration</span><span class="p">:</span> <span class="dl">'</span><span class="s1">5m</span><span class="dl">'</span> <span class="p">},</span>
      <span class="p">{</span> <span class="na">target</span><span class="p">:</span> <span class="mi">3</span><span class="p">,</span> <span class="na">duration</span><span class="p">:</span> <span class="dl">'</span><span class="s1">5m</span><span class="dl">'</span> <span class="p">},</span>
    <span class="p">]</span>
  <span class="p">}</span>
<span class="p">};</span>

<span class="k">export</span> <span class="kd">const</span> <span class="nx">options</span><span class="p">:</span> <span class="nx">Options</span> <span class="o">=</span> <span class="p">{</span>
  <span class="na">discardResponseBodies</span><span class="p">:</span> <span class="kc">true</span><span class="p">,</span>
  <span class="na">scenarios</span><span class="p">:</span> <span class="nx">scenarios</span><span class="p">,</span>
  <span class="na">systemTags</span><span class="p">:</span> <span class="p">[</span><span class="dl">'</span><span class="s1">status</span><span class="dl">'</span><span class="p">,</span> <span class="dl">'</span><span class="s1">url</span><span class="dl">'</span><span class="p">,</span> <span class="dl">'</span><span class="s1">check</span><span class="dl">'</span><span class="p">,</span> <span class="dl">'</span><span class="s1">scenario</span><span class="dl">'</span><span class="p">],</span>
  <span class="na">setupTimeout</span><span class="p">:</span> <span class="dl">'</span><span class="s1">5m</span><span class="dl">'</span><span class="p">,</span>
<span class="p">};</span>

<span class="k">export</span> <span class="k">async</span> <span class="kd">function</span> <span class="nx">schoolEntryBrowserTestFunction</span><span class="p">()</span> <span class="p">{</span>
  <span class="k">await</span> <span class="nx">schoolEntryBrowserTest</span><span class="p">();</span>
<span class="p">}</span>

<span class="k">export</span> <span class="k">async</span> <span class="kd">function</span> <span class="nx">schoolEntryApiTestFunction</span><span class="p">()</span> <span class="p">{</span>
  <span class="k">await</span> <span class="nx">schoolEntryApiTest</span><span class="p">();</span>
<span class="p">}</span>
</code></pre></div></div>

<p>This script defines options for the test and the test functions to be executed. The options are defined as JSON. An important option which determines the course of the test is <code class="language-plaintext highlighter-rouge">scenarios</code>. This is where executable scenarios can be defined, thus mapping the actual test.</p>

<p>To define a scenario one must define a function to be executed, as well as the number of executing parallel users, which in k6 are called Virtual Users (VU). The total duration of the scenario can be determined by specifying time periods. In addition, ramps can be defined to increase or decrease the number of parallel users during the test. Another way to influence the course of the test is to set a time interval in which a specific number of VUs should go through the scenario.</p>

<p>Several such scenarios can be defined for a test, which are then run using different configurations. To make this definition of the scenarios easier and faster than editing a long JSON file, we have developed a builder that dynamically creates the scenario configuration and makes it available on GitHub: <a href="https://github.com/cronn/k6-scenario-builder">https://github.com/cronn/k6-scenario-builder</a>.</p>

<h3 id="our-findings">Our findings</h3>

<p>During testing, we noticed a few things which need to be taken into account. First of all, it makes sense to have a dedicated machine available to run the tests. Since performance is not only affected by the load of many simultaneous users, but also by the amount of data in the database, we created both short spike tests as well as test scenarios that have a runtime of several hours in order to constantly increase the amount of data and simulate a kind of time-lapse of the actual use of the application. These tests can be carried out much more comfortably by an external machine than on your own laptop.</p>

<p>In addition, the execution of a test requires sufficient resources on the executing machine. Therefore, care should be taken to ensure that there are always free resources available during the execution of a test so as not to unintentionally influence the results. We noticed this when running browser tests with some VUs. Too many browsers open at the same time turned the machine into a bottleneck. Our solution to this is to define both scenarios and browser tests which depict the same user journey, but send the necessary requests directly to the backend in order to increase the load on the backend without accessing the browser. Such API scenarios are also well suited to quickly assemble a scenario and thus get an overview of the backend’s performance.</p>

<p>Another insight we gained was to test in an environment which was as close to production as possible. After all, the configuration of an environment, especially a complex microservice cluster, can have significant impact on performance. In addition to running the tests from another machine and testing on a production-like environment, it was still important for us to enable testing entirely on our own laptop. This allows developers to independently develop new scenarios and provide easy access to databases and logs.</p>

<p>It also occurred that we had exceeded professional limits by configuring our scenarios, especially during long tests. For example, we created an unrealistic number of appointments for one day or user, or even had too many users with the same permissions. Many different parameters can influence performance and should therefore be defined as early as possible, allowing us to avoid unnecessary test runs. Nevertheless, it was also important for us to deliberately exceed the known limits to test the limits of the application and then improve it where necessary. After all, the customer may not know their professional limits, or their limits might be reached through technical errors. The application should not become unusable because the user booked one appointment too many. One lesson learned was therefore to clarify professional limits at an early stage and to observe them in the tests.</p>

<h3 id="pros-and-cons-of-k6">Pros and Cons of k6</h3>

<p>We ran into problems from time to time during testing with k6. A significant limitation of developing performance tests with k6 is a lack of a debugger. k6 uses its own <a href="https://github.com/grafana/sobek">JavaScript engine</a>
to execute the test code, and there is no built-in debugger. The Javascript engine also has other weaknesses which you should be aware of, such as that it does not support the popular fetch API. In the context of browser tests, methods such as <em>goto()</em> are a weakness, as they do not always work reliably in combination with Chromium, which occasionally leads to timing problems. In addition, locators must be identified via XPaths, which is very susceptible to regression, as well as often unsightly and long. Finally, the documentation of k6 is often relatively short.</p>

<p>However, k6 also has many advantages. The reporting in combination with InfluxDB and Grafana works very well. Meaningful plots can be quickly created in such a setup without much prior knowledge and then be displayed in a dashboard so that the test results can be analyzed and communicated. In addition, the parallel execution of different scenarios, each of which is also executed with parallel virtual users, works very well. It allows you to create complex scenarios which map different types of performance tests, such as load tests, spike tests, and soak tests. The fact that the test options (and especially the scenarios) are described in JSON is an advantage as it provides a smooth transition to the Typescript code. You also have the option of running the browser tests in headful mode, so that problems can be detected and fixed during execution.</p>

<h3 id="summary">Summary</h3>

<p>Since we had constantly developed both our tests and setup during the test phase, an iterative approach paid off for us. We started with two simple scenarios for application-critical modules. In these initial scenarios, we realized that we needed more metrics and plots in our reports to analyze the results. Iteratively, we then added metrics to our tests and visualized them in the Grafana board. These metrics included information such as the duration of requests, the loading times of certain pages, or even the CPU and RAM usage of the executing machine. The duration of individual requests was particularly important for us, but which information is relevant depends on the application. Metric types built into k6 allow the collection of information to be flexibly designed. Working with k6 has shown us both strengths and weaknesses of the tool. Whether k6 is the best choice certainly depends on the use case, but for us it was a suitable tool despite some significant weaknesses.</p>]]></content><author><name>simonBiwer</name></author><category term="en" /><category term="testing" /><summary type="html"><![CDATA[We're sharing our experience with performance testing in the GA-Lotse project – using a setup with k6, Grafana, InfluxDB, and TypeScript.]]></summary></entry><entry xml:lang="de"><title type="html">Analyse von Geschäftsberichten mit LLMs – Teil 2</title><link href="https://blog.cronn.de/de/ai/largelanguagemodels/2025/06/24/analyse-von-geschaeftsberichten-mit-llms-2.html" rel="alternate" type="text/html" title="Analyse von Geschäftsberichten mit LLMs – Teil 2" /><published>2025-06-24T00:00:00+00:00</published><updated>2025-06-24T00:00:00+00:00</updated><id>https://blog.cronn.de/de/ai/largelanguagemodels/2025/06/24/analyse-von-geschaeftsberichten-mit-llms-2</id><content type="html" xml:base="https://blog.cronn.de/de/ai/largelanguagemodels/2025/06/24/analyse-von-geschaeftsberichten-mit-llms-2.html"><![CDATA[<p>Willkommen zurück zu unserer Serie über die Analyse von Geschäftsberichten mit KI! Im <a href="https://blog.cronn.de/de/ai/largelanguagemodels/2023/07/26/analyse-von-geschaeftsberichten-mit-chatgpt-1.html" target="_blank">ersten Teil</a> haben wir anhand eines Beispiels gezeigt, wie die Extraktion von Kennzahlen aus Geschäftsberichten mit LLMs wie ChatGPT grundsätzlich funktioniert. Jetzt gehen wir weiter in die Tiefe und zeigen dafür eine Lösung, die wir in Zusammenarbeit mit North Data produktiv einsetzen.</p>

<p>Wir konnten damals demonstrieren, wie sich relevante Informationen aus den dichten Textwüsten von Geschäftsberichten strukturiert herausfiltern lassen. Doch wer das in der Praxis skalieren will, stößt schnell an Grenzen – sei es bei der Genauigkeit über viele verschiedene Dokumente hinweg, der robusten Verarbeitung komplexer Layouts und Tabellen oder der Wirtschaftlichkeit, die für eine großflächige Analyse nötig ist.</p>

<p>Genau hier hat sich in der Zwischenzeit aber einiges getan. Mit <strong>Gemini Flash</strong> von Google steht ein Modell bereit, das die Karten für die automatisierte Dokumentenanalyse in Sachen Geschwindigkeit, Kontextverständnis und dem Ausliefern strukturierter Daten neu mischt.<sup id="fnref:1"><a href="#fn:1" class="footnote" rel="footnote" role="doc-noteref">1</a></sup> In diesem zweiten Teil wollen wir daher tief eintauchen: Was macht Gemini Flash so viel leistungsfähiger für diese spezifische Aufgabe als frühere Ansätze oder die klassischen OCR-Pipelines? Wie ermöglicht es den Schritt von der Machbarkeitsstudie zum produktiven Werkzeug? Werfen wir einen Blick unter die Haube.</p>

<figure>
<img data-src="/img/posts/Analyse-von-Geschaeftsberichten-2-northdata-grafik.webp" class="lazyload img-fluid img-feature" alt="Auf der Linken Seite: Unstrukturierte Beispieldokumente; Mitte ein Pfeil der nach rechts Zeigt, Aufschrift „AI“; der Pfeil Zeigt auf JSON-Code." />
<figcaption class="long-fig-caption"> Gemini extrahiert strukturierten JSON-Code aus PDFs. </figcaption>
</figure>

<h3 id="der-klassische-ansatz-ocr-als-basis-aber-nicht-die-ganze-lösung">Der klassische Ansatz: OCR als Basis, aber nicht die ganze Lösung</h3>

<p>Bevor wir uns den Fähigkeiten von Gemini widmen, lohnt sich ein kurzer Blick auf den traditionellen Weg zur Datenextraktion aus PDFs. Dieser beginnt fast immer mit <strong>Optical Character Recognition (OCR)</strong>. OCR-Tools helfen uns, wenn es darum geht, Text aus gescannten Dokumenten oder reinen Bild-PDFs lesbar zu machen. Sie wandeln Pixel in Buchstaben um. Das Ergebnis ist nicht nur der „rohe“ Textinhalt, sondern oft auch dessen Position auf der Seite, meist in Form von Koordinaten oder sogenannten Bounding Boxes für jedes erkannte Wort oder jede Zeile.</p>

<figure>
<img data-src="/img/posts/Analyse-von-Geschaeftsberichten-2-table.webp" class="lazyload img-fluid img-feature" alt="In einer Beispieltabelle („Balance sheet“) sind Begriffe und Zahlen durch Bounding Boxes markiert." />
<figcaption class="long-fig-caption"> Bounding Boxes bei OCR durch Azure Document Intelligence. </figcaption>
</figure>

<p>Nach diesem rohen Text samt Koordinaten fängt die eigentliche Arbeit oft erst an, denn für eine sinnvolle Analyse brauchen wir <em>strukturierte</em> Daten, keinen Fließtext. Hier beginnen die Herausforderungen:</p>

<p>Zuerst muss die Struktur im reinen Text-Output erkannt werden. Wie identifiziert man automatisch Tabellen, zusammengehörige Key-Value-Paare (wie „Umsatz: 10 Mio. €“) oder semantisch sinnvolle Blöcke? Dafür sind häufig komplexe, nachgelagerte Schritte notwendig – seien es speziell entwickelte Parser, regelbasierte Systeme, die auf bestimmte Muster achten, oder sogar separate Machine-Learning-Modelle, die auf Aufgaben wie Tabellenerkennung trainiert wurden.</p>

<p>Diese nachgelagerten Systeme sind allerdings oft <strong>anfällig für Layout-Änderungen</strong>. Kleine Anpassungen im Design eines Berichts von einem Jahr zum nächsten, oder die unterschiedlichen Formate verschiedener Unternehmen, können mühsam erstellte Regeln oder Parser aus dem Tritt bringen und unbrauchbar machen.</p>

<p>Hinzu kommt das fehlende <strong>Kontextverständnis</strong>. OCR liefert zwar den Text, versteht aber dessen Bedeutung nicht. Zu erkennen, dass sich der Begriff „Total Assets“ auf Seite 10 auf dieselbe Kennzahl bezieht wie eine detaillierte Aufschlüsselung in einer Tabelle auf Seite 45, übersteigt die Fähigkeiten reiner Texterkennung.</p>

<p>All diese Faktoren führen zu Komplexität und somit zu einem hohen <strong>Entwicklungs- und Wartungsaufwand</strong>. Es lässt sich feststellen: OCR ist ein wichtiges Werkzeug im Kasten. Aber für das Ziel der <strong>End-to-End-Extraktion <em>strukturierter</em> Daten</strong> ist es meist nur der erste Schritt in einer komplexen und oft fragilen Verarbeitungskette.</p>

<h3 id="unser-weg-zum-produktiveinsatz-evaluation-modellwahl-und-integration">Unser Weg zum Produktiveinsatz: Evaluation, Modellwahl und Integration</h3>

<p>Der Sprung von einer erfolgreichen Demonstration (wie in Teil 1 gezeigt<sup id="fnref:2"><a href="#fn:2" class="footnote" rel="footnote" role="doc-noteref">2</a></sup>) zu einem zuverlässigen, skalierbaren Produktivsystem erforderte einen systematischen Ansatz und Weiterentwicklungen in mehreren Bereichen.</p>

<p>Zunächst war eine <strong>solide Evaluation</strong> unerlässlich. Wir haben also manuell einen Datensatz aus 100 repräsentativen englischen Geschäftsberichten kuratiert. Für die wichtigsten Kennzahlen wurden die korrekten Werte (Ground Truth) von Hand annotiert und in einer Tabelle gesammelt. Nur mit einer solchen verlässlichen Basis lässt sich die Qualität verschiedener Modelle und Ansätze objektiv messen und über die Zeit verfolgen.</p>

<p>Parallel dazu erweiterten wir den Umfang der Extraktion im Vergleich zur alten Lösung deutlich. Statt nur einiger weniger Kennzahlen war das Ziel nun, eine breite Palette von über 20 relevanten Werten pro Bericht zuverlässig zu extrahieren. Dazu gehören unter anderem die vom Unternehmen ausgewiesenen Lohnkosten, Angaben zu Gewinn und Verlust, Barmittel, aber auch Daten wie die durchschnittliche Mitarbeiterzahl oder der Name des Wirtschaftsprüfers.</p>

<p>Diese anspruchsvolleren Ziele führten uns zu Tests verschiedener Modelle. Die Wahl fiel schließlich auf <strong>Gemini 2.0 Flash Lite:</strong> Dieses Modell vereinte für unseren Anwendungsfall alle entscheidenden Faktoren optimal.</p>

<figure>
<img data-src="/img/posts/Analyse-von-Geschäftsberichten-2-graph.webp" class="lazyload img-fluid img-feature" alt="Graf, Y-Achse: Artificial Analysis Intelligence Index, 0 bis 75; X-Achse: Price (USD per M Tokens), 0 - 8 USD; der Graf ist in vier Quadranten unterteilt, Gemini liegt alleine im oberen linken Quadranten (Score 70.49, 3.44 USD); alle anderen Modelle sind deutlich teurer oder schneiden im Intelligence Score schlechter ab." />
<figcaption class="long-fig-caption"> 
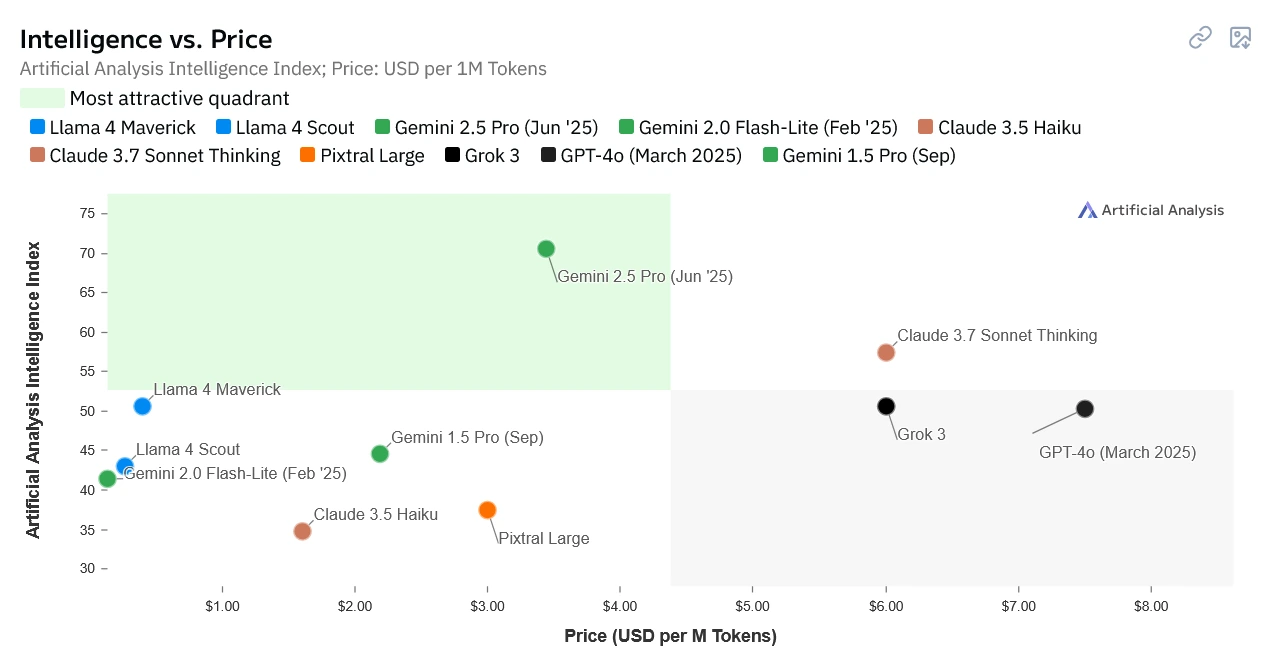
LLM-Vergleich anhand der Parameter „Intelligenz“ und „Preis“, via <a href="https://artificialanalysis.ai/models?models=llama-4-maverick%2Cllama-4-scout%2Cgemini-2-0-flash-lite-001%2Cgemini-2-5-pro%2Cclaude-3-5-haiku%2Cclaude-3-7-sonnet-thinking%2Cpixtral-large-2411%2Cgrok-3%2Cgpt-4o-chatgpt-03-25%2Cgemini-1-5-pro#intelligence-vs-price" target="_blank">artificialanalysis.ai</a>. </figcaption>
</figure>

<p><strong>Qualität &amp; Geschwindigkeit:</strong> In unseren Tests zeigte Gemini 2.0 Flash Lite eine überraschend hohe Genauigkeit für die meisten der anvisierten Kennzahlen, die oft mit der von größeren, teureren Modellen mithalten konnte. Google selbst positioniert die Flash-Modelle als optimiert für Aufgaben, bei denen es auf hohe Geschwindigkeit und Effizienz bei gleichzeitig guter Qualität ankommt<sup id="fnref:3"><a href="#fn:3" class="footnote" rel="footnote" role="doc-noteref">3</a></sup>. Unsere Erfahrungen bestätigen, dass das Modell seinem „Flash“ im Namen in puncto Verarbeitungsgeschwindigkeit gerecht wird.</p>

<p><strong>Kosten:</strong> Ein entscheidender Faktor für den Einsatz im großen Maßstab sind die Kosten. Gemini 2.0 Flash Lite ist deutlich günstiger als die größeren Pro-Modelle. Im Vergleich zu älteren Modellen wie gpt-3.5-turbo-16k aus dem ersten Teil, das im Juli 2023 noch etwa 3 US-Dollar pro Million Input-Token kostete<sup id="fnref:4"><a href="#fn:4" class="footnote" rel="footnote" role="doc-noteref">4</a></sup>, ist die von uns genutzte Gemini-Flash-Variante um den Faktor 40 günstiger<sup id="fnref:5"><a href="#fn:5" class="footnote" rel="footnote" role="doc-noteref">5</a></sup>! Das macht die Verarbeitung tausender Berichte wirtschaftlich tragbar.</p>

<p><strong>Multimodalität &amp; Kontext:</strong> Ein wesentlicher Vorteil gegenüber reinen Textmodellen oder klassischen OCR-Pipelines ist die Multimodalität von Gemini. Vereinfacht gesagt bedeutet das: Statt nur den rohen Text und dessen Koordinaten zu liefern (wie traditionelle OCR), kann Gemini Flash gleichzeitig den Text „lesen“ und das Seitenlayout „sehen“. Es „versteht“, wie Text in Spalten oder Tabellen angeordnet ist, erkennt Überschriften und kann Bilder oder Diagramme im Dokument interpretieren. Dadurch erfasst es den Kontext, den die reine Textreihenfolge oft nicht vermittelt, wesentlich besser. Dies ist gerade bei den komplexen und variantenreichen Layouts von Geschäftsberichten ein großer Vorteil. Gepaart mit dem langen Kontextfenster, das die Analyse umfangreicher Dokumentabschnitte am Stück erlaubt, ist dies ein entscheidender Fortschritt.</p>

<p>Diese Kombination aus guter Qualität, hoher Geschwindigkeit, niedrigen Kosten und der Fähigkeit, Dokumente ganzheitlich zu verstehen, machte Gemini 2.0 Flash Lite zur guten Wahl für unseren produktiven Einsatz in Zusammenarbeit mit North Data.</p>

<h3 id="gemini-flash-in-aktion-der-workflow-mit-structured-outputs">Gemini Flash in Aktion: Der Workflow mit Structured Outputs</h3>

<p>Der Kern unseres Ansatzes kombiniert die Stärken von Gemini mit pragmatischen Lösungen, um auch mit den Eigenheiten sehr umfangreicher Dokumente umzugehen.</p>

<p>Ein zentrales Problem stellen <strong>lange Geschäftsberichte</strong> dar, die oft hunderte von Seiten umfassen. Das gesamte Dokument an Gemini zu übergeben, wäre zwar ideal für den Kontext, ist aber zu teuer für den Masseneinsatz. Um dieses Problem zu umgehen, haben wir einen mehrstufigen Ansatz entwickelt: Zuerst setzen wir nach wie vor auf bewährte <strong>OCR-Technologie</strong>, um den reinen Text des gesamten Dokuments zu extrahieren. Dieser Rohtext dient uns dann als Basis für eine schnelle <strong>Voranalyse mittels Schlüsselwörtern</strong>. Wir suchen nach Begriffen und Phrasen, die typischerweise auf relevante Abschnitte hindeuten, wie zum Beispiel „Consolidated Balance Sheet“, „Income Statement“ oder „Notes to the Financial Statements“.</p>

<p>Basierend auf dieser Analyse wählen wir die <strong>bis zu 100 Seiten</strong> aus, die am wahrscheinlichsten die gesuchten Finanzkennzahlen enthalten. <em>Nur dieser Auszug</em> des Berichts wird dann als PDF-Kontext an Gemini Flash Lite übergeben. Dieser Kniff reduziert nicht nur die Verarbeitungskosten erheblich, sondern hilft auch, das Modell auf die wirklich wichtigen Teile des Dokuments zu konzentrieren und das „Rauschen“ irrelevanter Seiten zu minimieren.</p>

<p>Nachdem wir die relevanten Seiten isoliert haben, beauftragen wir Gemini mit der gezielten Extraktion in ein vordefiniertes Format. Ein weiterer Baustein für präzise Ergebnisse ist hierbei die Nutzung von sogenannten <strong>Structured Outputs</strong>. Gemini besitzt die Fähigkeit, nicht nur Text zu generieren, sondern direkt strukturierte JSON-Daten zu liefern, die einem vorgegebenen Schema folgen.</p>

<p>Wir definieren dazu im Vorfeld ein klares Zielschema, das genau festlegt, welche Datenfelder wir erwarten und in welchem Format (wie etwa „Zahl“, „Text“, „Währungssymbol“). In Python nutzen wir dafür gerne Pydantic zur einfachen Definition und Validierung. Diese Struktur geben wir dem Modell explizit als Anweisung mit. Das ist nicht nur praktisch für die automatisierte Weiterverarbeitung, sondern verbessert auch nachweislich die Qualität: In unseren Tests führte allein dieser Schritt zu einer <strong>Verbesserung des Evaluations-Ergebnisses um rund 4 %</strong>.</p>

<p>Hier ein vereinfachtes Python-Beispiel zur Illustration des Prinzips mit der <code class="language-plaintext highlighter-rouge">google-genai</code> -Bibliothek und Structured Outputs:</p>

<div class="language-python highlighter-rouge"><div class="highlight"><pre class="highlight"><code><span class="kn">from</span> <span class="nn">google</span> <span class="kn">import</span> <span class="n">genai</span>
<span class="kn">from</span> <span class="nn">google.genai</span> <span class="kn">import</span> <span class="n">types</span>
<span class="kn">from</span> <span class="nn">pydantic</span> <span class="kn">import</span> <span class="n">BaseModel</span><span class="p">,</span> <span class="n">Field</span>


<span class="n">client</span> <span class="o">=</span> <span class="n">genai</span><span class="p">.</span><span class="n">Client</span><span class="p">(</span><span class="n">api_key</span><span class="o">=</span><span class="s">"GEMINI_API_KEY"</span><span class="p">)</span>


<span class="c1"># Define the desired output structure using Pydantic
</span><span class="k">class</span> <span class="nc">FinancialData</span><span class="p">(</span><span class="n">BaseModel</span><span class="p">):</span>
    <span class="n">revenue</span><span class="p">:</span> <span class="nb">float</span> <span class="o">|</span> <span class="bp">None</span> <span class="o">=</span> <span class="n">Field</span><span class="p">(</span>
        <span class="n">description</span><span class="o">=</span><span class="s">"Total revenue reported for the fiscal year."</span>
    <span class="p">)</span>
    <span class="n">net_income</span><span class="p">:</span> <span class="nb">float</span> <span class="o">|</span> <span class="bp">None</span> <span class="o">=</span> <span class="n">Field</span><span class="p">(</span><span class="n">description</span><span class="o">=</span><span class="s">"Net income or profit after tax."</span><span class="p">)</span>
    <span class="n">total_assets</span><span class="p">:</span> <span class="nb">float</span> <span class="o">|</span> <span class="bp">None</span> <span class="o">=</span> <span class="n">Field</span><span class="p">(</span><span class="n">description</span><span class="o">=</span><span class="s">"Total assets value."</span><span class="p">)</span>
    <span class="n">fiscal_year</span><span class="p">:</span> <span class="nb">int</span> <span class="o">|</span> <span class="bp">None</span> <span class="o">=</span> <span class="n">Field</span><span class="p">(</span><span class="n">description</span><span class="o">=</span><span class="s">"The ending year of the fiscal period."</span><span class="p">)</span>
    <span class="n">currency_symbol</span><span class="p">:</span> <span class="nb">str</span> <span class="o">|</span> <span class="bp">None</span> <span class="o">=</span> <span class="n">Field</span><span class="p">(</span>
        <span class="n">description</span><span class="o">=</span><span class="s">"Currency symbol used for major values (e.g., $, £, €)."</span>
    <span class="p">)</span>


<span class="c1"># Upload the relevant PDF pages (assuming 'selected_report_pages.pdf' was created by pre-filtering)
</span><span class="n">pdf_file</span> <span class="o">=</span> <span class="n">client</span><span class="p">.</span><span class="n">files</span><span class="p">.</span><span class="n">upload</span><span class="p">(</span><span class="nb">file</span><span class="o">=</span><span class="s">"'selected_report_pages.pdf"</span><span class="p">)</span>

<span class="n">prompt</span> <span class="o">=</span> <span class="s">"""
Please analyze the provided pages from the annual report PDF.
Extract the following financial figures for the main consolidated entity reported:
- Total Revenue
- Net Income (Profit after tax)
- Total Assets
- The Fiscal Year End
- The primary Currency Symbol used for the main financial figures (£, $, € etc.)

Return the data strictly adhering to the provided 'FinancialData' schema.
If a value cannot be found or determined confidently, leave the corresponding field null.
Pay close attention to units (e.g., thousands, millions).
"""</span>

<span class="k">try</span><span class="p">:</span>
    <span class="n">response</span> <span class="o">=</span> <span class="n">client</span><span class="p">.</span><span class="n">models</span><span class="p">.</span><span class="n">generate_content</span><span class="p">(</span>
        <span class="n">model</span><span class="o">=</span><span class="s">"gemini-2.0-flash-lite-001"</span><span class="p">,</span>
        <span class="n">contents</span><span class="o">=</span><span class="p">[</span><span class="n">prompt</span><span class="p">,</span> <span class="n">pdf_file</span><span class="p">],</span>
        <span class="n">config</span><span class="o">=</span><span class="n">types</span><span class="p">.</span><span class="n">GenerateContentConfig</span><span class="p">(</span>
            <span class="n">response_mime_type</span><span class="o">=</span><span class="s">"application/json"</span><span class="p">,</span>
            <span class="n">response_schema</span><span class="o">=</span><span class="n">FinancialData</span><span class="p">,</span>
        <span class="p">),</span>
    <span class="p">)</span>
    <span class="n">extracted_data</span> <span class="o">=</span> <span class="n">FinancialData</span><span class="p">.</span><span class="n">model_validate_json</span><span class="p">(</span><span class="n">response</span><span class="p">.</span><span class="n">text</span><span class="p">)</span>
    <span class="k">print</span><span class="p">(</span><span class="n">extracted_data</span><span class="p">)</span>

<span class="k">except</span> <span class="nb">Exception</span> <span class="k">as</span> <span class="n">e</span><span class="p">:</span>
    <span class="k">print</span><span class="p">(</span><span class="sa">f</span><span class="s">"</span><span class="se">\n</span><span class="s">An error occurred: </span><span class="si">{</span><span class="n">e</span><span class="si">}</span><span class="s">"</span><span class="p">)</span>

<span class="k">finally</span><span class="p">:</span>
    <span class="n">client</span><span class="p">.</span><span class="n">files</span><span class="p">.</span><span class="n">delete</span><span class="p">(</span><span class="n">name</span><span class="o">=</span><span class="n">pdf_file</span><span class="p">.</span><span class="n">name</span><span class="p">)</span>
</code></pre></div></div>

<h3 id="ein-blick-auf-die-zahlen-wie-gut-funktioniert-es-wirklich">Ein Blick auf die Zahlen: Wie gut funktioniert es wirklich?</h3>

<p>Um die tatsächliche Leistung unseres Ansatzes mit Gemini Flash objektiv zu bewerten, haben wir, wie erwähnt, einen Datensatz aus 100 manuell annotierten Geschäftsberichten erstellt. Dieser dient als Ground Truth, gegen den wir die Extraktionsergebnisse des Modells prüfen.</p>

<p>Die Gesamtgenauigkeit über alle Kennzahlen und Berichte hinweg für unseren Ansatz lag bei <strong>83,5 %</strong>. Dies waren die ersten Machbarkeitswerte für die Lösung, die wir bei North Data integriert haben. Das ist eine solide Basis und zeigt, dass der Ansatz grundsätzlich funktioniert. Interessanter wird es jedoch, wenn man sich die Genauigkeit für einzelne Kennzahlen ansieht:</p>

<table>
  <thead>
    <tr>
      <th><strong>Kennzahlen (Parameter)</strong></th>
      <th><strong>Genauigkeit</strong></th>
    </tr>
  </thead>
  <tbody>
    <tr>
      <td><strong>Gesamt (Overall)</strong></td>
      <td><strong>83.5%</strong></td>
    </tr>
    <tr>
      <td>capital</td>
      <td>96.0%</td>
    </tr>
    <tr>
      <td>cash</td>
      <td>95.0%</td>
    </tr>
    <tr>
      <td>employees</td>
      <td>95.0%</td>
    </tr>
    <tr>
      <td>revenue</td>
      <td>95.0%</td>
    </tr>
    <tr>
      <td>equity</td>
      <td>98.0%</td>
    </tr>
    <tr>
      <td>currencySymbol</td>
      <td>99.0%</td>
    </tr>
    <tr>
      <td>auditorName</td>
      <td>89.0%</td>
    </tr>
    <tr>
      <td>materials</td>
      <td>89.0%</td>
    </tr>
    <tr>
      <td>…</td>
      <td>…</td>
    </tr>
    <tr>
      <td>liabilities (creditors)</td>
      <td>75.0%</td>
    </tr>
    <tr>
      <td>currentAssets</td>
      <td>64.0%</td>
    </tr>
    <tr>
      <td>realEstate</td>
      <td>60.0%</td>
    </tr>
    <tr>
      <td>receivables</td>
      <td>52.0%</td>
    </tr>
    <tr>
      <td>tax</td>
      <td>41.0%</td>
    </tr>
  </tbody>
</table>

<h3 id="was-verrät-uns-diese-tabelle-und-wo-liegen-die-aktuellen-hürden">Was verrät uns diese Tabelle und wo liegen die aktuellen Hürden?</h3>

<p>Die Evaluationsergebnisse zeichnen ein klares Bild: Bei <strong>klar definierten Stammdaten oder Werten</strong>, die in Geschäftsberichten oft prominent und relativ einheitlich ausgewiesen werden, erzielt das Modell sehr hohe Genauigkeitswerte. Dazu zählen beispielsweise <code class="language-plaintext highlighter-rouge">capital</code> (Eigenkapital), <code class="language-plaintext highlighter-rouge">equity</code> (Reinvermögen), die <code class="language-plaintext highlighter-rouge">employees</code> (Anzahl der Mitarbeiter), <code class="language-plaintext highlighter-rouge">cash</code> (Barmittel) oder das <code class="language-plaintext highlighter-rouge">currencySymbol</code> (Währungssymbol). Erfreulicherweise sind <strong>Halluzinationen</strong> – also das Erfinden von Zahlen, die im Dokument nicht existieren – in unseren Tests kein signifikantes Problem gewesen. Wenn Fehler auftraten, dann meist durch Fehlinterpretationen vorhandener Zahlen, nicht durch deren freie Erfindung.</p>

<p>Schwieriger wird es für das Modell bei komplexeren Kennzahlen. Hier zeigen sich die Grenzen des aktuellen Ansatzes, insbesondere wenn es um <strong>semantische Unschärfe</strong> und variierende Detailgrade geht. Viele Bilanzposten können in Berichten unterschiedlich definiert, benannt oder aufgeschlüsselt sein. Begriffe wie „Total Assets“ sind nicht immer absolut eindeutig – meint es die Bilanzsumme vor oder nach Abzug bestimmter Posten wie Goodwill, also den immateriellen Firmenwert?</p>

<p>Die genaue Abgrenzung von <code class="language-plaintext highlighter-rouge">currentAssets</code> (kurzfristige Vermögenswerte), <code class="language-plaintext highlighter-rouge">receivables</code> (Forderungen) oder <code class="language-plaintext highlighter-rouge">liabilities</code> (Verbindlichkeiten) variiert zwischen Unternehmen und Berichtsstandards. Hier stößt das Modell manchmal an seine Grenzen, die exakte, im jeweiligen Bericht gültige Definition allein aus dem unmittelbaren Kontext zu erschließen.</p>

<p>Ebenso spielt die <strong>Abhängigkeit von Layouts</strong> und der Platzierung von Informationen eine Rolle. Einige Werte, wie beispielsweise <code class="language-plaintext highlighter-rouge">realEstate</code> (Immobilienvermögen), sind oft nicht prominent auf den Hauptseiten der Bilanz zu finden, sondern detailliert in den „Notes to the Financial Statements“ (Anhang) versteckt. Die Fähigkeit des Modells, solche Informationen über verschiedene Seiten und Layouts hinweg korrekt zuzuordnen, ist stark gefordert und führt zu niedrigeren Genauigkeitswerten.</p>

<p>Schließlich erfordern manche Kennzahlen <strong>komplexere Interpretationen oder implizite Berechnungen</strong>. Die Extraktion von Werten wie <code class="language-plaintext highlighter-rouge">tax</code> (Steuern) ist hierfür ein gutes Beispiel. Oft spielen verschiedene Steuerarten (Ertragssteuern, Umsatzsteuern etc.) und latente Steuern eine Rolle, die über mehrere Abschnitte verteilt sein können. Die korrekte Zusammenführung und Interpretation dieser Informationen sind anspruchsvoll, was die aktuelle Genauigkeit von nur 41 % für diese Kennzahl erklärt.</p>

<p>Diese quantitativen Ergebnisse bestätigen unsere qualitativen Beobachtungen: Das Modell ist hervorragend darin, klar benannte Informationen zu finden. Bei Mehrdeutigkeiten, stark variierenden oder komplexen Layouts und der Notwendigkeit, implizites Wissen oder Zusammenhänge über mehrere Textstellen hinweg zu verstehen, stößt es jedoch an Grenzen.</p>

<p>Ein weiterer wichtiger Aspekt ist die <strong>variierende Genauigkeit zwischen verschiedenen Unternehmen</strong>. Die Standardabweichung der Genauigkeit pro Unternehmen liegt bei etwa 9,2 %. Besonders auffällig ist, dass die Genauigkeit bei den sehr großen, oft hunderte Seiten umfassenden und individuell gestalteten Berichten von börsennotierten Unternehmen (PLCs) wie AstraZeneca (50 %), Barclays (65 %), HSBC (50 %), Shell (70 %) oder Unilever (55 %) teilweise deutlich abfällt.</p>

<p>Tests mit unterschiedlich langen Ausschnitten aus den Berichten zeigten, dass die Länge des zu bewältigenden Kontextes für Gemini keine größere Schwierigkeit darstellt. Wir gehen daher davon aus, dass vor allem die Einzigartigkeit der Berichtsstrukturen dieser Konzerne für das Modell herausfordernd sind. Während Gemini Flash Lite gut mit Layouts zurechtkommt, die oft von kleineren Unternehmen mit Standardsoftware erstellt werden, sind diese komplexen Fälle eine größere Hürde. Eine Erklärung könnte sein, dass es die vom Standard abweichenden Berichte seltener in Geminis Trainingsdaten geschafft haben.</p>

<p>Ein weiteres wiederkehrendes Problem ist die korrekte Erfassung von <strong>Einheiten und Skalierungen</strong>. Das Übersehen oder die Fehlinterpretation von Angaben wie „in Tausend £“ oder „Millions USD“ führt zu extrahierten Werten, die um Faktoren von 1.000 oder 1.000.000 falsch sind. Hier sind robuste nachgelagerte Validierungsregeln und gezieltes Prompting notwendig, um das Modell für diese Details zu sensibilisieren.</p>

<p>Auch die Darstellung <strong>negativer Zahlen</strong>, die in Geschäftsberichten oft durch Klammern erfolgt (z.B. „(1.234)“ statt „-1.234“), erfordert einen expliziten Hinweis im Prompt, damit das Modell diese Konvention korrekt interpretiert und die Zahlen mit dem richtigen Vorzeichen extrahiert. Wie bereits gesagt stellen Halluzinationen (im Gegensatz zu älteren Modellen) hier keine großen Probleme dar, bloß die Interpretation der Zahlen gelingt nicht immer.</p>

<p>Zu guter Letzt stehen wir auch vor dem klassischen Trade-off zwischen Kosten und Leistung bei besonders komplexen Fällen. Anspruchsvollere Reasoning-Ansätze wie Chain-of-Thought (CoT), bei denen das Modell seine „Gedankenschritte“ explizit macht, oder der Einsatz noch größerer und leistungsfähigerer Modelle (z.B. Gemini 2.5 Pro) könnten bei den genannten Problemen, insbesondere bei den komplexen Berichten, Abhilfe schaffen.</p>

<p>Diese sind jedoch aktuell oft noch deutlich teurer. So ist beispielsweise <strong>Gemini 2.5 Pro derzeit 16- bis 32-mal so teuer wie das von uns genutzte Gemini 2.0 Flash Lite</strong>. Auch das sehr gängige GPT-4.1, welches in ChatGPT zum Einsatz kommt, kostet mit 2 $ pro 1 Million Input Tokens ca. 27-mal so viel wie Gemini 2.0 Flash Lite. Die Verarbeitung eines durchschnittlichen Berichts aus unserem Testdatensatz mit 30 Seiten kostet mit unserer Lösung daher nur ca. 0,0007 $!</p>

<h3 id="fazit-gemini-flash-als-leistungsstarke-ergänzung-im-werkzeugkasten">Fazit: Gemini Flash als leistungsstarke Ergänzung im Werkzeugkasten</h3>

<p>Gemini Flash hat sich für uns als nützlicher Baustein erwiesen, um die Extraktion strukturierter Daten aus Geschäftsberichten auf ein neues Level zu heben und in den produktiven Einsatz bei North Data zu bringen. Es ersetzt nicht zwangsläufig die gesamte klassische Pipeline (wie unsere OCR-Vorfilterung zeigt), aber es bietet eine enorm leistungsfähige, integrierte Alternative für den Kernprozess der intelligenten Datenextraktion und -strukturierung.</p>

<p>Die Fähigkeit, Layouts zu verstehen, über einen größeren Kontext zu arbeiten und direkt strukturierte Outputs zu liefern, reduziert die Komplexität und den Wartungsaufwand im Vergleich zu traditionellen, mehrstufigen Ansätzen erheblich. Die Herausforderungen bleiben, aber der Fortschritt ist deutlich und eröffnet neue Möglichkeiten für die automatisierte Finanzdatenanalyse.</p>

<p>Wir sind gespannt, wie sich diese Technologie weiterentwickelt und welche neuen Lösungsansätze sich ergeben. Habt ihr ähnliche Erfahrungen gemacht oder andere Strategien entwickelt? Teilt eure Gedanken mit uns!</p>

<p><em>Dieser Blogpost wurde mit Unterstützung von Gemini-2.5-Pro geschrieben.</em></p>

<div class="footnotes" role="doc-endnotes">
  <ol>
    <li id="fn:1">
      <p><a href="https://getomni.ai/ocr-benchmark" target="_blank">OmniAI OCR Benchmark</a>, abgerufen am 17.06.25 <a href="#fnref:1" class="reversefootnote" role="doc-backlink">&#8617;</a></p>
    </li>
    <li id="fn:2">
      <p><a href="https://blog.cronn.de/de/ai/largelanguagemodels/2023/07/26/analyse-von-geschaeftsberichten-mit-chatgpt-1.html" target="_blank">cronn Blog: Analyse von Geschäftsberichten mit ChatGPT – Teil 1</a> <a href="#fnref:2" class="reversefootnote" role="doc-backlink">&#8617;</a></p>
    </li>
    <li id="fn:3">
      <p><a href="https://cloud.google.com/vertex-ai/generative-ai/docs/models/gemini/2-0-flash-lite?hl=de" target="_blank">Dokumentation Google Gemini 2.0 Flash-Lite</a>, abgerufen am 17.06.25 <a href="#fnref:3" class="reversefootnote" role="doc-backlink">&#8617;</a></p>
    </li>
    <li id="fn:4">
      <p><a href="https://web.archive.org/web/20230614104237/https://openai.com/pricing" target="_blank">Web Archive: OpenAI-Preise vom 14. Juni 2023</a>, abgerufen am 17.06.25 <a href="#fnref:4" class="reversefootnote" role="doc-backlink">&#8617;</a></p>
    </li>
    <li id="fn:5">
      <p><a href="https://ai.google.dev/gemini-api/docs/pricing?hl=de" target="_blank">Preise für die Gemini Developer API</a>, abgerufen am 17.06.25 <a href="#fnref:5" class="reversefootnote" role="doc-backlink">&#8617;</a></p>
    </li>
  </ol>
</div>]]></content><author><name>leonardThiele</name></author><category term="de" /><category term="ai" /><category term="largelanguagemodels" /><summary type="html"><![CDATA[Wir zeigen einen KI-Use-Case im Einsatz: Extraktion von Kennzahlen aus Geschäftsberichten mittels LLM.]]></summary></entry><entry xml:lang="en"><title type="html">Analyzing Business Reports with LLMs – Part 2</title><link href="https://blog.cronn.de/en/ai/largelanguagemodels/2025/06/24/analyse-von-geschaeftsberichten-mit-llms-2-en.html" rel="alternate" type="text/html" title="Analyzing Business Reports with LLMs – Part 2" /><published>2025-06-24T00:00:00+00:00</published><updated>2025-06-24T00:00:00+00:00</updated><id>https://blog.cronn.de/en/ai/largelanguagemodels/2025/06/24/analyse-von-geschaeftsberichten-mit-llms-2-en</id><content type="html" xml:base="https://blog.cronn.de/en/ai/largelanguagemodels/2025/06/24/analyse-von-geschaeftsberichten-mit-llms-2-en.html"><![CDATA[<p>Welcome back to our series on analysing annual reports with AI. In <a href="https://blog.cronn.de/en/ai/largelanguagemodels/2023/07/26/analyzing-business-reports-with-chatgpt-part1.html">Part One</a> we showed how the extraction of key figures from annual reports with LLMs (such as ChatGPT) works. Now we are going deeper and showing the final working solution, which we are using in cooperation with North Data.</p>

<p>We have already demonstrated how relevant information can be filtered out of the dense text of annual reports in a structured way. But if you want to scale this process in practice, you quickly reach its limits – be it in terms of accuracy across many different documents, the robust processing of complex layouts and tables, or the cost-effectiveness of large-scale analysis.</p>

<p>This is exactly where there have been many exciting developments. With <strong>Gemini Flash</strong> from Google, a model is available which reshuffles the cards for automated document analysis in terms of speed, contextual understanding, and the delivery of structured data.<sup id="fnref:1"><a href="#fn:1" class="footnote" rel="footnote" role="doc-noteref">1</a></sup> In this second part, we will ask: what makes Gemini Flash so more powerful for this specific task than previous approaches or the classic OCR pipelines? How does it make the step from feasibility study to productive tool? Let us look under the hood.</p>

<figure>
<img data-src="/img/posts/Analyse-von-Geschaeftsberichten-2-northdata-grafik.webp" class="lazyload img-fluid img-feature" alt="On the left side: Unstructured sample documents; in the centre an arrow pointing to the right, labelled ‘AI’; the arrow points to JSON code." />
<figcaption class="long-fig-caption"> Gemini extracts structured JSON code from PDFs. </figcaption>
</figure>

<h3 id="the-classic-approach-ocr-as-the-basis-but-not-the-whole-solution">The classic approach: OCR as the basis, but not the whole solution</h3>
<p>Before we dive into Gemini’s capabilities, it is worth looking at the traditional way of extracting data from PDFs. This most commonly starts with <strong>Optical Character Recognition (OCR)</strong>. OCR tools generate text from scanned documents or image-only PDFs by converting pixels into letters. The result is not only the raw text content, but often also its position on the page, usually in the form of coordinates or so-called bounding boxes for each recognized word or line.</p>

<figure>
<img data-src="/img/posts/Analyse-von-Geschaeftsberichten-2-table.webp" class="lazyload img-fluid img-feature" alt="In an example table (‘Balance sheet’), terms and figures are marked with bounding boxes." />
<figcaption class="long-fig-caption"> OCR Bounding Boxes from Azure Document Intelligence. </figcaption>
</figure>

<p>However, for a meaningful analysis we need <em>structured</em> data, not continuous text. This is where the challenges begin.</p>

<p>The first hurdle lays in the structure in the pure text output being recognized. How do you automatically identify tables, related key-value pairs (such as “revenue: €10 million”) or semantically meaningful blocks? This often requires complex, downstream steps – whether purpose-built parsers, rule-based systems that look for specific patterns, or even separate machine learning models trained on tasks such as table recognition.</p>

<p>However, these downstream systems are often <strong>susceptible to layout changes</strong>. Small adjustments in the design of a report from one year to the next or the format differing between companies can throw off painstakingly created rules or parsers and make them unusable.</p>

<p>In addition, there is a lack of <strong>contextual understanding</strong>. OCR provides the text but does not understand its meaning. Recognizing that the term “Total Assets” on page 10 refers to the same metric as a detailed breakdown in a table on page 45 is beyond the capabilities of pure text recognition.</p>

<p>All these factors create complexity and thus lead to a <strong>high development and maintenance effort</strong>. It can be said that OCR is a valuable tool, but for the <strong>extraction of <em>structured</em> data</strong> it is usually only the first step in a complex and often fragile processing chain.</p>

<h3 id="our-path-to-productive-use-evaluation-model-selection-and-integration">Our path to productive use: evaluation, model selection and integration</h3>

<p>The leap from successful demonstration (as shown in Part 1<sup id="fnref:2"><a href="#fn:2" class="footnote" rel="footnote" role="doc-noteref">2</a></sup>) to a reliable, scalable production system required a systematic approach and further developments in several areas.</p>

<p>Firstly, a <strong>solid evaluation</strong> was essential. To this end we manually curated a dataset of 100 representative English annual reports. For the most important key figures, the correct values (ground truth) were annotated by hand and collected in a table. Only with such a reliable basis can the quality of different models and approaches be objectively measured and tracked over time.</p>

<p>Secondly, we significantly expanded the scope of extraction. Instead of just a few key figures, the goal was now to reliably extract a wide range of over 20 relevant values per report. This includes, among other things, the wage costs, information on profit and loss, cash flow, but also data such as the average number of employees or the name of the auditor.</p>

<p>These more demanding goals led us to test different models. In the end, the choice fell on <strong>Gemini 2.0 Flash Lite</strong>: This model optimally combined all the decisive factors for our application.</p>

<figure>
<img data-src="/img/posts/Analyse-von-Geschäftsberichten-2-graph.webp" class="lazyload img-fluid img-feature" alt="Graph, Y-axis: Artificial Analysis Intelligence Index, 0 to 75; X-axis: Price (USD per M tokens), 0 - 8 USD; the graph is divided into four quadrants, Gemini alone is in the upper left quadrant (score 70.49, 3.44 USD); all other models are significantly more expensive or perform worse in the Intelligence Score." />
<figcaption class="long-fig-caption"> LLM comparison based on the parameters "intelligence" and "price", via  <a href="https://artificialanalysis.ai/models?models=llama-4-maverick%2Cllama-4-scout%2Cgemini-2-0-flash-lite-001%2Cgemini-2-5-pro%2Cclaude-3-5-haiku%2Cclaude-3-7-sonnet-thinking%2Cpixtral-large-2411%2Cgrok-3%2Cgpt-4o-chatgpt-03-25%2Cgemini-1-5-pro#intelligence-vs-price" target="_blank">artificialanalysis.ai</a>. </figcaption>
</figure>

<p><strong>Quality &amp; Speed:</strong> In our tests, Gemini 2.0 Flash Lite showed high accuracy for most of the targeted metrics, often keeping up with that of larger, more expensive models. Google itself positions the Flash models as optimized for tasks where it is important to maintain high speed and efficiency while maintaining high quality <sup id="fnref:3"><a href="#fn:3" class="footnote" rel="footnote" role="doc-noteref">3</a></sup>. Our experience confirms that the model lives up to its “flash” in its name in terms of processing speed.</p>

<p><strong>Cost:</strong> A decisive factor for large-scale deployment is cost. Gemini 2.0 Flash Lite is significantly cheaper than the larger Pro models. Compared to older models like gpt-3.5-turbo-16k, which still cost about $3 per million input tokens in July 2023 <sup id="fnref:4"><a href="#fn:4" class="footnote" rel="footnote" role="doc-noteref">4</a></sup>, the Gemini Flash variant we used is cheaper by a factor of 40 <sup id="fnref:5"><a href="#fn:5" class="footnote" rel="footnote" role="doc-noteref">5</a></sup>! This makes the processing of thousands of reports economically viable.</p>

<p><strong>Multimodality &amp; Context:</strong> A significant advantage over plain text models or classic OCR pipelines is Gemini’s multimodality. Put simply, instead of just delivering the raw text and its coordinates (like traditional OCR), Gemini Flash can “read” the text and “see” the page layout at the same time. It “understands” how text is arranged in columns or tables, recognizes headings, and can interpret images or charts in the document. As a result, it is better at capturing context which the pure text order often does not convey. This is a great advantage, especially with the complex and varied layouts of annual reports. Coupled with the long context window, which allows the analysis of large document sections in one go, this is a decisive step forward.</p>

<p>This combination of good quality, high speed, low cost, and the ability to understand documents holistically made Gemini 2.0 Flash Lite a viable choice for our productive deployment in collaboration with North Data.</p>

<h3 id="gemini-flash-in-action-the-workflow-with-structured-outputs">Gemini Flash in Action: The Workflow with Structured Outputs</h3>

<p>The core of our approach combines the strengths of Gemini with pragmatic solutions to deal with the peculiarities of large documents.</p>

<p>A central problem with annual reports is that they often comprise hundreds of pages. While handing over the entire document to Gemini would be ideal for context, it is too expensive for mass use. To get around this problem, we have developed a multi-step approach: First, we still rely on proven <strong>OCR technology</strong> to extract the plain text of the entire document. This raw text then serves as the basis for a quick <strong>preliminary analysis</strong> using keywords. We look for terms and phrases that typically indicate relevant sections, such as “Consolidated Balance Sheet”, “Income Statement” or “Notes to the Financial Statements”.</p>

<p>Based on this analysis we then select the <strong>up to 100 pages</strong> that are most likely to contain the financial ratios we are looking for. <em>Only this selection</em> is then passed on to Gemini Flash Lite as a PDF context. This trick not only significantly reduces processing costs but also helps to focus the model on the important parts of the document and minimize the “noise” of irrelevant pages.</p>

<p>After isolating the relevant pages, we commission Gemini to extract them into a predefined format. Another building block for precise results is the use of so-called <strong>structured outputs</strong>. Gemini can not only generate text but also provides directly structured JSON data which follows a predetermined scheme.</p>

<p>To do this, we define a clear target scheme in advance, which in turn defines exactly which data fields we expect and in which format (such as “number”, “text”, “currency symbol”). In Python, we like to use Pydantic for easy definition and validation. We explicitly give this structure to the model as an instruction. This is not only practical for automated further processing, but also demonstrably improves quality: In our tests, this step alone led to an <strong>improvement in the evaluation result of around 4%</strong>.</p>

<p>Here is a simplified Python example to illustrate the principle with the <code class="language-plaintext highlighter-rouge">google-genai</code> library and structured outputs:</p>

<div class="language-python highlighter-rouge"><div class="highlight"><pre class="highlight"><code><span class="kn">from</span> <span class="nn">google</span> <span class="kn">import</span> <span class="n">genai</span>
<span class="kn">from</span> <span class="nn">google.genai</span> <span class="kn">import</span> <span class="n">types</span>
<span class="kn">from</span> <span class="nn">pydantic</span> <span class="kn">import</span> <span class="n">BaseModel</span><span class="p">,</span> <span class="n">Field</span>


<span class="n">client</span> <span class="o">=</span> <span class="n">genai</span><span class="p">.</span><span class="n">Client</span><span class="p">(</span><span class="n">api_key</span><span class="o">=</span><span class="s">"GEMINI_API_KEY"</span><span class="p">)</span>


<span class="c1"># Define the desired output structure using Pydantic
</span><span class="k">class</span> <span class="nc">FinancialData</span><span class="p">(</span><span class="n">BaseModel</span><span class="p">):</span>
    <span class="n">revenue</span><span class="p">:</span> <span class="nb">float</span> <span class="o">|</span> <span class="bp">None</span> <span class="o">=</span> <span class="n">Field</span><span class="p">(</span>
        <span class="n">description</span><span class="o">=</span><span class="s">"Total revenue reported for the fiscal year."</span>
    <span class="p">)</span>
    <span class="n">net_income</span><span class="p">:</span> <span class="nb">float</span> <span class="o">|</span> <span class="bp">None</span> <span class="o">=</span> <span class="n">Field</span><span class="p">(</span><span class="n">description</span><span class="o">=</span><span class="s">"Net income or profit after tax."</span><span class="p">)</span>
    <span class="n">total_assets</span><span class="p">:</span> <span class="nb">float</span> <span class="o">|</span> <span class="bp">None</span> <span class="o">=</span> <span class="n">Field</span><span class="p">(</span><span class="n">description</span><span class="o">=</span><span class="s">"Total assets value."</span><span class="p">)</span>
    <span class="n">fiscal_year</span><span class="p">:</span> <span class="nb">int</span> <span class="o">|</span> <span class="bp">None</span> <span class="o">=</span> <span class="n">Field</span><span class="p">(</span><span class="n">description</span><span class="o">=</span><span class="s">"The ending year of the fiscal period."</span><span class="p">)</span>
    <span class="n">currency_symbol</span><span class="p">:</span> <span class="nb">str</span> <span class="o">|</span> <span class="bp">None</span> <span class="o">=</span> <span class="n">Field</span><span class="p">(</span>
        <span class="n">description</span><span class="o">=</span><span class="s">"Currency symbol used for major values (e.g., $, £, €)."</span>
    <span class="p">)</span>


<span class="c1"># Upload the relevant PDF pages (assuming 'selected_report_pages.pdf' was created by pre-filtering)
</span><span class="n">pdf_file</span> <span class="o">=</span> <span class="n">client</span><span class="p">.</span><span class="n">files</span><span class="p">.</span><span class="n">upload</span><span class="p">(</span><span class="nb">file</span><span class="o">=</span><span class="s">"'selected_report_pages.pdf"</span><span class="p">)</span>

<span class="n">prompt</span> <span class="o">=</span> <span class="s">"""
Please analyze the provided pages from the annual report PDF.
Extract the following financial figures for the main consolidated entity reported:
- Total Revenue
- Net Income (Profit after tax)
- Total Assets
- The Fiscal Year End
- The primary Currency Symbol used for the main financial figures (£, $, € etc.)

Return the data strictly adhering to the provided 'FinancialData' schema.
If a value cannot be found or determined confidently, leave the corresponding field null.
Pay close attention to units (e.g., thousands, millions).
"""</span>

<span class="k">try</span><span class="p">:</span>
    <span class="n">response</span> <span class="o">=</span> <span class="n">client</span><span class="p">.</span><span class="n">models</span><span class="p">.</span><span class="n">generate_content</span><span class="p">(</span>
        <span class="n">model</span><span class="o">=</span><span class="s">"gemini-2.0-flash-lite-001"</span><span class="p">,</span>
        <span class="n">contents</span><span class="o">=</span><span class="p">[</span><span class="n">prompt</span><span class="p">,</span> <span class="n">pdf_file</span><span class="p">],</span>
        <span class="n">config</span><span class="o">=</span><span class="n">types</span><span class="p">.</span><span class="n">GenerateContentConfig</span><span class="p">(</span>
            <span class="n">response_mime_type</span><span class="o">=</span><span class="s">"application/json"</span><span class="p">,</span>
            <span class="n">response_schema</span><span class="o">=</span><span class="n">FinancialData</span><span class="p">,</span>
        <span class="p">),</span>
    <span class="p">)</span>
    <span class="n">extracted_data</span> <span class="o">=</span> <span class="n">FinancialData</span><span class="p">.</span><span class="n">model_validate_json</span><span class="p">(</span><span class="n">response</span><span class="p">.</span><span class="n">text</span><span class="p">)</span>
    <span class="k">print</span><span class="p">(</span><span class="n">extracted_data</span><span class="p">)</span>

<span class="k">except</span> <span class="nb">Exception</span> <span class="k">as</span> <span class="n">e</span><span class="p">:</span>
    <span class="k">print</span><span class="p">(</span><span class="sa">f</span><span class="s">"</span><span class="se">\n</span><span class="s">An error occurred: </span><span class="si">{</span><span class="n">e</span><span class="si">}</span><span class="s">"</span><span class="p">)</span>

<span class="k">finally</span><span class="p">:</span>
    <span class="n">client</span><span class="p">.</span><span class="n">files</span><span class="p">.</span><span class="n">delete</span><span class="p">(</span><span class="n">name</span><span class="o">=</span><span class="n">pdf_file</span><span class="p">.</span><span class="n">name</span><span class="p">)</span>
</code></pre></div></div>

<h3 id="a-look-at-the-numbers-how-well-does-it-really-work">A look at the numbers: How well does it really work?</h3>

<p>To objectively assess the actual performance of our approach with Gemini Flash, we created a dataset of 100 manually annotated business reports. This serves as ground truth against which we check the extraction results of the model.</p>

<p>The overall accuracy across all metrics and reports for our approach was <strong>83.5%</strong>. These were the first feasibility values for the solution we integrated at North Data. This is a solid basis which demonstrates that the approach works. However, it gets more interesting when you look at the accuracy for individual metrics:</p>

<table>
  <thead>
    <tr>
      <th><strong>Key figure (parameters)</strong></th>
      <th><strong>Accuracy</strong></th>
    </tr>
  </thead>
  <tbody>
    <tr>
      <td><strong>Overall</strong></td>
      <td><strong>83.5%</strong></td>
    </tr>
    <tr>
      <td>capital</td>
      <td>96.0%</td>
    </tr>
    <tr>
      <td>cash</td>
      <td>95.0%</td>
    </tr>
    <tr>
      <td>employees</td>
      <td>95.0%</td>
    </tr>
    <tr>
      <td>revenue</td>
      <td>95.0%</td>
    </tr>
    <tr>
      <td>equity</td>
      <td>98.0%</td>
    </tr>
    <tr>
      <td>currencySymbol</td>
      <td>99.0%</td>
    </tr>
    <tr>
      <td>auditorName</td>
      <td>89.0%</td>
    </tr>
    <tr>
      <td>materials</td>
      <td>89.0%</td>
    </tr>
    <tr>
      <td>…</td>
      <td>…</td>
    </tr>
    <tr>
      <td>liabilities (creditors)</td>
      <td>75.0%</td>
    </tr>
    <tr>
      <td>currentAssets</td>
      <td>64.0%</td>
    </tr>
    <tr>
      <td>realEstate</td>
      <td>60.0%</td>
    </tr>
    <tr>
      <td>receivables</td>
      <td>52.0%</td>
    </tr>
    <tr>
      <td>tax</td>
      <td>41.0%</td>
    </tr>
  </tbody>
</table>

<h3 id="what-does-this-table-tell-us-and-what-are-the-current-hurdles">What does this table tell us and what are the current hurdles?</h3>

<p>The results paint a clear picture: The model achieves remarkably high accuracy values for <strong>clearly defined master data or values</strong>, which are often prominently and relatively uniformly shown in annual reports. These include, for example, <code class="language-plaintext highlighter-rouge">capital</code>, <code class="language-plaintext highlighter-rouge">equity</code>, <code class="language-plaintext highlighter-rouge">employees</code>, <code class="language-plaintext highlighter-rouge">cash</code> or the <code class="language-plaintext highlighter-rouge">currency symbol</code>. Fortunately, <strong>hallucinations</strong> – for example inventing numbers that do not exist in the document – were not a significant problem in our tests. If errors occurred, it was usually due to misinterpretations of existing figures and not to their free invention.</p>

<p>It becomes more difficult for the model with more complex key figures. This is where the limitations of the current approach become apparent, especially when it comes to <strong>semantic fuzziness</strong> and varying levels of detail. Many balance sheet items can be defined, named, or broken down differently in reports. Terms such as “total assets” are not always clear – does it mean the balance sheet total before or after deduction of certain items such as goodwill, for example the intangible value?</p>

<p>The exact definition of <code class="language-plaintext highlighter-rouge">current assets</code>, <code class="language-plaintext highlighter-rouge">receivables</code> or liabilities varies between companies and reporting standards. This is where the model sometimes reaches its limits in deducing the exact definition valid in the respective report from the immediate context alone.</p>

<p>The <strong>dependence on layouts</strong> and the placement of information also plays a role. Some assets, such as <code class="language-plaintext highlighter-rouge">realEstate</code> (real estate assets), are often not prominently found on the main pages of the balance sheet but are hidden in detail in the “Notes to the Financial Statements” (Appendix). The model’s ability to correctly map such information across different pages and layouts is heavily challenged and results in lower accuracy scores.</p>

<p>Finally, some metrics require <strong>more complex interpretations or implicit calculations</strong>. The extraction of values such as <code class="language-plaintext highlighter-rouge">tax </code> is a good example of this. Different types of taxes (income taxes, sales taxes, etc.) and deferred taxes can often be spread over several sections. The correct aggregation and interpretation of this information is challenging, which explains the current accuracy of only 41% for this metric.</p>

<p>These quantitative results confirm our qualitative observations: the model is excellent at finding clearly labelled information. However, it reaches its limits when dealing with issues such as ambiguities in wording, widely varying or complex layouts, and the need to understand implicit knowledge or contexts across multiple text passages.</p>

<p>Another important aspect is the <strong>varying accuracy between different companies</strong>. The standard deviation of accuracy per company is about 9.2%. It is particularly striking that the accuracy of the large, individually designed reports from listed companies (PLCs) such as AstraZeneca (50%), Barclays (65%), HSBC (50%), Shell (70%) or Unilever (55%) tends to be significantly lower than average. Tests with excerpts of different lengths showed that the length of the context to be mastered is not a major difficulty for Gemini, we therefore assume that the uniqueness of the reporting structures of these groups is particularly challenging for the model. While Gemini Flash Lite handles layouts that are often created by smaller companies using off-the-shelf software, these complex cases are a bigger hurdle. One explanation could be that the reports that deviate from the standard rarely made it into Gemini’s training data.</p>

<p>Another recurring problem is the correct capture of <strong>units and scales</strong>. Missing or misinterpreting information such as “in thousands of £” or “millions of USD” will result in extracted values that are wrong by factors of 1,000 or 1,000,000. Here, robust downstream validation rules and targeted prompting are necessary to sensitize the model to these details.</p>

<p>The representation of <strong>negative numbers</strong>, which is often done by parentheses in annual reports (e.g. “(1.234)” instead of “-1.234”), also requires an explicit note in the prompt so that the model interprets this convention correctly and extracts the numbers with the correct sign. As already mentioned, hallucinations do not pose any major problems here (as it was with older models), it is the interpretation of the numbers that does not always succeed.</p>

<p>Finally, we are also faced with the classic trade-off between costs and performance in particularly complex cases. More sophisticated reasoning approaches such as Chain-of-Thought (CoT), in which the model makes its “thought steps” explicit, or the use of even larger and more powerful models (for example Gemini 2.5 Pro) could remedy the problems mentioned, especially when analysing the more complex reports.</p>

<p>However, these are currently often much more expensive. For example, <strong>Gemini 2.5 Pro is currently 16 to 32 times more expensive than the Gemini 2.0 Flash Lite we used</strong>. The common GPT-4.1, which is used in ChatGPT, also costs $2 per 1 million input tokens – about 27 times as much as Gemini 2.0 Flash Lite. Using our solution to process an average report from our 30-page test dataset costs only about $0.0007!</p>

<h3 id="conclusion-gemini-flash-as-a-powerful-addition-to-the-toolbox">Conclusion: Gemini Flash as a powerful addition to the toolbox</h3>

<p>Gemini Flash has proven to be a useful building block for us to take the extraction of structured data from annual reports to a new level and bring it into productive use at North Data. It does not necessarily replace the entire classic pipeline (as our OCR pre-filtering shows), but it does provide a powerful, integrated alternative to the core process of intelligent data extraction and structuring.</p>

<p>The ability to understand layouts, work within a larger context, and deliver structured outputs significantly reduces complexity and maintenance compared to traditional, multi-tiered approaches. The challenges remain, but the progress is clear and opens new opportunities for automated financial data analysis.</p>

<p>We are excited to see how this technology will develop further and what new solutions will emerge. Have you had similar experiences or developed different strategies? Share your thoughts with us!</p>

<p><em>This blog post was written with the support of Gemini 2.5 Pro.</em></p>

<div class="footnotes" role="doc-endnotes">
  <ol>
    <li id="fn:1">
      <p><a href="https://getomni.ai/ocr-benchmark" target="_blank">OmniAI OCR Benchmark</a>, retrieved 17/06/25 <a href="#fnref:1" class="reversefootnote" role="doc-backlink">&#8617;</a></p>
    </li>
    <li id="fn:2">
      <p><a href="https://blog.cronn.de/en/ai/largelanguagemodels/2023/07/26/analyzing-business-reports-with-chatgpt-part1.html" target="_blank">cronn Blog: Analyzing Business Reports with ChatGPT – Part I</a> <a href="#fnref:2" class="reversefootnote" role="doc-backlink">&#8617;</a></p>
    </li>
    <li id="fn:3">
      <p><a href="https://cloud.google.com/vertex-ai/generative-ai/docs/models/gemini/2-0-flash-lite?hl=de" target="_blank">Documentation Google Gemini 2.0 Flash-Lite</a>, retrieved 17/06/25 <a href="#fnref:3" class="reversefootnote" role="doc-backlink">&#8617;</a></p>
    </li>
    <li id="fn:4">
      <p><a href="https://web.archive.org/web/20230614104237/https://openai.com/pricing" target="_blank">Web Archive: OpenAI-Preise vom 14. Juni 2023</a>, retrieved 17/06/25 <a href="#fnref:4" class="reversefootnote" role="doc-backlink">&#8617;</a></p>
    </li>
    <li id="fn:5">
      <p><a href="https://ai.google.dev/gemini-api/docs/pricing?hl=de" target="_blank">Prices for Gemini Developer API</a>, retrieved 17/06/25 <a href="#fnref:5" class="reversefootnote" role="doc-backlink">&#8617;</a></p>
    </li>
  </ol>
</div>]]></content><author><name>leonardThiele</name></author><category term="en" /><category term="ai" /><category term="largelanguagemodels" /><summary type="html"><![CDATA[An AI use case in action: the extraction of key figures from annual reports using LLM.]]></summary></entry><entry xml:lang="en"><title type="html">Code Generation using Java Annotation Processing</title><link href="https://blog.cronn.de/en/java/codegeneration/2025/05/21/annotation-processing-code-generation.html" rel="alternate" type="text/html" title="Code Generation using Java Annotation Processing" /><published>2025-05-21T00:00:00+00:00</published><updated>2025-05-21T00:00:00+00:00</updated><id>https://blog.cronn.de/en/java/codegeneration/2025/05/21/annotation-processing-code-generation</id><content type="html" xml:base="https://blog.cronn.de/en/java/codegeneration/2025/05/21/annotation-processing-code-generation.html"><![CDATA[<h3 id="introduction-to-code-generation">Introduction to code generation</h3>

<p>Developers often find themselves confronted with writing the same type of simple code over and over again. Over time, some options were designed to reduce the time needed for writing trivial code. IDEs can automatically generate getters and setters or even apply custom templates that can be used for code generation. Elaborate tools like the OpenAPI Generator <sup id="fnref:openapi"><a href="#fn:openapi" class="footnote" rel="footnote" role="doc-noteref">1</a></sup> are able to create the groundwork for client and server code in REST-based communication by using the interface specification as input, and even more recently elaborate AIs have been launched with this purpose in mind. In general, there are two different types of generating code: one time generation, like the getter and setter creation from IDE, and continuous generation, like the OpenAPI generator. In the latter, a change of interface specification directly results in changes in the generated code, and thus specification and code remain in sync.</p>

<p>Java annotation processing, which was introduced in Java 1.6, is another example of continuous generation. The main idea is that a code generator operates on specific parts of the code which is marked by annotations. These annotations are then processed in the generator, where new code is generated based on the annotated code and the annotations themselves. One of the most prominent frameworks that incorporates annotation processing is Project Lombok <sup id="fnref:lombok"><a href="#fn:lombok" class="footnote" rel="footnote" role="doc-noteref">2</a></sup> which, among other features, has the option of generating getters and setters via annotation processing. The advantage of annotation processing is that the new methods are only created in the generated code and are not present in the actual versioned code, which in turn is more precise and contains less trivial boilerplate code. Furthermore, the generated code does not become obsolete and thus requires no maintenance.</p>

<h3 id="using-an-existing-annotation-processor">Using an existing annotation processor</h3>

<p>An annotation processor is in most cases already present if one is using third party libraries. The process of using it as code generator is easily described through the following example: suppose you want to map an object of type <code class="language-plaintext highlighter-rouge">Company</code> to its DTO <code class="language-plaintext highlighter-rouge">CompanyDto</code>. MapStruct <sup id="fnref:mapstruct"><a href="#fn:mapstruct" class="footnote" rel="footnote" role="doc-noteref">3</a></sup> enables simple mapping of different types through generated classes which are described by annotations on an interface used as base.</p>

<p>Let us look at a Definition of a MapStruct mapper for a Company object to <code class="language-plaintext highlighter-rouge">CompanyDto</code>:</p>

<div class="language-java highlighter-rouge"><div class="highlight"><pre class="highlight"><code><span class="c1">// File: CompanyMapper.java</span>
<span class="nd">@Mapper</span>
<span class="kd">public</span> <span class="kd">interface</span> <span class="nc">CompanyMapper</span> <span class="o">{</span>
	<span class="nc">CompanyMapper</span> <span class="no">INSTANCE</span> <span class="o">=</span> <span class="nc">Mappers</span><span class="o">.</span><span class="na">getMapper</span><span class="o">(</span><span class="nc">CompanyMapper</span><span class="o">.</span><span class="na">class</span><span class="o">);</span>

	<span class="nd">@Mapping</span><span class="o">(</span><span class="n">target</span> <span class="o">=</span> <span class="s">"companyName"</span><span class="o">,</span> <span class="n">source</span> <span class="o">=</span> <span class="s">"name"</span><span class="o">)</span>
	<span class="nd">@Mapping</span><span class="o">(</span><span class="n">target</span> <span class="o">=</span> <span class="s">"companyAge"</span><span class="o">,</span> <span class="n">source</span> <span class="o">=</span> <span class="s">"age"</span><span class="o">)</span>
	<span class="nc">CompanyDto</span> <span class="nf">map</span><span class="o">(</span><span class="nc">Company</span> <span class="n">company</span><span class="o">);</span>
<span class="o">}</span>
</code></pre></div></div>

<p>The actual usage of the mapper from above looks like this:</p>

<div class="language-java highlighter-rouge"><div class="highlight"><pre class="highlight"><code><span class="c1">// File: CompanyMapperTest.java</span>
<span class="nd">@Test</span>
<span class="kt">void</span> <span class="nf">mapCompanyToDto</span><span class="o">()</span> <span class="kd">throws</span> <span class="nc">Exception</span> <span class="o">{</span>
    <span class="nc">Company</span> <span class="n">source</span> <span class="o">=</span> <span class="k">new</span> <span class="nc">Company</span><span class="o">(</span><span class="s">"cronn GmbH"</span><span class="o">,</span> <span class="mi">10</span><span class="o">);</span>

    <span class="nc">CompanyDto</span> <span class="n">destination</span> <span class="o">=</span> <span class="nc">CompanyMapper</span><span class="o">.</span><span class="na">INSTANCE</span><span class="o">.</span><span class="na">map</span><span class="o">(</span><span class="n">source</span><span class="o">);</span>

    <span class="n">assertThat</span><span class="o">(</span><span class="n">destination</span><span class="o">.</span><span class="na">getCompanyName</span><span class="o">()).</span><span class="na">isEqualTo</span><span class="o">(</span><span class="s">"cronn GmbH"</span><span class="o">);</span>
    <span class="n">assertThat</span><span class="o">(</span><span class="n">destination</span><span class="o">.</span><span class="na">getCompanyAge</span><span class="o">()).</span><span class="na">isEqualTo</span><span class="o">(</span><span class="mi">10</span><span class="o">);</span>
<span class="o">}</span>
</code></pre></div></div>

<p>In order to use an annotation processor (in this case MapStruct) it is necessary to inform the build tool that such a processor is present and should be used. Gradle, for example, employs the keyword “annotationProcessor” for this, as is shown below.</p>

<div class="language-groovy highlighter-rouge"><div class="highlight"><pre class="highlight"><code><span class="c1">// File: build.gradle</span>
<span class="n">dependencies</span> <span class="o">{</span>
    <span class="n">annotationProcessor</span><span class="o">(</span><span class="s2">"org.mapstruct:mapstruct-processor:${mapstructVersion}"</span><span class="o">)</span>
    <span class="o">...</span>
<span class="o">}</span>
</code></pre></div></div>

<p>Using the above definition MapStruct then creates an implementation for the interface using the information given through the annotations. The output for this is shown below.</p>

<div class="language-java highlighter-rouge"><div class="highlight"><pre class="highlight"><code><span class="c1">// Generated File: CompanyMapperImpl.java</span>
<span class="kd">public</span> <span class="kd">class</span> <span class="nc">CompanyMapperImpl</span> <span class="kd">implements</span> <span class="nc">CompanyMapper</span> <span class="o">{</span>

    <span class="nd">@Override</span>
    <span class="kd">public</span> <span class="nc">CompanyDto</span> <span class="nf">map</span><span class="o">(</span><span class="nc">Company</span> <span class="n">company</span><span class="o">)</span> <span class="o">{</span>
        <span class="k">if</span> <span class="o">(</span> <span class="n">company</span> <span class="o">==</span> <span class="kc">null</span> <span class="o">)</span> <span class="o">{</span>
            <span class="k">return</span> <span class="kc">null</span><span class="o">;</span>
        <span class="o">}</span>

        <span class="nc">String</span> <span class="n">companyName</span> <span class="o">=</span> <span class="kc">null</span><span class="o">;</span>
        <span class="kt">int</span> <span class="n">companyAge</span> <span class="o">=</span> <span class="mi">0</span><span class="o">;</span>

        <span class="n">companyName</span> <span class="o">=</span> <span class="n">company</span><span class="o">.</span><span class="na">getName</span><span class="o">();</span>
        <span class="n">companyAge</span> <span class="o">=</span> <span class="n">company</span><span class="o">.</span><span class="na">getAge</span><span class="o">();</span>

        <span class="nc">CompanyDto</span> <span class="n">companyDto</span> <span class="o">=</span> <span class="k">new</span> <span class="nc">CompanyDto</span><span class="o">(</span> <span class="n">companyName</span><span class="o">,</span> <span class="n">companyAge</span> <span class="o">);</span>

        <span class="k">return</span> <span class="n">companyDto</span><span class="o">;</span>
    <span class="o">}</span>
<span class="o">}</span>
</code></pre></div></div>

<p>Through annotation processing, an interesting aspect of the Java compilation step becomes visible. Normally, the compilation to bytecode starts with the parsing step, continues with an analyzing step and ends with the bytecode generation (note that this is an oversimplification for the needs of this article). Annotation processing is directly incorporated into this process. After the parsing step, all relevant annotations are processed by processors and if new code has been generate the parsing step is restarted. By repeating these steps in multiple rounds it is possible to generate code in one annotation processor which itself contains annotations which may trigger further processors in following rounds. This is nicely illustrated in the OpenJDK article on Compilation Overview <sup id="fnref:compilation"><a href="#fn:compilation" class="footnote" rel="footnote" role="doc-noteref">4</a></sup>.</p>

<figure>
<img data-src="/img/posts/annotation-processing-code-generation-grafik.avif" class="lazyload img-fluid img-feature" alt="Diagram of the JavaCompiler flow." />
<figcaption class="long-fig-caption"> The compilation process contains a repetition in case annotation processors generate new source material. </figcaption>
</figure>

<h3 id="custom-code-generator-for-annotation-processing">Custom code generator for annotation processing</h3>

<p>The usage of existing annotation processors from third party libraries is already a big improvement for typical situations. However, the more interesting application is the development and use of custom generators. For this purpose, Java offers the <code class="language-plaintext highlighter-rouge">javax.annotation.processing.Processor</code> interface <sup id="fnref:processor"><a href="#fn:processor" class="footnote" rel="footnote" role="doc-noteref">5</a></sup>, which is already implemented in the abstract class <code class="language-plaintext highlighter-rouge">javax.annotation.processing.AbstractProcessor</code>. When creating a custom annotation processor either this interface has to be implemented, or the abstract class has to be extended in order to inform the compilation unit to use it. Through this, the custom processor inherits, among others, the methods <code class="language-plaintext highlighter-rouge">getSupportedAnnotationTypes</code> and <code class="language-plaintext highlighter-rouge">process</code>.</p>

<p>One of the first steps in creating a custom annotation processor is to tell the compilation unit, which annotations are handled by this processor. When inheriting from <code class="language-plaintext highlighter-rouge">AbstractProcessor</code>, instead of implementing <code class="language-plaintext highlighter-rouge">getSupportedAnnotationTypes</code> with a custom implementation, the supported annotations can be configured with the annotation <code class="language-plaintext highlighter-rouge">@SupportedAnnotationTypes</code>, which is used on the processor itself. Here, it is possible to use existing annotations as well as custom annotations specifically created for use with this processor. It is even possible to use wildcards for this.</p>

<p>The following example shows a custom annotation and how this is used in a custom annotation processor.</p>

<div class="language-java highlighter-rouge"><div class="highlight"><pre class="highlight"><code><span class="c1">// File: Builder.java</span>
<span class="kn">package</span> <span class="nn">org.example</span><span class="o">;</span>

<span class="nd">@Retention</span><span class="o">(</span><span class="nc">RetentionPolicy</span><span class="o">.</span><span class="na">SOURCE</span><span class="o">)</span>
<span class="nd">@Target</span><span class="o">(</span><span class="nc">ElementType</span><span class="o">.</span><span class="na">TYPE</span><span class="o">)</span>
<span class="kd">public</span> <span class="nd">@interface</span> <span class="nc">Builder</span> <span class="o">{</span>
<span class="o">}</span>
</code></pre></div></div>

<p>The custom annotation processor using the custom annotation from above looks like this:</p>

<div class="language-java highlighter-rouge"><div class="highlight"><pre class="highlight"><code><span class="c1">// File: BuilderAnnotationProcessor.java</span>
<span class="nd">@SupportedAnnotationTypes</span><span class="o">(</span><span class="s">"org.example.Builder"</span><span class="o">)</span>
<span class="kd">public</span> <span class="kd">class</span> <span class="nc">BuilderAnnotationProcessor</span> <span class="kd">extends</span> <span class="nc">AbstractProcessor</span> <span class="o">{</span>

    <span class="nd">@Override</span>
    <span class="kd">public</span> <span class="kt">boolean</span> <span class="nf">process</span><span class="o">(</span><span class="nc">Set</span><span class="o">&lt;?</span> <span class="kd">extends</span> <span class="nc">TypeElement</span><span class="o">&gt;</span> <span class="n">annotations</span><span class="o">,</span> <span class="nc">RoundEnvironment</span> <span class="n">roundEnv</span><span class="o">)</span> <span class="o">{</span>
        <span class="o">...</span>
</code></pre></div></div>

<p>The <code class="language-plaintext highlighter-rouge">process</code> method is the one which is called by the compilation unit and where the actual generation happens. A set of all configured annotations and a <code class="language-plaintext highlighter-rouge">RoundEnvironment</code> for the current processing round are given as parameters. In order to get all elements that are currently annotated with the configured annotations, the round environment can be used by calling its method <code class="language-plaintext highlighter-rouge">getElementsAnnotatedWith(…)</code>. Depending on the target, on which the annotation is specified, the returned elements may be of different element types like classes, fields or methods (e.g. in the upper example for <code class="language-plaintext highlighter-rouge">@org.example.Builder</code> the target <code class="language-plaintext highlighter-rouge">ElementType.TYPE</code> was used, which specifies classes, interfaces, enums and records).</p>

<div class="language-java highlighter-rouge"><div class="highlight"><pre class="highlight"><code><span class="c1">// File: BuilderAnnotationProcessor.java</span>
<span class="nd">@Override</span>
<span class="kd">public</span> <span class="kt">boolean</span> <span class="nf">process</span><span class="o">(</span><span class="nc">Set</span><span class="o">&lt;?</span> <span class="kd">extends</span> <span class="nc">TypeElement</span><span class="o">&gt;</span> <span class="n">annotations</span><span class="o">,</span> <span class="nc">RoundEnvironment</span> <span class="n">roundEnv</span><span class="o">)</span> <span class="o">{</span>
    <span class="k">for</span> <span class="o">(</span><span class="nc">Element</span> <span class="n">classElement</span> <span class="o">:</span> <span class="n">roundEnv</span><span class="o">.</span><span class="na">getElementsAnnotatedWith</span><span class="o">(</span><span class="nc">Builder</span><span class="o">.</span><span class="na">class</span><span class="o">))</span> <span class="o">{</span>
        <span class="nc">String</span> <span class="n">className</span> <span class="o">=</span> <span class="n">classElement</span><span class="o">.</span><span class="na">getSimpleName</span><span class="o">().</span><span class="na">toString</span><span class="o">();</span>
        <span class="n">process</span><span class="o">(</span><span class="n">className</span><span class="o">);</span>
    <span class="o">}</span>
<span class="o">}</span>
</code></pre></div></div>

<p>For the actual Java file creation, a <code class="language-plaintext highlighter-rouge">Filer</code> <sup id="fnref:filer"><a href="#fn:filer" class="footnote" rel="footnote" role="doc-noteref">6</a></sup> instance can be used, which already has information about the build location for newly created files. Additionally, to the <code class="language-plaintext highlighter-rouge">RoundEnvironment</code> mentioned above, when inheriting from <code class="language-plaintext highlighter-rouge">AbstractProcessor</code>, a <code class="language-plaintext highlighter-rouge">ProcessingEnvironment</code> also exists, which can be accessed from child classes and be used in order to get such a <code class="language-plaintext highlighter-rouge">Filer</code> instance for creating new source files.</p>

<div class="language-java highlighter-rouge"><div class="highlight"><pre class="highlight"><code><span class="c1">// File: BuilderAnnotationProcessor.java</span>
<span class="kd">private</span> <span class="kt">void</span> <span class="nf">process</span><span class="o">(</span><span class="nc">String</span> <span class="n">className</span><span class="o">)</span> <span class="o">{</span>
    <span class="o">...</span>
    <span class="k">try</span> <span class="o">{</span>
        <span class="nc">JavaFileObject</span> <span class="n">sourceFile</span> <span class="o">=</span> <span class="n">processingEnv</span>
            <span class="o">.</span><span class="na">getFiler</span><span class="o">()</span>
            <span class="o">.</span><span class="na">createSourceFile</span><span class="o">(</span><span class="n">getSourceFileName</span><span class="o">(</span><span class="n">className</span><span class="o">));</span>

        <span class="k">try</span> <span class="o">(</span><span class="nc">Writer</span> <span class="n">writer</span> <span class="o">=</span> <span class="k">new</span> <span class="nc">BufferedWriter</span><span class="o">(</span><span class="n">sourceFile</span><span class="o">.</span><span class="na">openWriter</span><span class="o">()))</span> <span class="o">{</span>
            <span class="n">writer</span><span class="o">.</span><span class="na">write</span><span class="o">(</span><span class="n">generateSourceCode</span><span class="o">(...));</span>
        <span class="o">}</span>
    <span class="o">}</span> <span class="k">catch</span> <span class="o">(</span><span class="nc">IOException</span> <span class="n">e</span><span class="o">)</span> <span class="o">{</span>
        <span class="c1">// handle exception</span>
        <span class="o">...</span>
    <span class="o">}</span>
<span class="o">}</span>
</code></pre></div></div>

<p>The final code that is generated by the processor, is just text that is written with the file writer of the filer instance. Therefore, it can be created in different well-known ways, e.g. by using string concatenation, <code class="language-plaintext highlighter-rouge">StringBuilder</code>s or multi-line strings with formatters. However, if its content gets too complex, dedicated frameworks like <sup id="fnref:javapoet"><a href="#fn:javapoet" class="footnote" rel="footnote" role="doc-noteref">7</a></sup> or more elaborate techniques like StringTemplates <sup id="fnref:stringtemplate"><a href="#fn:stringtemplate" class="footnote" rel="footnote" role="doc-noteref">8</a></sup> are advised. The custom code generator in our example code <sup id="fnref:examplecode"><a href="#fn:examplecode" class="footnote" rel="footnote" role="doc-noteref">9</a></sup> builds up on StringTemplates and shows some of the capabilities there. As mentioned previously, the generation process repeats itself in the case of newly created files also containing annotations for which annotation processors exist.</p>

<p>As described above, it is important to note that the complete annotation processing happens during the compilation step. If debugging is desired it is therefore necessary to add debug information to this, for example in the case of Gradle, by adding the <code class="language-plaintext highlighter-rouge">-Dorg.gradle.debug=true</code> flag to the current Gradle task. Through this, it is possible to use typical debugging tools, which make the development of such a code generator as simple as regular code.</p>

<p>In order to use the custom annotation processor during compilation of the target code, the compiler has to be informed about the existence of a processor to be used. There are different ways to achieve this, ranging from specific javac options like <code class="language-plaintext highlighter-rouge">javac -processor …</code>, to maven plugins. It is also possible to register it in the meta information of the build jar file in a file typically named <code class="language-plaintext highlighter-rouge">META-INF/services/javax.annotation.processing.Processor</code>, where each annotation processor is listed line by line. This is also the solution used in our example code. To make this process even easier, Google AutoService library <sup id="fnref:googleauto"><a href="#fn:googleauto" class="footnote" rel="footnote" role="doc-noteref">10</a></sup> automatically creates such a file (interestingly enough, by using annotations and generating the file through annotation processing).</p>

<div class="language-plaintext highlighter-rouge"><div class="highlight"><pre class="highlight"><code>// File: META-INF/services/javax.annotation.processing.Processor
org.example.BuilderAnnotationProcessor
</code></pre></div></div>

<h3 id="conclusion">Conclusion</h3>

<p>Many possibilities exist for automatic generation of simple code in Java. This article presented Annotation Processing, which is easy to use and deeply integrated in the Java environment. Potential applications range from builder classes, object mappers between different domain models, (fluent) setters and getters, automatic generation of constructors and boilerplate methods such as <code class="language-plaintext highlighter-rouge">toString()</code> and <code class="language-plaintext highlighter-rouge">hashCode()</code>. All of which can be used by adding a single annotation to the target code. Our example code <sup id="fnref:examplecode:1"><a href="#fn:examplecode" class="footnote" rel="footnote" role="doc-noteref">9</a></sup> demonstrates the usage of existing third party libraries as well as the creation of custom annotations and generators. Due to the mentioned versatility and ease-of-use annotation processing is a powerful tool in the Java ecosystem.</p>

<div class="footnotes" role="doc-endnotes">
  <ol>
    <li id="fn:openapi">
      <p><a href="https://openapi-generator.tech/" target="_blank">OpenAPI Generator</a> <a href="#fnref:openapi" class="reversefootnote" role="doc-backlink">&#8617;</a></p>
    </li>
    <li id="fn:lombok">
      <p><a href="https://projectlombok.org/" target="_blank">Project Lombok</a> Note: unlike typical annotation processors, in order to fulfill all its goals, Project Lombok directly manipulates the <code class="language-plaintext highlighter-rouge">.class</code> files instead of creating new <code class="language-plaintext highlighter-rouge">.java</code> files first <a href="#fnref:lombok" class="reversefootnote" role="doc-backlink">&#8617;</a></p>
    </li>
    <li id="fn:mapstruct">
      <p><a href="https://mapstruct.org/" target="_blank">MapStruct</a> <a href="#fnref:mapstruct" class="reversefootnote" role="doc-backlink">&#8617;</a></p>
    </li>
    <li id="fn:compilation">
      <p><a href="https://openjdk.org/groups/compiler/doc/compilation-overview/index.html" target="_blank">OpenJDK compilation overview</a> <a href="#fnref:compilation" class="reversefootnote" role="doc-backlink">&#8617;</a></p>
    </li>
    <li id="fn:processor">
      <p><a href="https://docs.oracle.com/en/java/javase/21/docs/api/java.compiler/javax/annotation/processing/Processor.html" target="_blank">Java Processor interface documentation</a> <a href="#fnref:processor" class="reversefootnote" role="doc-backlink">&#8617;</a></p>
    </li>
    <li id="fn:filer">
      <p><a href="https://docs.oracle.com/en/java/javase/21/docs/api/java.compiler/javax/annotation/processing/Filer.html" target="_blank">Java Filer documentation</a> <a href="#fnref:filer" class="reversefootnote" role="doc-backlink">&#8617;</a></p>
    </li>
    <li id="fn:javapoet">
      <p><a href="https://github.com/palantir/javapoet" target="_blank">JavaPoet</a> <a href="#fnref:javapoet" class="reversefootnote" role="doc-backlink">&#8617;</a></p>
    </li>
    <li id="fn:stringtemplate">
      <p><a href="https://www.stringtemplate.org/" target="_blank">StringTemplate</a> <a href="#fnref:stringtemplate" class="reversefootnote" role="doc-backlink">&#8617;</a></p>
    </li>
    <li id="fn:examplecode">
      <p><a href="https://github.com/cronn/annotation-processing-blog-post-example" target="_blank">Example code</a> <a href="#fnref:examplecode" class="reversefootnote" role="doc-backlink">&#8617;</a> <a href="#fnref:examplecode:1" class="reversefootnote" role="doc-backlink">&#8617;<sup>2</sup></a></p>
    </li>
    <li id="fn:googleauto">
      <p><a href="https://github.com/google/auto/tree/main/service" target="_blank">Google AutoService</a> <a href="#fnref:googleauto" class="reversefootnote" role="doc-backlink">&#8617;</a></p>
    </li>
  </ol>
</div>]]></content><author><name>kevinKeul</name></author><category term="en" /><category term="java" /><category term="codegeneration" /><summary type="html"><![CDATA[Writing trivial code can be cumbersome and can reduce code clarity. Here we show how Java's Annotation Processing can help.]]></summary></entry><entry xml:lang="en"><title type="html">Handling of the ‘this-escape’ warning in JDK 21</title><link href="https://blog.cronn.de/en/java/2024/08/13/this-escape.html" rel="alternate" type="text/html" title="Handling of the ‘this-escape’ warning in JDK 21" /><published>2024-08-13T00:00:00+00:00</published><updated>2024-08-13T00:00:00+00:00</updated><id>https://blog.cronn.de/en/java/2024/08/13/this-escape</id><content type="html" xml:base="https://blog.cronn.de/en/java/2024/08/13/this-escape.html"><![CDATA[<p>JDK version 21 introduced a new rule to the Java linter. According to this rule it is not permitted to call an overridable method within the constructor of a class <sup id="fnref:jdk-bug"><a href="#fn:jdk-bug" class="footnote" rel="footnote" role="doc-noteref">1</a></sup>. If this rule is disregarded and the Java code compiled using the <span style="white-space: pre;"><code class="language-plaintext highlighter-rouge">-Xlint:all</code></span> or <span style="white-space: pre;"><code class="language-plaintext highlighter-rouge">-Xlint:this-escape</code></span> flag, this leads to the following <code class="language-plaintext highlighter-rouge">this-escape</code> warning:</p>

<div class="language-plaintext highlighter-rouge"><div class="highlight"><pre class="highlight"><code>warning: [this-escape] possible `this` escape before subclass is fully initialized
</code></pre></div></div>

<p><strong>You can jump to the three approaches here:</strong></p>

<ul>
  <li>
    <p><a href="#Using the keywords `final`, `private` or `static`">Using the keywords <code class="language-plaintext highlighter-rouge">final</code>, <code class="language-plaintext highlighter-rouge">private</code> or <code class="language-plaintext highlighter-rouge">static</code></a></p>
  </li>
  <li>
    <p><a href="#Usage of the annotation `@PostConstruct`">Usage of the annotation <code class="language-plaintext highlighter-rouge">@PostConstruct</code></a></p>
  </li>
  <li>
    <p><a href="#Revise the class design">Revise the class design</a></p>
  </li>
</ul>

<h3 id="background">Background</h3>
<p>The addition of the new rule to the Java linter in JDK 21 is a good improvement as it helps prevent code smell. It has long been recommended to avoid calling overridable methods from the constructor <sup id="fnref:effective-java"><a href="#fn:effective-java" class="footnote" rel="footnote" role="doc-noteref">2</a></sup> <sup id="fnref:java-doc"><a href="#fn:java-doc" class="footnote" rel="footnote" role="doc-noteref">3</a></sup>. However, as an analysis <sup id="fnref:analysis"><a href="#fn:analysis" class="footnote" rel="footnote" role="doc-noteref">4</a></sup> of some well-known open source projects shows, there are still places in the code where the recommendation is forgotten or ignored. Even in our own projects the upgraded Java linter was also able to find a few places that did not follow the recommendation.</p>

<p>In this article, we will briefly look at why no overridable methods should be called in the constructor. The following three sections show approaches  that were used to resolve the warning in our projects.</p>

<p><strong>In the following, it is assumed that the code shown is always compiled with the flag <span style="white-space: pre;"><code class="language-plaintext highlighter-rouge">-Xlint:all</code></span>, even if this was not explicitly specified. The complete code is available in this <a href="https://github.com/cronn/this-escape-blog-post-example/">GitHub repository</a>.</strong></p>

<h3 id="origin-story">Origin Story</h3>
<p>The rationale for the <code class="language-plaintext highlighter-rouge">this-escape</code> warning is explained below. Using an example, let’s take a look at the class <code class="language-plaintext highlighter-rouge">Person</code>. The class has an instance variable <code class="language-plaintext highlighter-rouge">name</code> and a public non-final method <code class="language-plaintext highlighter-rouge">greet()</code>. The <code class="language-plaintext highlighter-rouge">greet()</code> method is called in the constructor of the class. The code compiles fine with JDK 17, but when compiling with JDK 21, the Java linter issues a <code class="language-plaintext highlighter-rouge">this-escape</code> warning.</p>

<div class="language-java highlighter-rouge"><div class="highlight"><pre class="highlight"><code><span class="kd">public</span> <span class="kd">class</span> <span class="nc">Person</span> <span class="o">{</span>

    <span class="kd">private</span> <span class="kd">final</span> <span class="nc">String</span> <span class="n">name</span><span class="o">;</span>

    <span class="kd">public</span> <span class="nf">Person</span><span class="o">(</span><span class="nc">String</span> <span class="n">name</span><span class="o">)</span> <span class="o">{</span>
        <span class="k">this</span><span class="o">.</span><span class="na">name</span> <span class="o">=</span> <span class="nc">Objects</span><span class="o">.</span><span class="na">requireNonNullElse</span><span class="o">(</span><span class="n">name</span><span class="o">,</span> <span class="s">"stranger"</span><span class="o">);</span>
        <span class="n">greet</span><span class="o">();</span> <span class="c1">// Calls overrideable method, causes this-escape warning</span>
    <span class="o">}</span>

    <span class="kd">public</span> <span class="kt">void</span> <span class="nf">greet</span><span class="o">()</span> <span class="o">{</span>
        <span class="nc">System</span><span class="o">.</span><span class="na">out</span><span class="o">.</span><span class="na">println</span><span class="o">(</span><span class="s">"Hello "</span> <span class="o">+</span> <span class="n">name</span> <span class="o">+</span> <span class="s">"!"</span><span class="o">);</span>
    <span class="o">}</span>
<span class="o">}</span>
</code></pre></div></div>

<p>The <code class="language-plaintext highlighter-rouge">Person</code> class itself is unproblematic, but as soon as the class is extended, it can lead to errors that are difficult to find. The Java linter warns of this with the <code class="language-plaintext highlighter-rouge">this-escape</code> warning. To be able to provoke an error, we also create the class <code class="language-plaintext highlighter-rouge">Musician</code> as an extension of the class <code class="language-plaintext highlighter-rouge">Person</code>. The class <code class="language-plaintext highlighter-rouge">Musician</code> adds another instance variable, <code class="language-plaintext highlighter-rouge">instrument</code>, and overrides the method <code class="language-plaintext highlighter-rouge">greet()</code>.</p>

<div class="language-java highlighter-rouge"><div class="highlight"><pre class="highlight"><code><span class="kd">public</span> <span class="kd">class</span> <span class="nc">Musician</span> <span class="kd">extends</span> <span class="nc">Person</span> <span class="o">{</span>

    <span class="kd">private</span> <span class="kd">final</span> <span class="nc">String</span> <span class="n">instrument</span><span class="o">;</span>

    <span class="kd">public</span> <span class="nf">Musician</span><span class="o">(</span><span class="nc">String</span> <span class="n">name</span><span class="o">,</span> <span class="nc">String</span> <span class="n">instrument</span><span class="o">)</span> <span class="o">{</span>
        <span class="kd">super</span><span class="o">(</span><span class="n">name</span><span class="o">);</span>
        <span class="k">this</span><span class="o">.</span><span class="na">instrument</span> <span class="o">=</span> <span class="nc">Objects</span><span class="o">.</span><span class="na">requireNonNullElse</span><span class="o">(</span><span class="n">instrument</span><span class="o">,</span> <span class="s">"triangle"</span><span class="o">);</span>
    <span class="o">}</span>

    <span class="nd">@Override</span>
    <span class="kd">public</span> <span class="kt">void</span> <span class="nf">greet</span><span class="o">()</span> <span class="o">{</span>
        <span class="kd">super</span><span class="o">.</span><span class="na">greet</span><span class="o">();</span>
        <span class="nc">System</span><span class="o">.</span><span class="na">out</span><span class="o">.</span><span class="na">println</span><span class="o">(</span><span class="s">"I heard you play "</span> <span class="o">+</span> <span class="n">instrument</span> <span class="o">+</span> <span class="s">". Awesome!"</span><span class="o">);</span>
    <span class="o">}</span>
<span class="o">}</span>
</code></pre></div></div>

<p>What is now being output when a new <code class="language-plaintext highlighter-rouge">Musician</code> object is created with the <code class="language-plaintext highlighter-rouge">new Musician("Jimi", "guitar")</code> statement? When an instance of <code class="language-plaintext highlighter-rouge">Musician</code> is created, the constructor of <code class="language-plaintext highlighter-rouge">Person</code> is called in the constructor of <code class="language-plaintext highlighter-rouge">Musician</code>. In the constructor of <code class="language-plaintext highlighter-rouge">Person</code>, the instance variable <code class="language-plaintext highlighter-rouge">name</code> is initialized and then the method <code class="language-plaintext highlighter-rouge">greet()</code> is called. The variable <code class="language-plaintext highlighter-rouge">instrument</code> is then initialized within the constructor of the class <code class="language-plaintext highlighter-rouge">Musician</code>. The statement results in the following output:</p>

<div class="language-plaintext highlighter-rouge"><div class="highlight"><pre class="highlight"><code>Hello Jimi!
I heard you play null. Awesome!
</code></pre></div></div>

<p>The overridden method <code class="language-plaintext highlighter-rouge">greet()</code> is called from <code class="language-plaintext highlighter-rouge">Person</code> even before <code class="language-plaintext highlighter-rouge">Musician</code> has been fully instantiated. This results in the value <code class="language-plaintext highlighter-rouge">null</code> being output for <code class="language-plaintext highlighter-rouge">instrument</code>, although <code class="language-plaintext highlighter-rouge">instrument</code> can never have the value <code class="language-plaintext highlighter-rouge">null</code> after instantiation of the object <code class="language-plaintext highlighter-rouge">Musician</code>. The reason for the incorrect output is quickly apparent in the example. Nevertheless, it shows that a class should not call any overridable methods of its own class in the constructor, as the class cannot ensure that it is in a consistent state when the method is called. It follows that the <code class="language-plaintext highlighter-rouge">greet()</code> method should not be both overridable and called by the constructor at the same time.</p>

<p>It should be noted that the error in this example seems obvious as we have looked at a simple example to explain the situation. In practice, the error in an extensive class within a complex class hierarchy with further inheritance and nesting in connection with concurrency can be considerably more difficult to locate.</p>

<h3 id="three-approaches">Three approaches</h3>
<p>The following three sections present ways of preventing or circumventing the calling of an overridable method from the constructor.</p>

<p><a id="Using the keywords `final`, `private` or `static`"></a></p>

<h4 id="using-the-keywords-final-private-or-static">Using the keywords <code class="language-plaintext highlighter-rouge">final</code>, <code class="language-plaintext highlighter-rouge">private</code> or <code class="language-plaintext highlighter-rouge">static</code></h4>
<p>The most direct way to prevent the <code class="language-plaintext highlighter-rouge">this-escape</code> warning is to prohibit the overwriting of all methods called by the constructor. This can be achieved in Java with the keywords <code class="language-plaintext highlighter-rouge">final</code>, <code class="language-plaintext highlighter-rouge">private</code>, and <code class="language-plaintext highlighter-rouge">static</code>. If a class is declared as <code class="language-plaintext highlighter-rouge">final</code>, it is no longer possible to extend it. Accordingly, none of its methods can be overwritten. The declaration of a method as <code class="language-plaintext highlighter-rouge">final</code>, <code class="language-plaintext highlighter-rouge">private</code> or <code class="language-plaintext highlighter-rouge">static</code> ensures that it is the method alone which cannot be overwritten.</p>

<p>We can use these keywords  to fix the incorrect output of the <code class="language-plaintext highlighter-rouge">Person</code> and <code class="language-plaintext highlighter-rouge">Musician</code> classes from the last section in various ways. In the following, we first declare the <code class="language-plaintext highlighter-rouge">greet()</code> method of <code class="language-plaintext highlighter-rouge">Person</code> as <code class="language-plaintext highlighter-rouge">final</code> to satisfy the Java linter.</p>

<div class="language-java highlighter-rouge"><div class="highlight"><pre class="highlight"><code><span class="kd">public</span> <span class="kd">class</span> <span class="nc">Person</span> <span class="o">{</span>

    <span class="kd">private</span> <span class="kd">final</span> <span class="nc">String</span> <span class="n">name</span><span class="o">;</span>

    <span class="kd">public</span> <span class="nf">Person</span><span class="o">(</span><span class="nc">String</span> <span class="n">name</span><span class="o">)</span> <span class="o">{</span>
        <span class="k">this</span><span class="o">.</span><span class="na">name</span> <span class="o">=</span> <span class="nc">Objects</span><span class="o">.</span><span class="na">requireNonNullElse</span><span class="o">(</span><span class="n">name</span><span class="o">,</span> <span class="s">"stranger"</span><span class="o">);</span>
        <span class="n">greet</span><span class="o">();</span>
    <span class="o">}</span>

    <span class="kd">public</span> <span class="kd">final</span> <span class="kt">void</span> <span class="nf">greet</span><span class="o">()</span> <span class="o">{</span> <span class="c1">// Method is now final</span>
        <span class="nc">System</span><span class="o">.</span><span class="na">out</span><span class="o">.</span><span class="na">println</span><span class="o">(</span><span class="s">"Hello "</span> <span class="o">+</span> <span class="n">name</span> <span class="o">+</span> <span class="s">"!"</span><span class="o">);</span>
    <span class="o">}</span>
<span class="o">}</span>
</code></pre></div></div>

<p>This makes it so that the <code class="language-plaintext highlighter-rouge">Musician</code> class can no longer overwrite the <code class="language-plaintext highlighter-rouge">greet()</code> method. Instead, a separate method <code class="language-plaintext highlighter-rouge">printInstrument()</code> is defined in the <code class="language-plaintext highlighter-rouge">Musician</code> class, which is now responsible for the output of the instrument. For this approach to work, we must define that the class <code class="language-plaintext highlighter-rouge">Musician</code> should not be extended by any other class, so we add the keyword <code class="language-plaintext highlighter-rouge">final</code> to the declaration of the class – otherwise, the Java linter would give us a <code class="language-plaintext highlighter-rouge">this-escape</code> warning here too.</p>

<div class="language-java highlighter-rouge"><div class="highlight"><pre class="highlight"><code><span class="kd">public</span> <span class="kd">final</span> <span class="kd">class</span> <span class="nc">Musician</span> <span class="kd">extends</span> <span class="nc">Person</span> <span class="o">{</span> <span class="c1">// Class is now final</span>

    <span class="kd">private</span> <span class="kd">final</span> <span class="nc">String</span> <span class="n">instrument</span><span class="o">;</span>

    <span class="kd">public</span> <span class="nf">Musician</span><span class="o">(</span><span class="nc">String</span> <span class="n">name</span><span class="o">,</span> <span class="nc">String</span> <span class="n">instrument</span><span class="o">)</span> <span class="o">{</span>
        <span class="kd">super</span><span class="o">(</span><span class="n">name</span><span class="o">);</span>
        <span class="k">this</span><span class="o">.</span><span class="na">instrument</span> <span class="o">=</span> <span class="nc">Objects</span><span class="o">.</span><span class="na">requireNonNullElse</span><span class="o">(</span><span class="n">instrument</span><span class="o">,</span> <span class="s">"triangle"</span><span class="o">);</span>
        <span class="n">printInstrument</span><span class="o">();</span>
    <span class="o">}</span>

    <span class="kd">public</span> <span class="kt">void</span> <span class="nf">printInstrument</span><span class="o">()</span> <span class="o">{</span>
        <span class="nc">System</span><span class="o">.</span><span class="na">out</span><span class="o">.</span><span class="na">println</span><span class="o">(</span><span class="s">"I heard you play "</span> <span class="o">+</span> <span class="n">instrument</span> <span class="o">+</span> <span class="s">". Awesome!"</span><span class="o">);</span>
    <span class="o">}</span>
<span class="o">}</span>
</code></pre></div></div>

<p>After the changes, the statement <code class="language-plaintext highlighter-rouge">new Musician("Jimi", "guitar")</code> leads to the following output:</p>

<div class="language-plaintext highlighter-rouge"><div class="highlight"><pre class="highlight"><code>Hello Jimi!
I heard you play guitar! Awesome!
</code></pre></div></div>

<p>However, it is not always possible to declare a class as <code class="language-plaintext highlighter-rouge">final</code> or method as <code class="language-plaintext highlighter-rouge">final</code>, <code class="language-plaintext highlighter-rouge">private</code>, or <code class="language-plaintext highlighter-rouge">static</code>. If the class is managed by a dependency injection framework, such as Spring or Quarkus, the call of overridable methods from the constructor can usually be bypassed in another way. We will look at these in the next section.</p>

<p><a id="Usage of the annotation `@PostConstruct`"></a></p>

<h4 id="usage-of-the-annotation-postconstruct">Usage of the annotation <code class="language-plaintext highlighter-rouge">@PostConstruct</code></h4>
<p>Although we will be using Spring in the following examples, the approach can also be used for other dependency injection frameworks that implement the <em>Jakarta Contexts and Dependency Injection</em> specification or the <em>Jakarta Annotations</em> specification. Part of the <em>Jakarta Annotations</em> specification is the annotation <code class="language-plaintext highlighter-rouge">@PostContruct</code>, which is essential for the approach presented here. Using the annotation, we can link into the life cycle of a bean managed by Spring. In the case of <code class="language-plaintext highlighter-rouge">@PostConstruct</code> this happens, as the name suggests, after the constructor has been executed and the bean has been fully initialized. This makes it possible to move the call of an overridable method from the constructor to a safe place. Spring offers other ways to insert custom code into the lifecycle of a bean, but the use of <code class="language-plaintext highlighter-rouge">@PostConstruct</code> is the recommended <sup id="fnref:spring-lifecycle"><a href="#fn:spring-lifecycle" class="footnote" rel="footnote" role="doc-noteref">5</a></sup>, so only this will be discussed here.</p>

<p>In order to illustrate the use of <code class="language-plaintext highlighter-rouge">@PostConstruct</code>, let us extend our earlier example. In the previous example, the instrument <em>triangle</em> was assigned to each musician if no instrument was specified. We want to optimize this a little by making it possible to connect an external resource. This should provide a mapping between known musicians, represented by their name, and their instrument. The mapping should be saved in a cache for faster access. The use of the cache is shown schematically in the following listing:</p>

<div class="language-java highlighter-rouge"><div class="highlight"><pre class="highlight"><code><span class="nc">String</span> <span class="n">name</span> <span class="o">=</span> <span class="n">getName</span><span class="o">();</span> <span class="c1">// Get name of a musician from somewhere</span>
<span class="nc">String</span> <span class="n">instrument</span> <span class="o">=</span> <span class="n">getInstrument</span><span class="o">();</span> <span class="c1">// Get instrument from somewhere</span>
<span class="k">if</span> <span class="o">(</span><span class="n">instrument</span> <span class="o">==</span> <span class="kc">null</span><span class="o">)</span> <span class="o">{</span>
    <span class="cm">/*
         musicianInstrumentCache contains a mapping of the form:
         Jimi -&gt; guitar
         Miles -&gt; trumpet
         Ludwig -&gt; piano
         ...
    */</span>
    <span class="n">instrument</span> <span class="o">=</span> <span class="n">musicianInstrumentCache</span><span class="o">.</span><span class="na">getInstrumentFor</span><span class="o">(</span><span class="n">name</span><span class="o">);</span>
<span class="o">}</span>
<span class="nc">Musician</span> <span class="n">musician</span> <span class="o">=</span> <span class="k">new</span> <span class="nc">Musician</span><span class="o">(</span><span class="n">name</span><span class="o">,</span> <span class="n">instrument</span><span class="o">);</span>
</code></pre></div></div>

<p>We create two classes for the implementation. The abstract class <code class="language-plaintext highlighter-rouge">MusicianInstrumentCache</code> contains a simple cache, which was realized as a <code class="language-plaintext highlighter-rouge">Map</code> with the mapping musician name ⟼ instrument, and calls the method <code class="language-plaintext highlighter-rouge">updateCache()</code> in the constructor. The <code class="language-plaintext highlighter-rouge">updateCache()</code> method is to be used by the specializations of <code class="language-plaintext highlighter-rouge">MusicianInstrumentCache</code> (see below) to read in an external resource and update the cache. The following applies to the <code class="language-plaintext highlighter-rouge">updateCache()</code> method:</p>

<ul>
  <li>
    <p>Calling the method should enable other classes to update the cache at runtime . The method should therefore be public.</p>
  </li>
  <li>
    <p>For different types of resources, such as external files, databases, etc., it should be possible to create different specializations of <code class="language-plaintext highlighter-rouge">MusicianInstrumentCache</code>, which override the <code class="language-plaintext highlighter-rouge">updateCache()</code> method in line with the resource used. Therefore, the method should be abstract and cannot be declared as <code class="language-plaintext highlighter-rouge">private</code>, <code class="language-plaintext highlighter-rouge">final</code>, or <code class="language-plaintext highlighter-rouge">static</code>.</p>
  </li>
</ul>

<p>The implementation of the abstract class <code class="language-plaintext highlighter-rouge">MusicianInstrumentCache</code> is given below. The linter issues a <code class="language-plaintext highlighter-rouge">this-escape</code> warning when the class is compiled, as the abstract method <code class="language-plaintext highlighter-rouge">updateCache()</code> is called in the constructor.</p>

<div class="language-java highlighter-rouge"><div class="highlight"><pre class="highlight"><code><span class="kd">public</span> <span class="kd">abstract</span> <span class="kd">class</span> <span class="nc">MusicianInstrumentCache</span> <span class="o">{</span>

    <span class="kd">protected</span> <span class="kd">static</span> <span class="kd">final</span> <span class="nc">Map</span><span class="o">&lt;</span><span class="nc">String</span><span class="o">,</span> <span class="nc">String</span><span class="o">&gt;</span> <span class="n">cache</span> <span class="o">=</span>
            <span class="k">new</span> <span class="nc">ConcurrentHashMap</span><span class="o">&lt;&gt;();</span>

    <span class="kd">public</span> <span class="nf">MusicianInstrumentCache</span><span class="o">()</span> <span class="o">{</span>
        <span class="nc">System</span><span class="o">.</span><span class="na">out</span><span class="o">.</span><span class="na">println</span><span class="o">(</span><span class="s">"MusicianInstrumentCache.init()"</span><span class="o">);</span>
        <span class="n">updateCache</span><span class="o">();</span> <span class="c1">// Calls overrideable method, causes this-escape warning</span>
    <span class="o">}</span>

    <span class="kd">public</span> <span class="kd">abstract</span> <span class="kt">void</span> <span class="nf">updateCache</span><span class="o">();</span> <span class="c1">// Should be public and abstract</span>

    <span class="kd">public</span> <span class="nc">String</span> <span class="nf">getInstrumentFor</span><span class="o">(</span><span class="nc">String</span> <span class="n">name</span><span class="o">)</span> <span class="o">{</span>
        <span class="k">return</span> <span class="n">cache</span><span class="o">.</span><span class="na">get</span><span class="o">(</span><span class="n">name</span><span class="o">);</span>
    <span class="o">}</span>
<span class="o">}</span>
</code></pre></div></div>

<p>Before we address the problem, let’s look at a specialization of the class <code class="language-plaintext highlighter-rouge">MusicianInstrumentCache</code>. The class <code class="language-plaintext highlighter-rouge">FileBasedMusicianInstrumentCache</code> shows a possible specialization of <code class="language-plaintext highlighter-rouge">MusicianInstrumentCache</code>. The class should read the mapping from a file via the Spring-injected <code class="language-plaintext highlighter-rouge">ResourceLoader</code>, then proceed to write it to the cache. To keep the example short, the reading of the file and the writing to the cache is only implied in the code.</p>

<div class="language-java highlighter-rouge"><div class="highlight"><pre class="highlight"><code><span class="nd">@Component</span>
<span class="kd">public</span> <span class="kd">class</span> <span class="nc">FileBasedMusicianInstrumentCache</span> <span class="kd">extends</span> <span class="nc">MusicianInstrumentCache</span> <span class="o">{</span>

    <span class="kd">private</span> <span class="kd">final</span> <span class="nc">ResourceLoader</span> <span class="n">resourceLoader</span><span class="o">;</span>
    <span class="kd">private</span> <span class="nc">String</span> <span class="n">mappingResource</span> <span class="o">=</span> <span class="s">"classpath:mapping.csv"</span><span class="o">;</span>

    <span class="kd">public</span> <span class="nf">FileBasedMusicianInstrumentCache</span><span class="o">(</span><span class="nc">ResourceLoader</span> <span class="n">resourceLoader</span><span class="o">)</span> <span class="o">{</span>
        <span class="nc">System</span><span class="o">.</span><span class="na">out</span><span class="o">.</span><span class="na">println</span><span class="o">(</span><span class="s">"FileBasedMusicianInstrumentCache.init()"</span><span class="o">);</span>
        <span class="k">this</span><span class="o">.</span><span class="na">resourceLoader</span> <span class="o">=</span> <span class="n">resourceLoader</span><span class="o">;</span>
    <span class="o">}</span>

    <span class="nd">@Override</span>
    <span class="kd">public</span> <span class="kt">void</span> <span class="nf">updateCache</span><span class="o">()</span> <span class="o">{</span>
        <span class="nc">System</span><span class="o">.</span><span class="na">out</span><span class="o">.</span><span class="na">println</span><span class="o">(</span><span class="s">"FileBasedMusicianInstrumentCache.updateCache()"</span><span class="o">);</span>
        <span class="c1">// Logic for importing mapping and adding it to the cache. Briefly,</span>
        <span class="c1">// represented by the following lines without exception handling:</span>
        <span class="nc">Resource</span> <span class="n">resource</span> <span class="o">=</span> <span class="n">resourceLoader</span><span class="o">.</span><span class="na">getResource</span><span class="o">(</span><span class="n">mappingResource</span><span class="o">);</span>
        <span class="nc">String</span> <span class="n">content</span> <span class="o">=</span> <span class="n">resource</span><span class="o">.</span><span class="na">getContentAsString</span><span class="o">(</span><span class="nc">StandardCharsets</span><span class="o">.</span><span class="na">UTF_8</span><span class="o">);</span>
        <span class="nc">Arrays</span><span class="o">.</span><span class="na">stream</span><span class="o">(</span><span class="n">content</span><span class="o">.</span><span class="na">split</span><span class="o">(</span><span class="s">"\n"</span><span class="o">))</span>
                <span class="o">.</span><span class="na">map</span><span class="o">(</span><span class="n">line</span> <span class="o">-&gt;</span> <span class="n">line</span><span class="o">.</span><span class="na">split</span><span class="o">(</span><span class="s">","</span><span class="o">))</span>
                <span class="o">.</span><span class="na">forEach</span><span class="o">(</span><span class="n">mapping</span> <span class="o">-&gt;</span> <span class="n">cache</span><span class="o">.</span><span class="na">put</span><span class="o">(</span><span class="n">mapping</span><span class="o">[</span><span class="mi">0</span><span class="o">],</span> <span class="n">mapping</span><span class="o">[</span><span class="mi">1</span><span class="o">]));</span>
    <span class="o">}</span>

    <span class="c1">// getter and setter</span>
<span class="o">}</span>
</code></pre></div></div>

<p>It should be noted that if the <code class="language-plaintext highlighter-rouge">updateCache()</code> method of the <code class="language-plaintext highlighter-rouge">FileBasedMusicianInstrumentCache</code> class is called in the constructor of the <code class="language-plaintext highlighter-rouge">MusicianInstrumentCache</code> class, then the <code class="language-plaintext highlighter-rouge">resourceLoader</code> has not yet been set. This is because, as described in the section <em>Origin Story</em>, the constructor of the extending class <code class="language-plaintext highlighter-rouge">FileBasedMusicianInstrumentCache</code> calls the constructor of the class <code class="language-plaintext highlighter-rouge">MusicianInstrumentCache</code> as the first statement, even if the call via <code class="language-plaintext highlighter-rouge">super()</code> was not explicitly specified in the Java code. This can also be seen in the output, where <em>FileBasedMusicianInstrumentCache.updateCache()</em> is written to the console before <em>FileBasedMusicianInstrumentCache.init()</em>:</p>

<div class="language-plaintext highlighter-rouge"><div class="highlight"><pre class="highlight"><code>MusicianInstrumentCache.init()
FileBasedMusicianInstrumentCache.updateCache()
FileBasedMusicianInstrumentCache.init()
</code></pre></div></div>

<p>Fortunately, the error and the <code class="language-plaintext highlighter-rouge">this-escape</code> warning can be fixed with the annotation <code class="language-plaintext highlighter-rouge">@PostConstruct</code> without major adjustments, so that the overridable method <code class="language-plaintext highlighter-rouge">updateCache()</code> is no longer called before the object has been completely initialized. It is sufficient to annotate the <code class="language-plaintext highlighter-rouge">updateCache()</code> method in the <code class="language-plaintext highlighter-rouge">MusicianInstrumentCache</code> class with <code class="language-plaintext highlighter-rouge">@PostConstruct</code>. The call of the method <code class="language-plaintext highlighter-rouge">updateCache()</code> can be removed from the constructor, as Spring is now responsible for the call. The class <code class="language-plaintext highlighter-rouge">FileBasedMusicianInstrumentCache</code> can remain unchanged, as Spring checks whether a method with <code class="language-plaintext highlighter-rouge">@PostConstruct</code> is annotated in a superclass and adopts the behaviour for the subclasses.</p>

<div class="language-java highlighter-rouge"><div class="highlight"><pre class="highlight"><code><span class="kd">public</span> <span class="kd">abstract</span> <span class="kd">class</span> <span class="nc">MusicianInstrumentCache</span> <span class="o">{</span>

    <span class="kd">protected</span> <span class="kd">static</span> <span class="kd">final</span> <span class="nc">Map</span><span class="o">&lt;</span><span class="nc">String</span><span class="o">,</span> <span class="nc">String</span><span class="o">&gt;</span> <span class="n">cache</span> <span class="o">=</span>
            <span class="k">new</span> <span class="nc">ConcurrentHashMap</span><span class="o">&lt;&gt;();</span>

    <span class="kd">public</span> <span class="nf">MusicianInstrumentCache</span><span class="o">()</span> <span class="o">{</span>
        <span class="nc">System</span><span class="o">.</span><span class="na">out</span><span class="o">.</span><span class="na">println</span><span class="o">(</span><span class="s">"MusicianInstrumentCache.init()"</span><span class="o">);</span>
        <span class="c1">// Remove importMapping() method call here</span>
    <span class="o">}</span>

    <span class="nd">@PostConstruct</span> <span class="c1">// Add annotation</span>
    <span class="kd">public</span> <span class="kd">abstract</span> <span class="kt">void</span> <span class="nf">updateCache</span><span class="o">();</span>

    <span class="kd">public</span> <span class="nc">String</span> <span class="nf">getInstrumentFor</span><span class="o">(</span><span class="nc">String</span> <span class="n">name</span><span class="o">)</span> <span class="o">{</span>
        <span class="k">return</span> <span class="n">cache</span><span class="o">.</span><span class="na">get</span><span class="o">(</span><span class="n">name</span><span class="o">);</span>
    <span class="o">}</span>
<span class="o">}</span>
</code></pre></div></div>

<p>When the application is started, the constructor <code class="language-plaintext highlighter-rouge">MusicianInstrumentCache</code> is still called when the class <code class="language-plaintext highlighter-rouge">FileBasedMusicianInstrumentCache</code> is initialized, but the method <code class="language-plaintext highlighter-rouge">updateCache()</code> is no longer called in the constructor; instead, the constructor of <code class="language-plaintext highlighter-rouge">FileBasedMusicianInstrumentCache</code> is completed first. Only after <code class="language-plaintext highlighter-rouge">FileBasedMusicianInstrumentCache</code> has been completely constructed does Spring call the <code class="language-plaintext highlighter-rouge">updateCache()</code> method annotated with <code class="language-plaintext highlighter-rouge">@PostConstruct</code>. This results in the following output:</p>

<div class="language-plaintext highlighter-rouge"><div class="highlight"><pre class="highlight"><code>MusicianInstrumentCache.init()
FileBasedMusicianInstrumentCache.init()
FileBasedMusicianInstrumentCache.updateCache()
</code></pre></div></div>

<p>The procedure with <code class="language-plaintext highlighter-rouge">@PostConstruct</code> makes it possible to link the use of overridable methods to the creation of the object without the problems that may result when calling from the constructor. However, this requires the use of a dependency injection framework that supports the annotation <code class="language-plaintext highlighter-rouge">@PostConstruct</code>.</p>

<p>The previous two sections described two small tweaks to  satisfy the linter. In the next section we will look at another way of dealing with the warning.</p>

<p><a id="Revise the class design"></a></p>

<h4 id="revise-the-class-design">Revise the class design</h4>
<p>Sometimes the <code class="language-plaintext highlighter-rouge">this-escape</code> warning can also serve as a suggestion to re-evaluate the class design. Depending on the result of the evaluation, the necessary changes may have a greater impact on the structure of the code than was the case with the other two methods. We once again take up the example from the previous section to show what an adaptation of the class design could look like.</p>

<p>In the last section, the two classes <code class="language-plaintext highlighter-rouge">MusicianInstrumentCache</code> and <code class="language-plaintext highlighter-rouge">FileBasedMusicianInstrumentCache</code> were created, with the latter extending the former. Due to inheritance, the method <code class="language-plaintext highlighter-rouge">updateCache()</code> had to be public and overridable, which ultimately led to the <code class="language-plaintext highlighter-rouge">this-escape</code> warning. In the following, the class design should use composition instead of inheritance.</p>

<p>The functionality of the class <code class="language-plaintext highlighter-rouge">MusicianInstrumentCache</code> is split for this purpose. The management of the cache will remain the task of the class <code class="language-plaintext highlighter-rouge">MusicianInstrumentCache</code>. The import of an external resource is outsourced to the class <code class="language-plaintext highlighter-rouge">FileBasedMusicianInstrumentImporter</code>. The class <code class="language-plaintext highlighter-rouge">FileBasedMusicianInstrumentImporter</code> also receives a reference to an instance of the class <code class="language-plaintext highlighter-rouge">MusicianInstrumentCache</code>. Below, the old, inheritance-based class design is compared to the new class design in a UML class diagram.</p>

<div class="language-plaintext highlighter-rouge"><div class="highlight"><pre class="highlight"><code>Inheritance                           Composition
=========                             ===========
┌────────────────────────────────┐   ┌────────────────────────────────────────┐
│           &lt;abstract&gt;           │   │                                        │
│    MusicianInstrumentCache     │   │        MusicianInstrumentCache         │
├────────────────────────────────┤   ├────────────────────────────────────────┤
│#cache:Map&lt;String,String&gt;       │   │-cache:Map&lt;String,String&gt;               │
├────────────────────────────────┤   ├────────────────────────────────────────┤
│+importMapping():void &lt;abstract&gt;│   │~put(name:String,instrument:String):void│
│+getInstrumentFor(String):String│   │+getInstrumentFor(String):String        │
└────────────────────────────────┘   └────────────────────────────────────────┘
                 ▲                                       ^
                 │                                       │
                 │                                       │ -cache
                 │                                       │
┌────────────────┴───────────────┐   ┌───────────────────┴────────────────────┐
│FileBasedMusicianInstrumentCache│   │  FileBasedMusicianInstrumentImporter   │
├────────────────────────────────┤   ├────────────────────────────────────────┤
│-resourceLoader:ResourceLoader  │   │-resourceLoader:ResourceLoader          │
├────────────────────────────────┤   ├────────────────────────────────────────┤
│+importMapping():void           │   │+importMapping():void                   │
└────────────────────────────────┘   └────────────────────────────────────────┘
</code></pre></div></div>

<p>The following listing shows the code of the new class <code class="language-plaintext highlighter-rouge">MusicianInstrumentCache</code>. The class has two methods, one for reading and one for writing the cache. <code class="language-plaintext highlighter-rouge">MusicianInstrumentCache</code> was annotated with <code class="language-plaintext highlighter-rouge">@Component</code>, as it is managed by the Dependency Injection Framework, and is to be injected into <code class="language-plaintext highlighter-rouge">FileBasedMusicianInstrumentImporter</code>.</p>

<div class="language-java highlighter-rouge"><div class="highlight"><pre class="highlight"><code><span class="nd">@Component</span>
<span class="kd">public</span> <span class="kd">class</span> <span class="nc">MusicianInstrumentCache</span> <span class="o">{</span>

    <span class="kd">private</span> <span class="kd">final</span> <span class="nc">Map</span><span class="o">&lt;</span><span class="nc">String</span><span class="o">,</span> <span class="nc">String</span><span class="o">&gt;</span> <span class="n">cache</span> <span class="o">=</span> <span class="k">new</span> <span class="nc">ConcurrentHashMap</span><span class="o">&lt;&gt;();</span>

    <span class="kt">void</span> <span class="nf">put</span><span class="o">(</span><span class="nc">String</span> <span class="n">name</span><span class="o">,</span> <span class="nc">String</span> <span class="n">instrument</span><span class="o">)</span> <span class="o">{</span>
        <span class="n">cache</span><span class="o">.</span><span class="na">put</span><span class="o">(</span><span class="n">name</span><span class="o">,</span> <span class="n">instrument</span><span class="o">);</span>
    <span class="o">}</span>

    <span class="kd">public</span> <span class="nc">String</span> <span class="nf">getInstrumentFor</span><span class="o">(</span><span class="nc">String</span> <span class="n">name</span><span class="o">)</span> <span class="o">{</span>
        <span class="k">return</span> <span class="n">cache</span><span class="o">.</span><span class="na">get</span><span class="o">(</span><span class="n">name</span><span class="o">);</span>
    <span class="o">}</span>
<span class="o">}</span>
</code></pre></div></div>

<p>The code of the class <code class="language-plaintext highlighter-rouge">FileBasedMusicianInstrumentImporter</code> is shown in the following listing. The annotation <code class="language-plaintext highlighter-rouge">@PostConstruct</code> is no longer required as it is now sufficient to declare the class  as <code class="language-plaintext highlighter-rouge">final</code>.</p>

<div class="language-java highlighter-rouge"><div class="highlight"><pre class="highlight"><code><span class="nd">@Component</span>
<span class="kd">public</span> <span class="kd">final</span> <span class="kd">class</span> <span class="nc">FileBasedMusicianInstrumentImporter</span> <span class="o">{</span>

    <span class="kd">private</span> <span class="kd">final</span> <span class="nc">MusicianInstrumentCache</span> <span class="n">cache</span><span class="o">;</span>
    <span class="kd">private</span> <span class="kd">final</span> <span class="nc">ResourceLoader</span> <span class="n">resourceLoader</span><span class="o">;</span>
    <span class="kd">private</span> <span class="nc">String</span> <span class="n">mappingResource</span> <span class="o">=</span> <span class="s">"classpath:mapping.csv"</span><span class="o">;</span>

    <span class="kd">public</span> <span class="nf">FileBasedMusicianInstrumentImporter</span><span class="o">(</span><span class="nc">MusicianInstrumentCache</span> <span class="n">cache</span><span class="o">,</span>
                                               <span class="nc">ResourceLoader</span> <span class="n">resourceLoader</span><span class="o">)</span> <span class="o">{</span>
        <span class="k">this</span><span class="o">.</span><span class="na">cache</span> <span class="o">=</span> <span class="n">cache</span><span class="o">;</span>
        <span class="k">this</span><span class="o">.</span><span class="na">resourceLoader</span> <span class="o">=</span> <span class="n">resourceLoader</span><span class="o">;</span>
        <span class="n">importMapping</span><span class="o">();</span>
    <span class="o">}</span>

    <span class="kd">public</span> <span class="kt">void</span> <span class="nf">importMapping</span><span class="o">()</span> <span class="o">{</span>
        <span class="c1">// Logic for importing mapping and adding it to the cache. Briefly,</span>
        <span class="c1">// represented by the following lines without exception handling:</span>
        <span class="nc">Resource</span> <span class="n">resource</span> <span class="o">=</span> <span class="n">resourceLoader</span><span class="o">.</span><span class="na">getResource</span><span class="o">(</span><span class="n">mappingResource</span><span class="o">);</span>
        <span class="nc">String</span> <span class="n">content</span> <span class="o">=</span> <span class="n">resource</span><span class="o">.</span><span class="na">getContentAsString</span><span class="o">(</span><span class="nc">StandardCharsets</span><span class="o">.</span><span class="na">UTF_8</span><span class="o">);</span>
        <span class="nc">Arrays</span><span class="o">.</span><span class="na">stream</span><span class="o">(</span><span class="n">content</span><span class="o">.</span><span class="na">split</span><span class="o">(</span><span class="s">"\n"</span><span class="o">))</span>
                <span class="o">.</span><span class="na">map</span><span class="o">(</span><span class="n">line</span> <span class="o">-&gt;</span> <span class="n">line</span><span class="o">.</span><span class="na">split</span><span class="o">(</span><span class="s">","</span><span class="o">))</span>
                <span class="o">.</span><span class="na">forEach</span><span class="o">(</span><span class="n">mapping</span> <span class="o">-&gt;</span> <span class="n">cache</span><span class="o">.</span><span class="na">put</span><span class="o">(</span><span class="n">mapping</span><span class="o">[</span><span class="mi">0</span><span class="o">],</span> <span class="n">mapping</span><span class="o">[</span><span class="mi">1</span><span class="o">]));</span>
    <span class="o">}</span>

    <span class="c1">// getter and setter</span>
<span class="o">}</span>
</code></pre></div></div>

<p>The example is intended to provide an impression of what a revision of the class design could look like. However, this does not always have to involve a switch from inheritance to composition. It could also involve extracting/moving methods, or using a creational pattern  to resolve the call of an overridable method from the constructor.</p>

<p>At this point, we have looked at all the approaches  that were used to upgrade our project. The next section summarizes the main points of this article.</p>

<h3 id="summary">Summary</h3>
<p>In this post, we described the motivation behind the Java linter’s <code class="language-plaintext highlighter-rouge">this-escape</code> warning and showed three ways to prevent said warnings. The possibilities are listed below:</p>

<ol>
  <li>Use of the keywords <code class="language-plaintext highlighter-rouge">final</code>, <code class="language-plaintext highlighter-rouge">private</code>, or <code class="language-plaintext highlighter-rouge">static</code>;</li>
  <li>Use of the annotation <code class="language-plaintext highlighter-rouge">@PostConstruct</code>;</li>
  <li>Revision of the class design</li>
</ol>

<p>It is not always the case that all three approaches are applicable. Sometimes a combination of multiple approaches is necessary to resolve the warning. The best way to deal with the warning must be decided on a case-by-case basis. In most cases the first or second approach should be sufficient; however, the use of the second approach requires that the affected class is managed by a dependency injection framework such as Spring or Quarkus. Reworking the class design should always lead to success, but is also the most time-consuming.</p>

<h3 id="references">References</h3>

<div class="footnotes" role="doc-endnotes">
  <ol>
    <li id="fn:jdk-bug">
      <p><a href="https://bugs.openjdk.org/browse/JDK-8015831">Add lint check for calling overridable methods from a constructor</a> <a href="#fnref:jdk-bug" class="reversefootnote" role="doc-backlink">&#8617;</a></p>
    </li>
    <li id="fn:effective-java">
      <p>Joshua Bloch. 2001. Effective Java programming language guide. Sun Microsystems, Inc., USA. <a href="#fnref:effective-java" class="reversefootnote" role="doc-backlink">&#8617;</a></p>
    </li>
    <li id="fn:java-doc">
      <p><a href="https://docs.oracle.com/javase/tutorial/java/IandI/final.html">Writing Final Classes and Methods</a> <a href="#fnref:java-doc" class="reversefootnote" role="doc-backlink">&#8617;</a></p>
    </li>
    <li id="fn:analysis">
      <p><a href="https://www.javaspecialists.eu/archive/Issue210-Calling-Methods-from-a-Constructor.html">Calling Methods from a Constructor</a> <a href="#fnref:analysis" class="reversefootnote" role="doc-backlink">&#8617;</a></p>
    </li>
    <li id="fn:spring-lifecycle">
      <p><a href="https://docs.spring.io/spring-framework/reference/6.0/core/beans/factory-nature.html#beans-factory-lifecycle">Customizing the Nature of a Bean</a> <a href="#fnref:spring-lifecycle" class="reversefootnote" role="doc-backlink">&#8617;</a></p>
    </li>
  </ol>
</div>]]></content><author><name>christophHellmich</name></author><category term="en" /><category term="java" /><summary type="html"><![CDATA[The article explains the new linter rule `this-escape` in JDK 21. We show why it was introduced and how to stop receiving this warning.]]></summary></entry></feed>